How to Properly Setup Cloudflare with WordPress and Take Advantage of Free SSL and CDN
Cloudflare is an excellent free service that has been quietly making the web experience better for everyone. Each day Cloudflare is helping millions of websites by blocking malicious attacks, DDoS attacks, and more.
Why Use Cloudflare?
Cloudflare’s automated defenses mitigated 8.7 million network-layer DDoS attacks in 2023. This represents an 85% increase compared to 2022.
Cloudflare accelerated the usage of SSL by providing its users with free SSL back in 2014. With Free SSL and Cloudflare CDN, you can speed up your website by a significant margin.
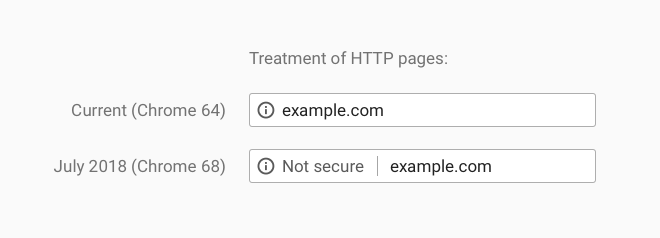
Since Chrome’s version 68, Google is flagging sites without HTTPS as not safe.
There’s no excuse to not use HTTPS and CDN. Cloudflare itself offers a lot of security features by mitigating DDoS attacks, preventing a data breach, providing intelligent firewall rules and more security features.
Quick Navigation
WordPress Security is not rocket science, but it’s true that WordPress is not the most secure platform out there. You can configure Cloudflare with WordPress to have multiple benefits. Some of the major benefits of using Cloudflare with WordPress are–
- Paying less to hosting companies due to less amount of bandwidth usage
- Preventing common security vulnerabilities
- Having access to free CDN (arguably one of the best free CDN out there)
- Cut extra bandwidth costs
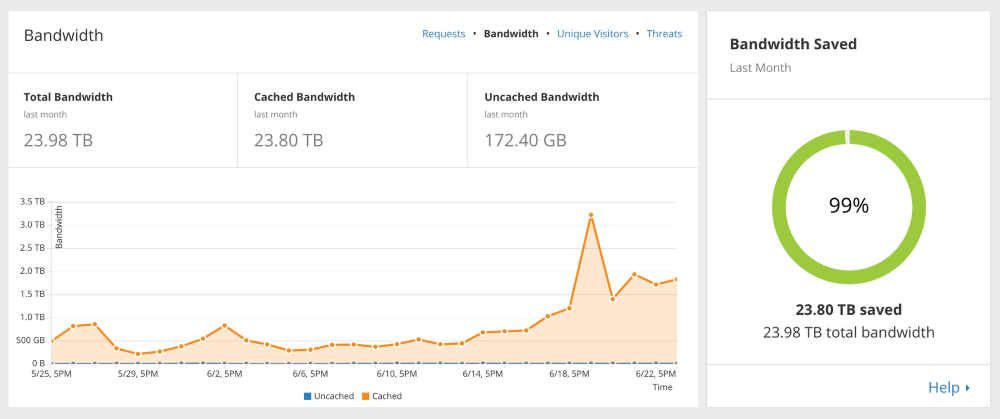
A company named Buzzlie saved up to 96% of AWS cost after switching to Cloudflare. Cloudflare can save more than 80% of your total bandwidth cost by using their cache. In the following case, the service saved almost 99% of the total bandwidth.
How to Setup Cloudflare with WordPress?
Configuring Cloudflare with WordPress is a lot easier than you think. All you have to do is change your domain nameserver. After adding your website at Cloudflare.com, Cloudflare will offer you their DNS.
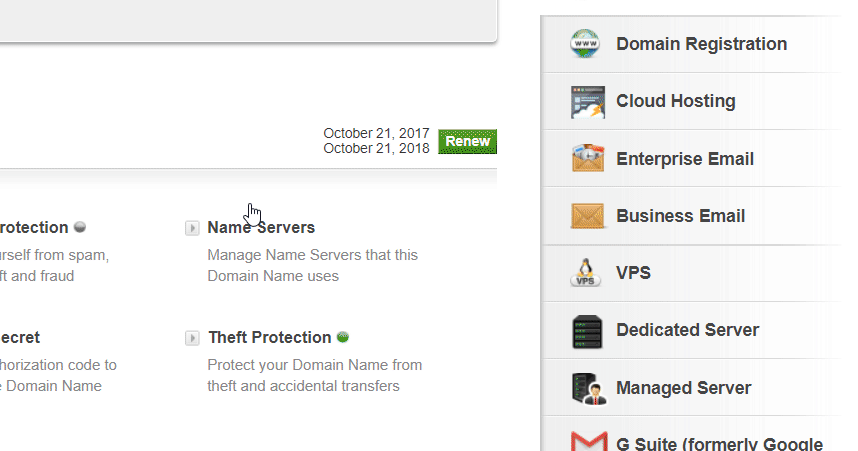
Change Domain Nameserver
When you change your DNS, it will take some time to propagate the DNS from everywhere. After the propagation period, you can use all the great services of Cloudflare including free SSL and CDN. Refer to the following article to know how you can change your domain nameserver to use Cloudflare.
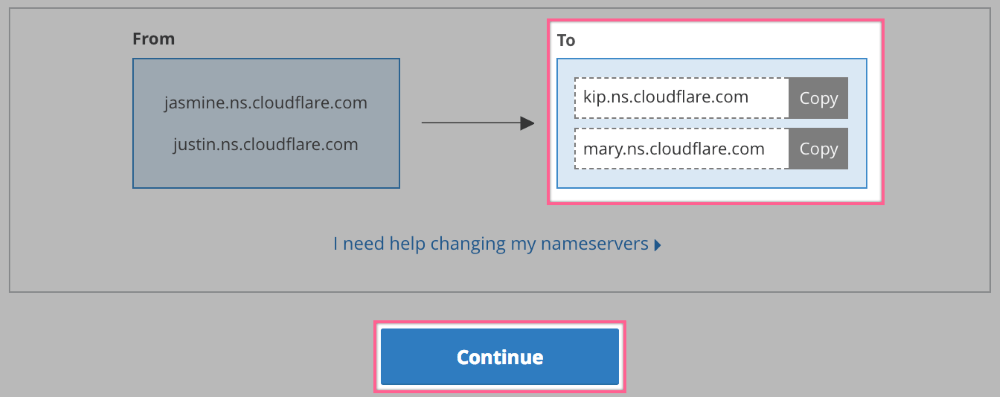
After getting Cloudflare’s DNS, login to your domain control panel. Then you have to change your DNS. You can use free Cloudflare SSL and Cloudflare CDN shortly after the propagation is completed.
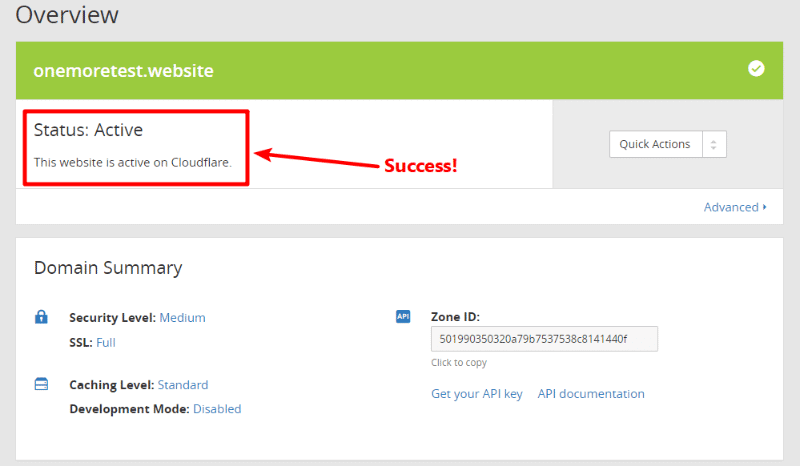
After some time, you should see that you have successfully enabled Cloudflare on your website when the status says “Active.”
Properly Setup Cloudflare with Cloudflare WordPress Plugin
Cloudflare has a dedicated WordPress plugin that uses the best possible settings for WordPress. The plugin automatically configures your website with a one-click WordPress-optimized settings.
“Cloudflare drastically improves the performance of WordPress sites with minimal configuration.”
— Scott Park, Owner at Firefall, LLC, User of Cloudflare’s WordPress Plugin
Setting up the Cloudflare WordPress plugin is straightforward. After logging in with your Cloudflare credentials, you can apply the most optimized default settings, change cache management and purge Cloudflare’s cache from your WordPress dashboard.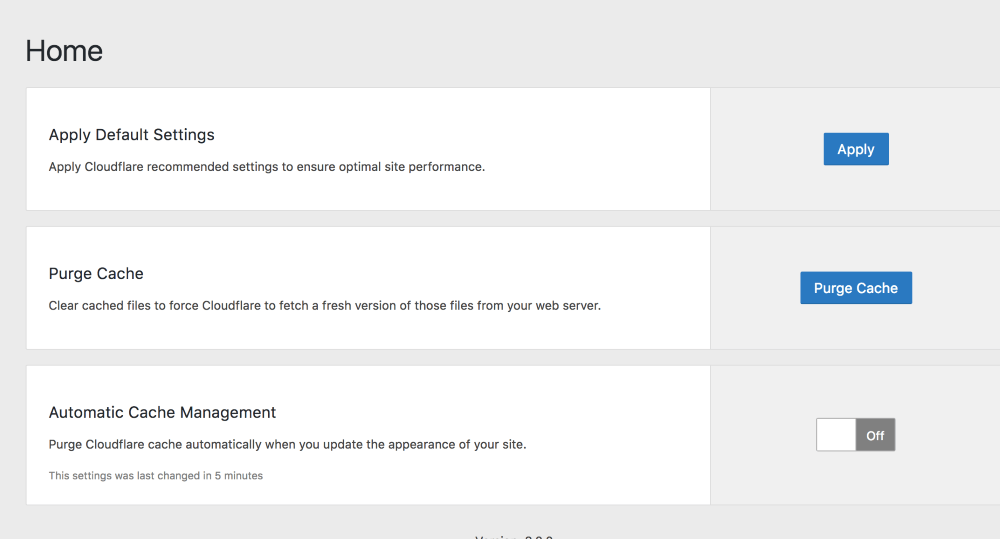
Demo Video
Watch the following video to have a complete understanding to integrate Cloudflare with WordPress.
After activating Cloudflare, it may take a few hours to access the Cloudflare enabled website. Next, we are going to enable Cloudflare’s free SSL service to take the full advantage of Cloudflare.
What Is SSL?
SSL is also known as Secure Sockets Layer. SSL is a security protocol to create an encrypted connection between a server and a client (web browser). This link assures that all data transferred between the client (browser) and the server is protected and none can eavesdrop in the middle.
SSL provides your website the necessary security means to send and receive sensitive data without worrying about data tampering or eavesdropping.
How can you tell if a site has an SSL connection?
It’s simple.
If a site’s URL starts with HTTPS:// and there is a lock icon beside the address bar, then the website is utilizing the proper SSL mechanism.
Why is SSL important?
SSL is one of the main factors of great SEO rankings. [Also read: Ultimate WordPress SEO Guide | 21+ WordPress SEO Tips] The fundamental reason to install an SSL Certificate is to create a fully secured web session between client and server. When a secure connection takes place (when you see a padlock icon at the browser bar), you can be assured that all data passed between the web server and your browser will be kept secret and encrypted
Other SSL Advantages
Improves customer trust: One of the primary reasons to use SSL is to gain the customer’s confidence. The little padlock icon ensures customers that their information will not be misused or compromised. This is particularly helpful for websites that do transactions.
Customers can be assured that their data is going to the intended target servers, and no intermediary medium can tamper with the information.
Before getting your SSL certificate, the CA verifies your authenticity as the CA only issues SSL certificates to legitimate companies and businesses.
SSL Protects your information against phishing attacks. Phishing sites are fraudulent copies of well-known websites with the same design. The phishing websites target people to obtain login credentials and credit card information or social security numbers.
Phishing sites more than often have an exact look and feel as the original site. However, the website URL is always a bit different. Usually, they add a number or an extra letter in the URL so that people do not notice whether it is an authentic domain or a fake one. Phishing site operators cannot receive an EV certificate due to the validation requirements.
Better search engine rankings: Since 2018, Google has been considering SSL as a factor for search engine rankings. HTTPS is now a ranking factor by Google. If you’re doing search engine optimization, there is no reason not to have an SSL certificate.
How SSL Works?

Why does SSL cost a lot of money when you can use Letsencrypt/Cloudflare for free?
Regarding “security,” there is no significant difference between paid and free SSLs. Both paid and free SSls are trusted by CA, and both of them provides the same 256-bit encryption with the same encryption algorithm.
You will get some additional features if you get the higher end certificates. Paid certificates offer things like Extended Validation. EV certificates will say the business name that was verified, instead of just saying secured or showing a lock icon. (Compare paypal.com to see the difference)
How to Integrate Cloudflare SSL with WordPress?
Since we already know SSL is vital for your business’s success, you should enable Cloudflare’s SSL service to make sure you are keeping up with the latest standards of the web.
Enable Cloudflare SSL with WordPress
Enabling SSL from Cloudflare takes a few clicks. However, after enabling SSL, you have to solve other problems that might arise with SSL too.
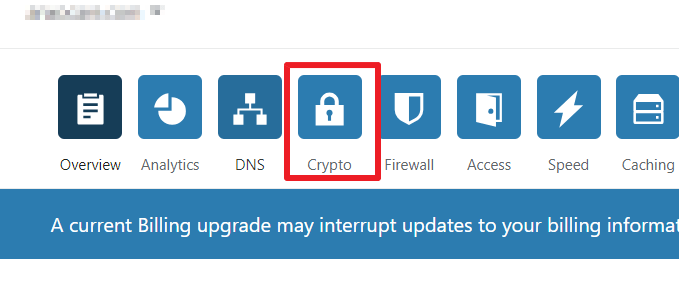
- Login to your Cloudflare Dashboard and navigate to your website in the Cloudflare dashboard.
- You will see all the available tools on top of your Cloudflare settings panel.
- Choose Crypto from the Cloudflare settings.
- Choose Flexible SSL from the menu. Flexible SSL is the most compatible SSL setting. A secure connection between your visitor and Cloudflare server will be established, but no secure connection between Cloudflare and your web server will take place. The advantage of flexible SSL is you don’t need to have an SSL certificate on your web server. However, your visitors still see the site as being HTTPS enabled, and you will get all the benefits of using an SSL. So select Flexible from the SSL dropdown.

- After enabling SSL, it will take up to 24 hours to activate the SSL certificate for you to start using. All Cloudflare SSLs are universal, so you do not need to worry about issuing separate certificates for your
Question about CloudFlare Flexible SSL vs Strict (Full)
Cloudflare is essentially a reverse proxy. If you’re using Cloudflare for your website, browsers first send the request to a Cloudflare server, which then forwards the request to your actual server (in this case, your hosting provider) and then sends the response back to the browser.
With the “flexible” setting, you’re getting an encrypted connection for the first step – the connection between your visitor and Cloudflare, but not between Cloudflare and your web server/hosting provider.
If anyone’s able to intercept this connection, they can observe the traffic in plain text. To put this into an example, a visitor might be safe from someone intercepting traffic on their WiFi, but a more sophisticated attacker in a position to intercept traffic on some Internet backbone would be a problem.
You can also use Cloudflare with the Full (Strict) setting, which enables encryption for the connection between Cloudflare and your web server. This is where a Let’s Encrypt-certificate or Cloudflare’s internal Origin CA.
No matter which of these options you pick, Cloudflare will always be able to see requests and responses in plain text, so you’ll need to trust them not to do anything bad with that.
Redirect HTTP to HTTPS from your WordPress Installation
When you see the green dot with the word “Active Certificate” you can access the HTTPS version of your website. You can navigate to the SSL enabled version of your website by putting https:// in front of your domain name.
But you will notice that you still can access the http:// version of the website. If you want to redirect all your traffic to the https:// version, you have to perform the following two tasks.
Replace All HTTP URLS with HTTPS
The padlock icon will only appear when all your content is served through the HTTPS version of the website. However, since you have been using the non-http version of the website, all your internal links and images inside the content will still be using the non-http variants of the website.
You need to fix this mixed content error. There are a few ways of tackling this, but we are going to show the safest way so that you do not need to face the too many redirects issue.
- Login to your WordPress Dashboard
- Install the plugin Better Search and Replace
- Write your old website URL with http:// in the “Search for” text field and write your new website URL with https:// in the “Replace with” text field.
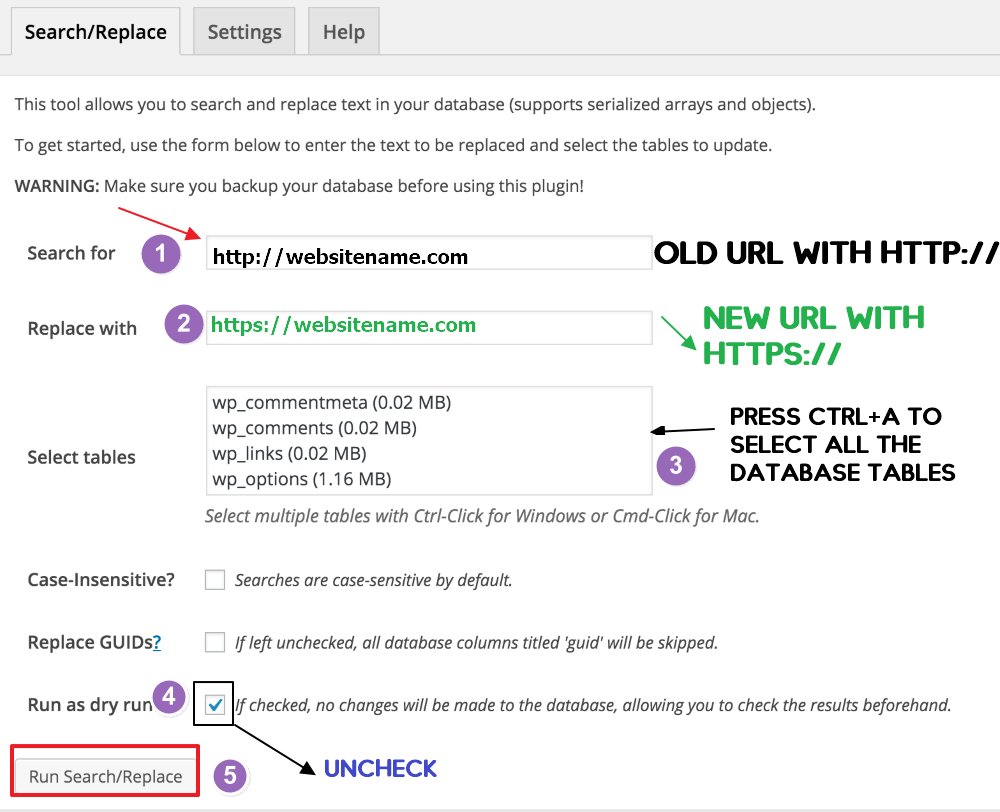
- Select all the tables by pressing Ctrl+A
- Uncheck “Run as dry run”
- Click Run Search/Replace
Takeaway: The plugin will replace all your existing http:// links with https:// version. Replacing all the existing HTTP links will fix the mixed content error for you permanently.
Be cautious before running this. You should create a database backup before executing this process as this will alter your database, and you cannot revert backup without database backup.
Turn On Always Use HTTPS from Cloudflare
There’s still one problem is remaining. You should figure out that you can access your webpage’s SSL activated https:// URL without any issue. But the problem is, the http:// version would be still working separately. Essentially making two similar versions of the same page.
Redirect All HTTP requests to HTTPS
- Login to Cloudflare Dashboard
- Navigate to “Crypto” from the top menu section
- Scroll to bottom until you find Always Use HTTPS
- Turn the setting on like the following image.
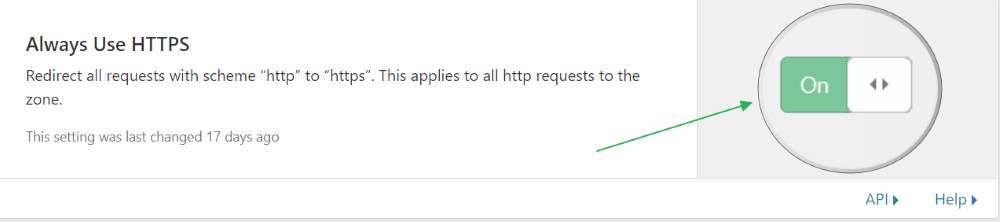
- Done!
Best Cloudflare Settings for WordPress
Although many people say that using the WordPress Cloudflare plugin is enough for the best Cloudflare settings for WordPress, we want to disagree.
Every website is different and depending on your audience, you should optimize your Cloudflare settings. We will be suggesting some changes to get the best Cloudflare settings for your WordPress website, according to your needs.
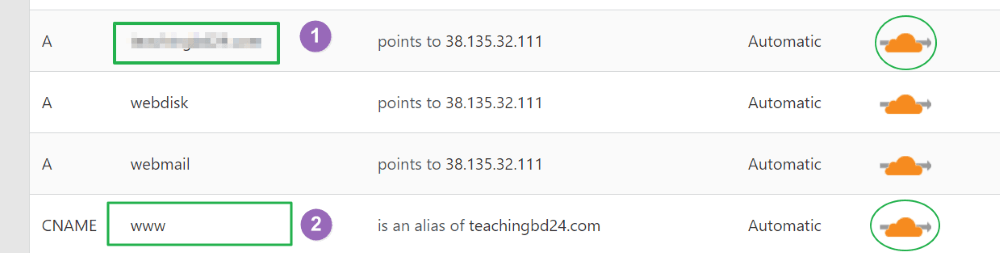
- Make sure you add www as CNAME from DNS and enable traffic through Cloudflare.
- Enable Opportunistic Encryption to enable HTTP/2 from Crypto

- Enable TLS 1.3 from Crypto.
- Do not auto minify HTML CSS Javascript from Cloudflare. We suggest minifying on WordPress end via a plugin like Autoptimize
- Caching level: Standard (from Caching at the top menu bar)
- Browser Cache Expiration – Respect Existing Headers (So your caching settings will be respected by Cloudflare)
- From Firewall change the Challenge Passage to 15 minutes/30 Minutes. [So that real visitors do not have to suffer long]
- From Firewall change the Security Level to Medium. In most of the cases, Medium level of security is enough. If your website is targeted to countries where people share the same IP, you can even choose Low so people do not have to face CAPTCHA everyone now and then.
This is one of the best Cloudflare settings for WordPress. We have been using this setting in more than 100 WordPress websites and got the best results.
Wrap Up
Well, that should do it. Now your website should be using Cloudflare’s free SSL and CDN. CDN is a great way to boost page speed, and Cloudflare provides additional security services to make sure your website stays protected from malicious attacks.
However, you should still follow our WordPress Security Guide to make sure you are not vulnerable to attacks.
Disclosure: WP Hive earns a commission when you buy through partner links. It does not influence the unbiased opinions of our writers. Learn more →
Share:
https://wphive.com/performance-security/setup-cloudflare-with-wordpress/
Saif Hassan
Product Manager by passion & profession. Lead Product Manager at weDevs, former PM @ Poptin. Passionate about writing & tech. He's an advocate of Human-Centered Design and believes that websites and the tools used to build them should be well crafted, intuitive, and accessible. Cyclist. Reader. A WordPress ninja 🥷, HCI expert & a design thinker 💡


4 replies on “How to Properly Setup Cloudflare with WordPress and Take Advantage of Free SSL and CDN”
Great, Nice elaborated article on SSL. However, Setting up Strict SSL need, Hosting end Another SSL, where is (lets encrypt) do the best.
Article has been updated with Strict SSL option.
hi sir, i have successfully added my site to cloudflare and and activated Full SSL, i have one question my wordpress address url and site url in settings->General are in http format should i change them to https or leave them as it is. because everything is working file i have redirected all http traffic to https from cloudflare settings.
Yes, you should change it from http to https.