Easiest Way to Move a WordPress Site from Localhost to Server [Step by Step]
If you have installed WordPress on your localhost using WAMP or XAMP, then you might be wanting to move your WordPress site from localhost to server. It is natural that you want to showcase your site to the world.
There are many ways to move a WordPress site from localhost to server. This tutorial will explore the easiest way to move WordPress site from localhost to server step by step.
New users find the manual process complicated. Moving a WordPress site from localhost to server using the manual process requires certain level of expertise, so we will be using a plugin to accomplish the task. The best free plugin to perform this task is Duplicator. Duplicator is completely free and used by more than 1 million people.
The plugin currently has more than 1900+ reviews and more than 1 million active installations. Users can’t go wrong if a plugin has this much usage!
Why Not Manually Move a WordPress Site from Localhost to Server?
You can always use the manual method if you want to take the matter into your own hands. However, we will be using the plugin as we consider this is the easiest way for a new user.
You may have already set up your website on localhost using XAMPP or WAMP. Migrating your site doesn’t have to be complicated. The Duplicator plugin for WordPress takes care of the whole process and makes the experience significantly better.
Part 1: Move a WordPress Site from Localhost to Server (Localhost End)
All you have to do is to install the plugin at your local WordPress installation. If you do not know how to install a plugin, follow our plugin installation tutorial.
- Search for Duplicator in the WordPress plugin repository.
- Click Install. Then click again to Activate
- After activating the Duplicator plugin, go to your WordPress Dashboard and navigate to the Duplicator settings, available at the bottom left of your Dashboard. When navigating to the Duplicator settings, you will find there is a section named “Packages.” Click on Packages.

- As you have just installed Duplicator for the first time, you will not have any existing backup packages at that point. If you want to create a new package, click the Create New tab.
You will see a few more options like Requirements. It will let you know that if your server supports Duplicator or not. You should remember that Duplicator only supports websites that are under 2 GB.
2GB is sufficient for most WordPress blogs. But you have if you have a WordPress blog that has more than 2GB of file storage, then you cannot use Duplicator to move your WordPress site from localhost to server. You will have to use a paid plugin like Backup Buddy or will have to transfer the whole website manually.
Creating Backup with Duplicator
So let’s start by creating the first backup. You usually do not need to change anything in the installer options. Given that, you pass all tests; you can proceed to create the site package.
- Click next, and Duplicator will begin scan the website to make a full archive and will show a screen like the following.

- If the scan finishes successfully, you will be able to build the package. Click Build to start building.
- The plugin will go ahead and backup your whole website including all the plugins themes, posts, pages, and media to a single compressed file.
- Once the backing up process is complete, you will be given the option to download two files — the archive file in zip format which has all of your contents, database, and media and the installer.php file.
- Download both files and store in a safe location. These two files will be used to restore your whole website to a new server.

Part 2: Move a WordPress Site from Localhost to Server (Server End)
We have completed the first part, which is creating the whole backup of your localhost website.
One thing the plugin does not take care is creating a database automatically at your live server. So you have to create a new database on your new server manually. It is pretty easy and only requires a few clicks.
- First login to your cPanel
- Go to MySQL Databases
![Easiest Way to Move a WordPress Site from Localhost to Server [Step by Step] 1](https://wphive.com/wp-content/uploads/2018/12/Moving-Localhost-to-Live-Server-1.png)
- Give a database name and note the down the full database name with the prefix. in this case, the whole database name is bdjobcareer73_demo
![Easiest Way to Move a WordPress Site from Localhost to Server [Step by Step] 2](https://wphive.com/wp-content/uploads/2018/12/Moving-Localhost-to-Live-Server-2.png)
- You will get a success message after creating the database. The next task is to create a database user. Scroll down, and you will find a database user section. From here, choose a username. In this case, we are creating a database user bdjobcareer73_demo. It is important to note down both the database username and password. We will need this.
![Easiest Way to Move a WordPress Site from Localhost to Server [Step by Step] 3](https://wphive.com/wp-content/uploads/2018/12/Moving-Localhost-to-Live-Server-3.png)
- After clicking Create User, the following window will appear. You can select ALL PRIVILEGES, or you could choose everything except DROP as described in our WordPress Security Guide.
![Easiest Way to Move a WordPress Site from Localhost to Server [Step by Step] 4](https://wphive.com/wp-content/uploads/2018/12/Moving-Localhost-to-Live-Server-5.png)
- Now all you have to is adding the database user to the previously created database. Click Add to add the user to your database.
![Easiest Way to Move a WordPress Site from Localhost to Server [Step by Step] 5](https://wphive.com/wp-content/uploads/2018/12/Moving-Localhost-to-Live-Server-4.png)
See the following video to know how to create a database in MySQL easily.
Part 3: Restoring Backup to Live Server
- First, you have to log in your cPanel and using the credentials hosting company gave you.
- Navigate to your cPanel File Manager and navigate to public_html.

Now you have to upload the two files you had downloaded before.
- The archive file
- The installer.php file
After uploading the two files to your document root
- Upload both of the files to your document root. In most of the hosting, the document root folder is known as public_html. Upload both the files.
- Open a web browser and type your domain name and append installer.php the end of it. For example,
https://your-domain/installer.php or http(s)://your-domain/your-wp-directory/installer.php.
You will see this screen. Here, you have to fill up the database info that you saved earlier while creating the database.
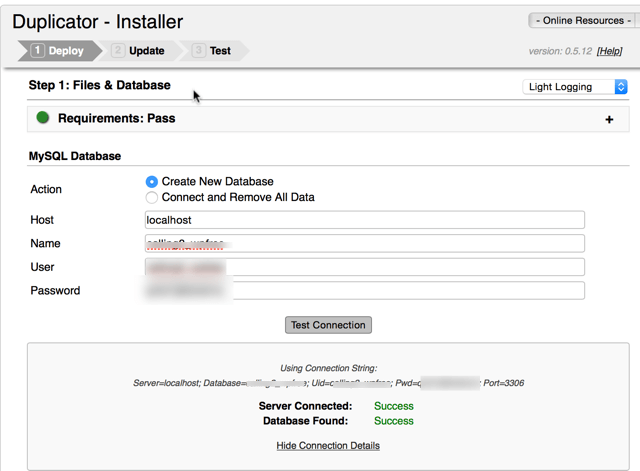
3. Enter database setup info ❯ test connection ❯ click Next
The test connection button will verify your connection with the database. If you see an error here, then you do not have a successful connection with your database. If you see a Success message like the image above, then it is all ok to run the deployment.
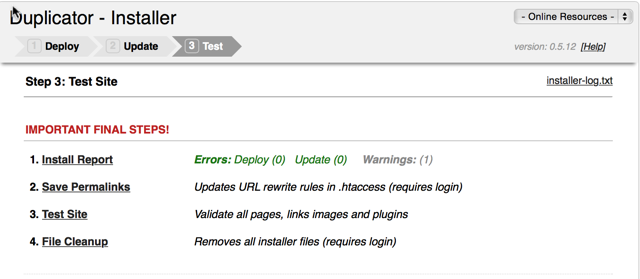
4. If you click next, you will be provided with the following screen.
In the New Settings page, mention your domain name. For example, if you want to move your WordPress website to “abcd.com” then change the URL to “abcd.com” under New Settings.
Giving a new URL in New Settings will replace all localhost links of your database with the new website URL you are providing.
So when you are ready, click Next. The deployment will start. You will get a warning that says “Any existing data in the database will be overwritten”. Ignore the warning and click OK to go ahead with the installation process.
That’s it! You have been successful to move your WordPress site from localhost to server.
You should be able to login to your web server by clicking your WordPress Dashboard. Usually, https://domain.com/wp-admin
The Final Part
The first thing you have to do after restoring from Duplicator is to go to the Permalink section of your WordPress Dashboard.
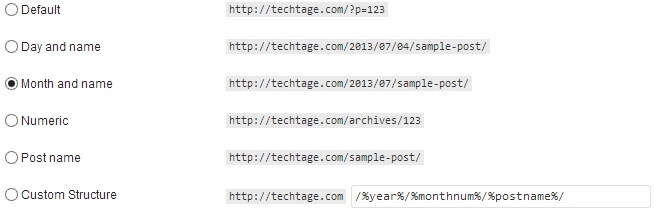
You have to save the permalink settings twice. This will solve all the link related problems you might have.
That’s it you have finally moved your local server to a live server using an easy way like duplicator. Other plugins which can achieve that like Backup Buddy or Udraft Plus, but they are paid. This is the only free plugin that does it for free.
It is critical that you take care of your WordPress security after installing your WordPress Security Guide and tips to secure your website.
It is also essential to make sure that your site is perfectly optimized for search engines. Follow our Search Engine Optimization Guide for an in-depth tutorial.
Disclosure: WP Hive earns a commission when you buy through partner links. It does not influence the unbiased opinions of our writers. Learn more →
Share:
https://wphive.com/tutorials/easiest-way-move-a-wordpress-site-from-localhost-to-server-step-by-step/
Saif Hassan
Product Manager by passion & profession. Lead Product Manager at weDevs, former PM @ Poptin. Passionate about writing & tech. He's an advocate of Human-Centered Design and believes that websites and the tools used to build them should be well crafted, intuitive, and accessible. Cyclist. Reader. A WordPress ninja 🥷, HCI expert & a design thinker 💡

