35+ Most Common WordPress Errors and How to Fix Them? (2024)
[This article covers the most common WordPress errors & how to fix them]
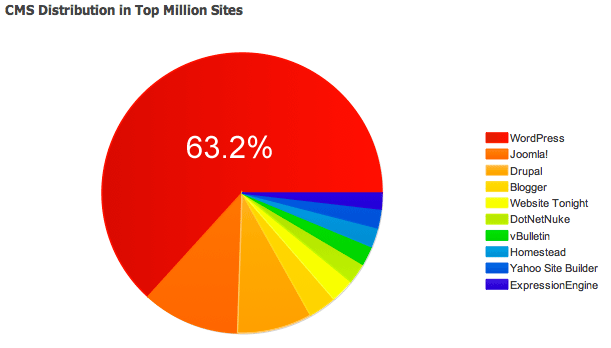
WordPress is undeniably the most used blogging software and content management system (CMS) with a staggering more than 40% market share.
Though WordPress is very easy to use; but WordPress users often face several problems while using WordPress. For example, if you are not concerned about WordPress Security, you might face trouble.
You need to know why these problems happen. Also, you need to know how to fix these common WordPress issues.
No system is 100% secured or 100% bug-free.
If there are problems, there are also solutions. The best way to handle a problem is to stay calm and think out the ways to solve them.
Common WordPress Errors
WordPress users faces many issues every day. Here we are discussing the most common WordPress errors and the solution how to fix them.
Quick Navigation
1. Internal Server Error
The Internal Server Error is one the most common WordPress errors faced by WordPress users. However, there is no one specific reason for internal server error. The source of the problem is unidentified and can happen for many reasons including theme issue, plugin issue or server issue.
Solution to WordPress Internal Server Error
- One of the solutions to fix the error is to deactivate all the plugins and reactivating them.
- If you can’t log in to your WordPress dashboard, then go to your file manager, and navigate to wp-content. Delete all the plugins and then try reloading website.
- If you still could not solve Internal Server Error, then there might be hosting related issues. Contact your hosting provider to know more about the problem.
2. White Screen of Death
Another common WordPress error is a White Screen of Death (WSoD).
White screen of death means a blank white page with no message.
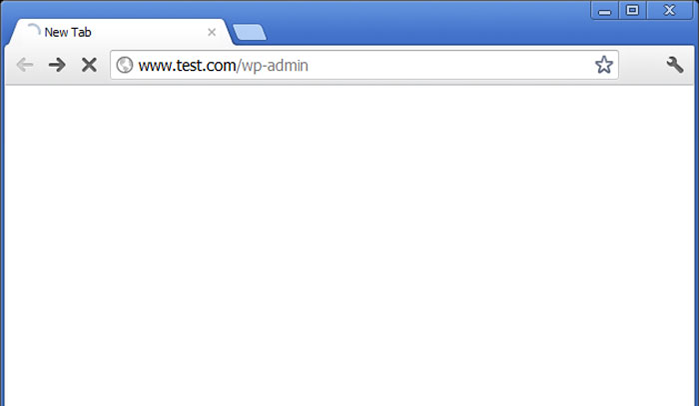
The cause of the problem is different at different times. Sometimes it happens due to over usage of PHP memory limit.
Solution of White Screen of Death Issue in WordPress
- Increasing PHP memory limit
you can increase PHP memory limit by adding the following code to your wp-config.php file.define( 'WP_MEMORY_LIMIT', '256M' ); - Try disabling all plugins and reactivating them.
- Change themes
3. WordPress Syntax Error

WordPress Syntax Error is another common WordPress errors. When someone tries to add code snippets and accidentally miss any of the syntaxes, then the screen shows this error. Using FTP is the best way to fix the error.
Parse error- syntax error, unexpected $end in /public_html/wp-content/themes/justwrite/functions.php on line 129
The error message is self-explanatory. The message indicates the line of the error.
Solution of WordPress Syntax Error
The easiest solution for WordPress syntax error is restored the old file. If you do not have the backup of the changed file, then go to the line mentioned in the error code and try fixing it.
- You will have to write in the correct syntax to fix the issue. Most of the time it is a semicolon or missing bracket.
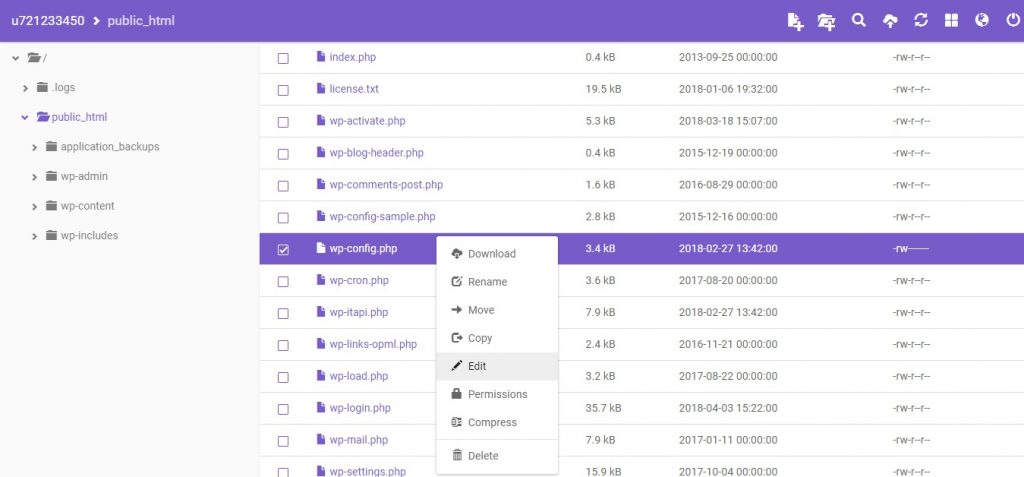
4. Error Establishing Database Connection
While working in WordPress, another common WordPress error is Error Establishing Database Connections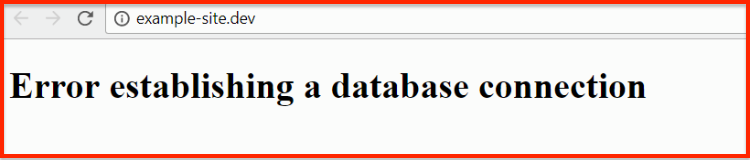
When the user changes or modifies the database authorization, then usually this error pops up. It may also occur because of wrong database information. Many times, when there is a high load on your website with lots of concurrent users, users may face “Error establishing database connection” error.
Fix Error Establishing Database Connection
- One can solve the problem by double checking the
wp-config.phpfile. Check if the correct database information is provided inside of thewp-config.phpfile. - Providing the correct database info should fix your problem. If it does not, contact your hosting provider.
5. 404 Not Found on Posts
Having a problem in finding the post and facing “Error 404: Content Not Found” is a widespread problem. Most of the time the permalink settings is the reason that a user can’t find the post on the site page.
Solve 404 Not Found
- By updating permalinks settings, one can solve this error.
- Check our tutorial on WordPress 404 Error to know more about the error and fix it.
Usually resetting the permalink settings fix WordPress 404 errors on posts.

Know more about SEO friendly WordPress permalinks in WordPress
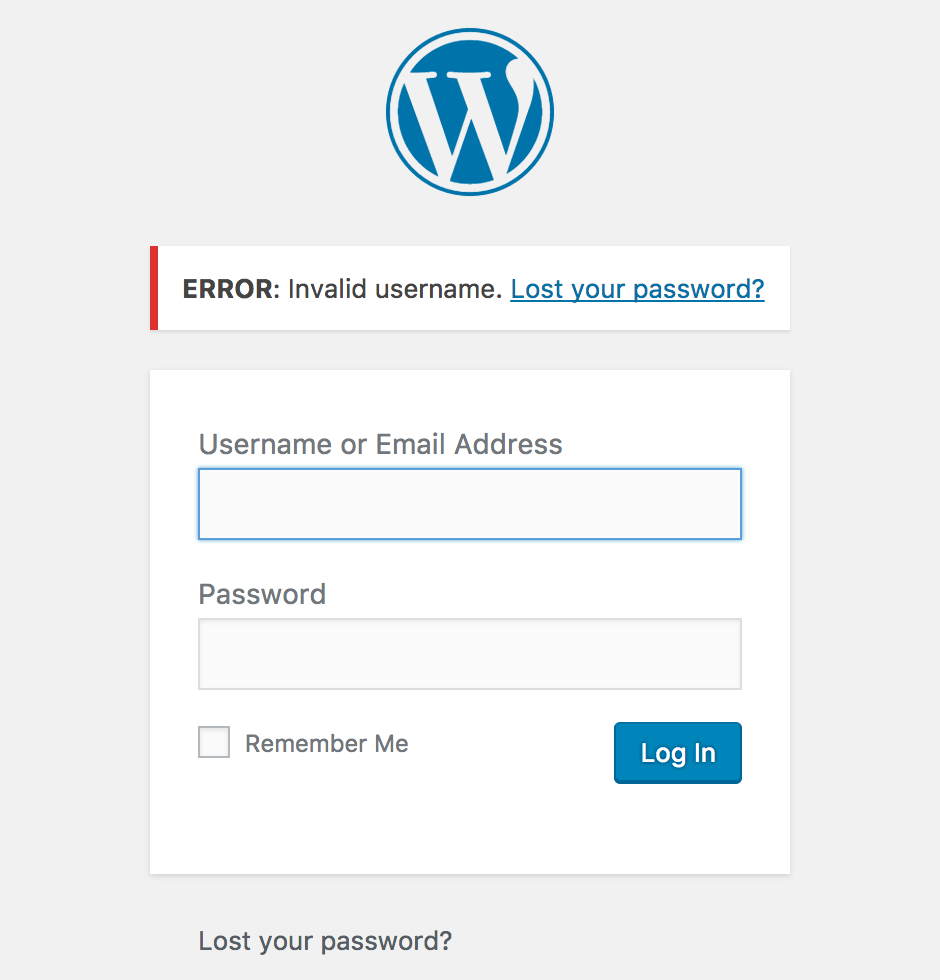
6. Locked Out of Admin
Another critical and common WordPress error is Locked Out of Admin. This error mainly occurs because the user forgets the password and don’t have access to the recovery email.
Fix Locked Out of Admin Issue
The user is usually locked out of the Wordpress admin area and can’t get access to the dashboard. It usually happens if a website gets hacked, database tables are compromised, or the user simply forgets his password, and the recovery email does not match.
7. Too Many Redirects Issue
An error can occur in any form. Too Many Redirects Issue is a very common WordPress error. It mainly happens when the user misconfigures the redirection tools of WordPress.
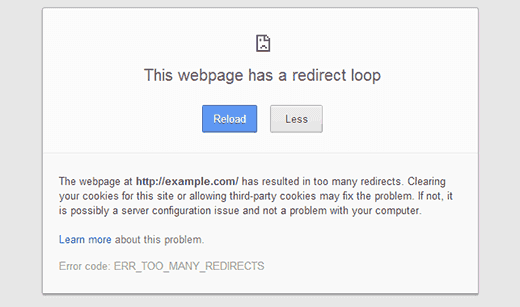
The URL system of WordPress is user-friendly, and you always should use SEO friendly permalinks. But if user misconfigures the usual redirection of WordPress, this error occurs. It can also happen by 3rd party redirection plugins.
Solve WordPress Too Many Redirect Issue
To solve this issue, you can delete any new redirection plugins. If it does not resolve your problem, you can go to your wp-config.php and add these two lines inside your wp-config.php starting from line 2.
define(‘WP_HOME’,’http://example.com’);
define(‘WP_SITEURL’,’http://example.com’);
Instead of example.com, use your site name.
Also, try fixing your permalink settings by saving permalink settings twice.
8. Briefly Unavailable for Scheduled Maintenance
When working in WordPress, there are many times that suddenly the site become unavailable for a brief time. This error is famously known as Briefly Unavailable for Scheduled Maintenance.
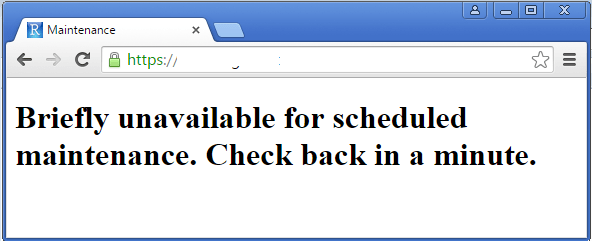
When a WordPress site is updating, the site keeps everything in maintenance mode, but if the update is interrupted, then WordPress cannot revert to the working condition. The website gets stuck at maintenance mode.
Solve WordPress Maintenance Mode
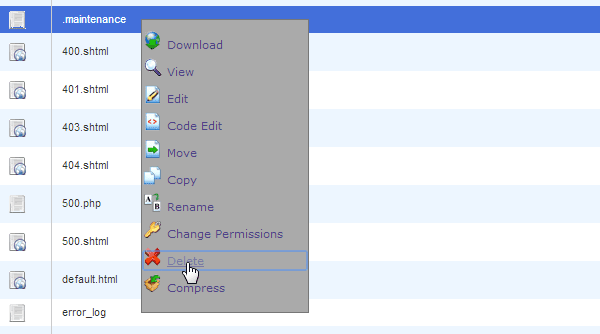
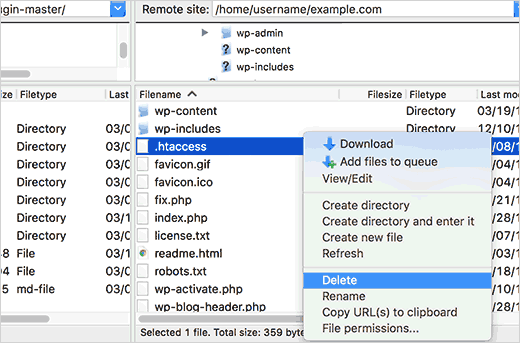
To solve the issue, you can log in to your site’s root folder using FTP. Try finding a file named .maintenance your site’s root directory. If you cannot see the file then make sure you checked to show hidden files on your FTP client. If you are using Filezilla, you can force to show hidden files by clicking on Server » Force showing hidden files from the menu bar.
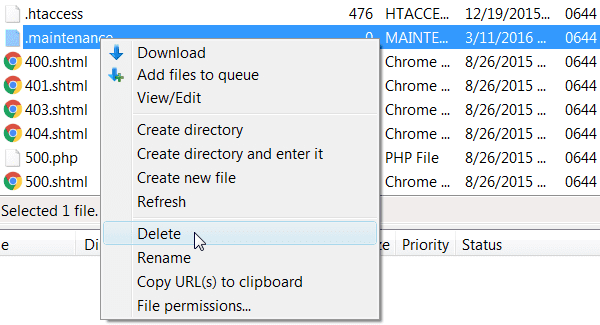
WordPress creates a .maintenance file during the update process which indicates that your site is in the maintenance mode. Unless this file is removed your site will remain in the maintenance mode and your users will continue to see the notification.
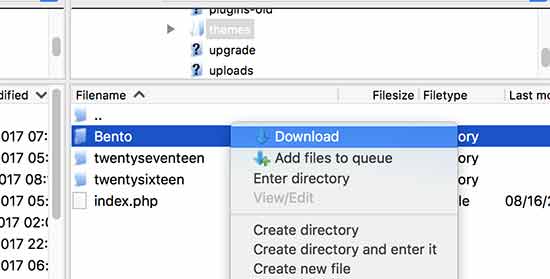
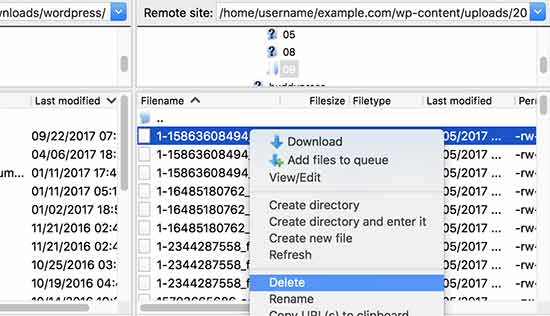
If you are using cPanel, or other hosting plans, go to File Manager and try finding .maintenance and delete it like the following image.
9. Error with Uploading Images
Uploading Images Issue is another common WordPress errors. Often users see broken images while uploading through the media uploader. The reason behind this is wrong file input and also the wrong permission from the WordPress list.
Solve Image Uploading Issue
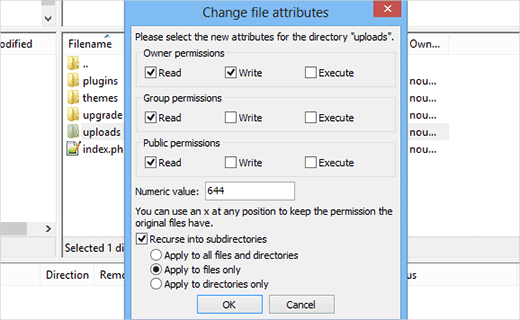
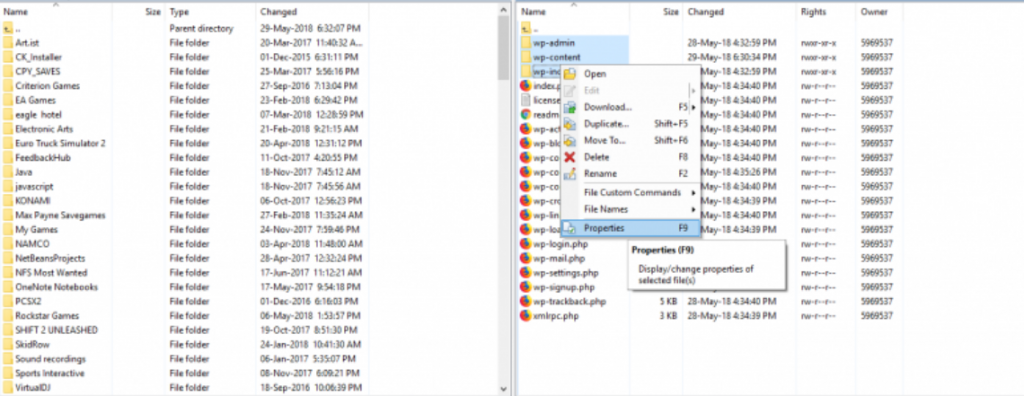
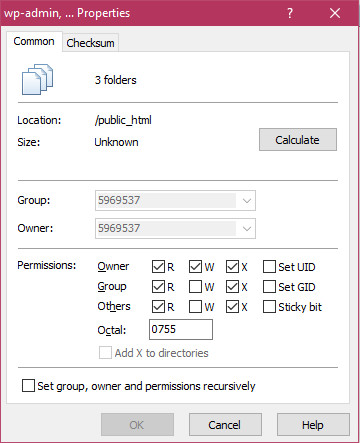
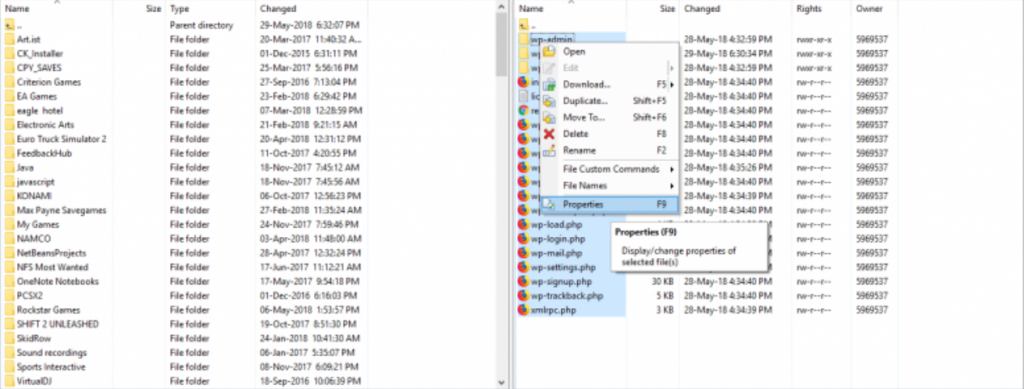
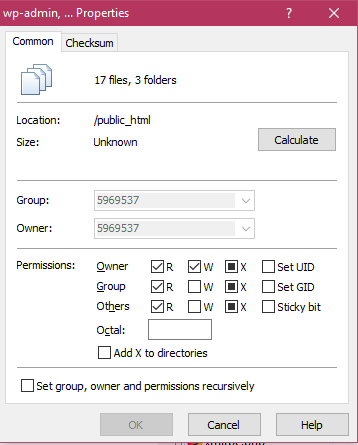
- Login to your file manager and set permission 644 to your wp-content folder. Check our WordPress Security Guide 2024 to know in depth about the importance of file permissions in WordPress.
- If that doesn’t solve your issues, contact your hosting provider.
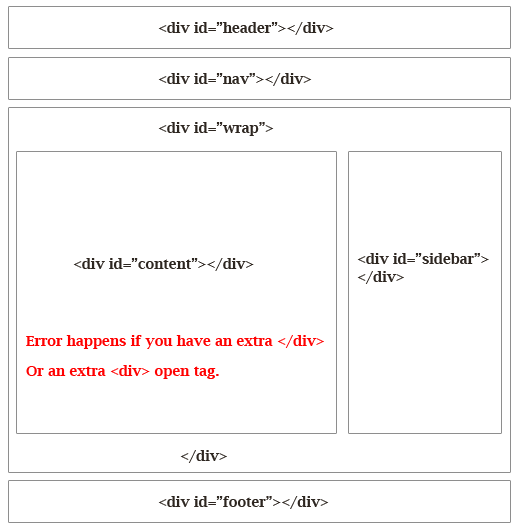
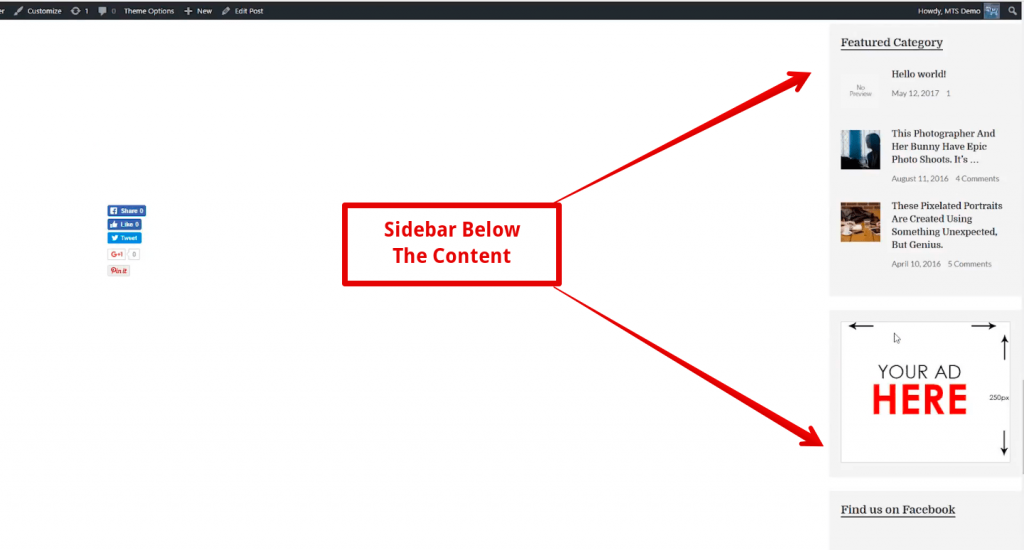
10. Sidebar Below Content Error In WordPress
‘Sidebar below content’ is another common WordPress error. In this error, the sidebar, which is commonly positioned on the right or left side of the screen, is just seen below the content.
This error mostly occurs due to a wrong tag in any specific blog post or page.
Another reason why your sidebar is dropping below your content is because there is a HTML or CSS error in your theme.
Let’s have a look at the div structure:
Solution of Sidebar Below Content Error
The sidebar below content error is very easy to resolve. All you need to do is follow the correct procedure as described here.
In case you ever face this type of error on your blog, simply go to W3C Markup Validation Service.
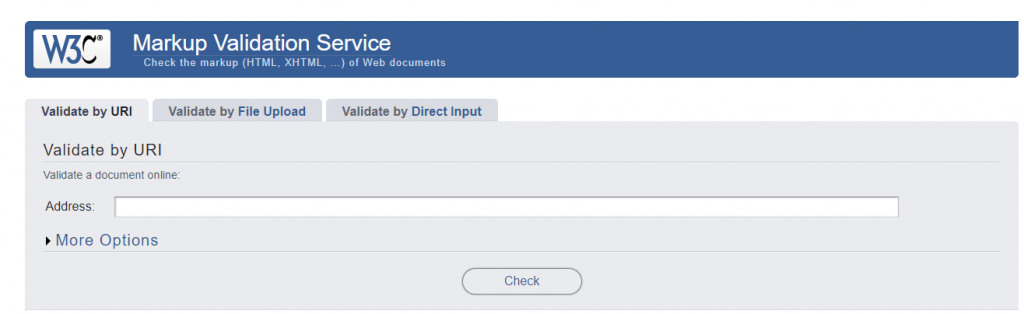
In the address box just type the URL of the post or page on which you’re facing sidebar below content error and click on “Check”.
The moment you do it, you’ll get to know where the error is. You can simply follow the instructions shown on the screen and remove the extra tag from that particular post or page.
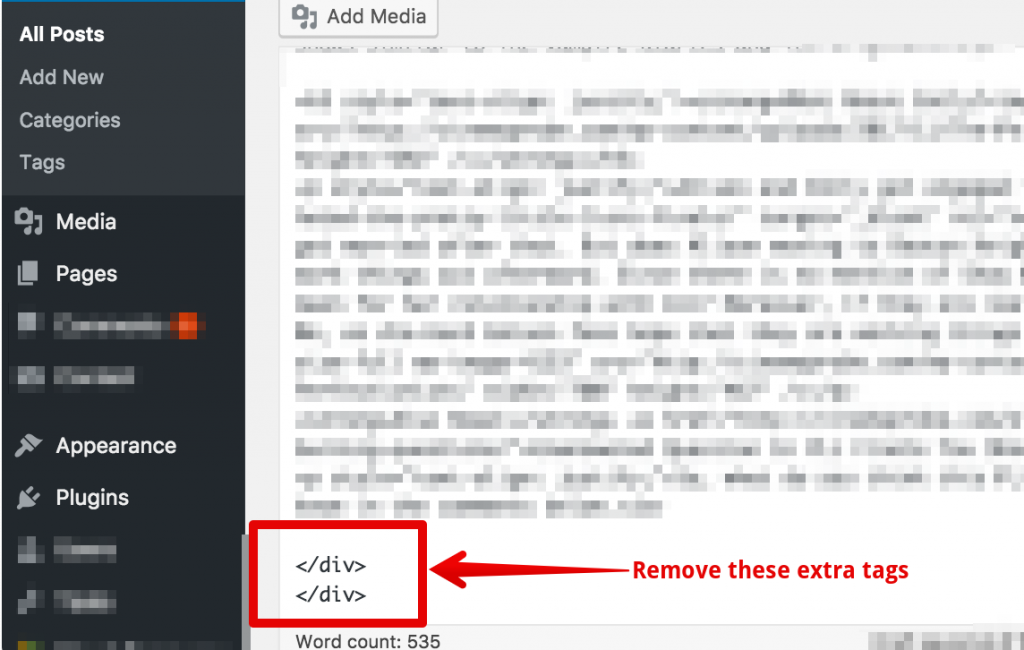
As soon as you delete those extra tags, just update the post or page and refresh the website, it will start functioning correctly, and you’ll be able to see the sidebar in its proper place.
If you are creating a custom theme, and this issue is happening with you, then few other issues could be:
Improper width ratio. If your content width is only 960 px, then you have to keep things proportional. For example, content width 600 px, and sidebar width 300 px with 60 px margin between them.
The other issue could be float property. You have to make sure that you added float: left; and float: right to the appropriate elements. If you do not do that, then it will not work properly.
11. White Text and Missing Buttons in WordPress Visual Editor
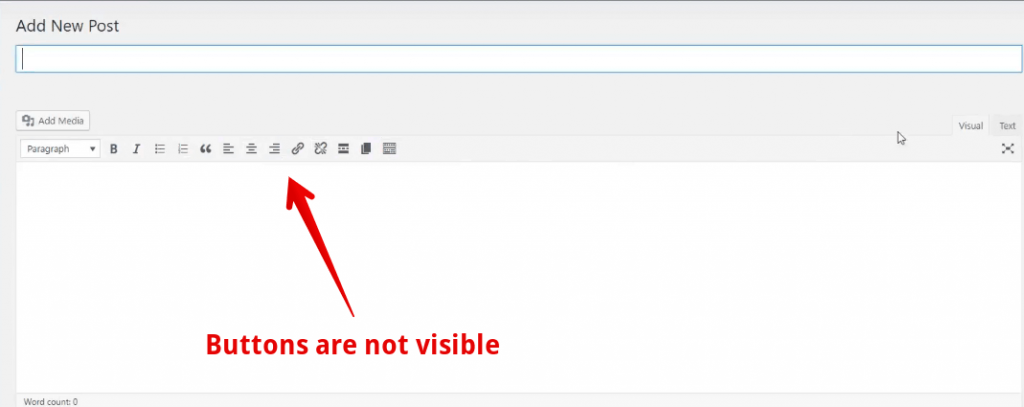
When you log into WordPress dashboard to start writing a post, you may notice that many important buttons are missing from visual editor panel. It’s a serious issue and should be dealt with immediately to keep things under control.
As a WordPress user, it is important that you fix this white text and missing buttons error as soon as possible.

WP dashboard looks like this where different buttons for styling (bold, underline, text color, etc.) are available.
At times these buttons don’t appear on the dashboard, making it tough for users to edit their posts.
It could be due to any small error which you can fix easily. The absence of TinyMCE plugin in many WordPress themes causes white text and missing buttons error in WP visual editor.
Fix White Text and Missing Buttons in WordPress Visual Editor
To resolve it, you can simply go to Plugins and click on ‘Add New’ option.
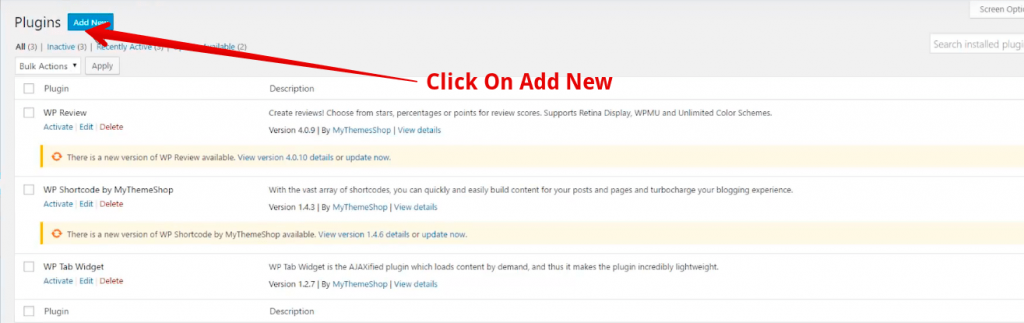
Search for the TinyMCE Advanced plugin in WP plugin store.

Once, you install the plugin, activate it and refresh your website. Usually, when this plugin is installed, all the missing buttons in WP visual editor will appear, and the white text error will resolve. If the problem continues, you can clear the browser cache and check if it works or not.
If the error doesn’t get fixed even after using the above two methods, it means that a file in your WordPress is corrupted.
You can replace TinyMCE script in your web server to bring things to normal. For this, you can use FTP to access the public_html folder and select wp-includes.
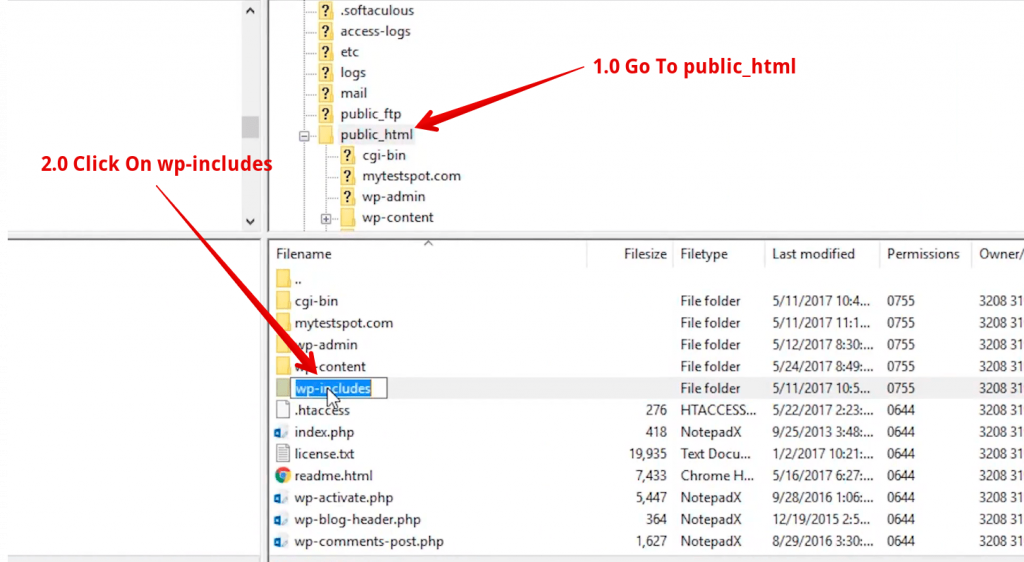
Now go to the theme folder.
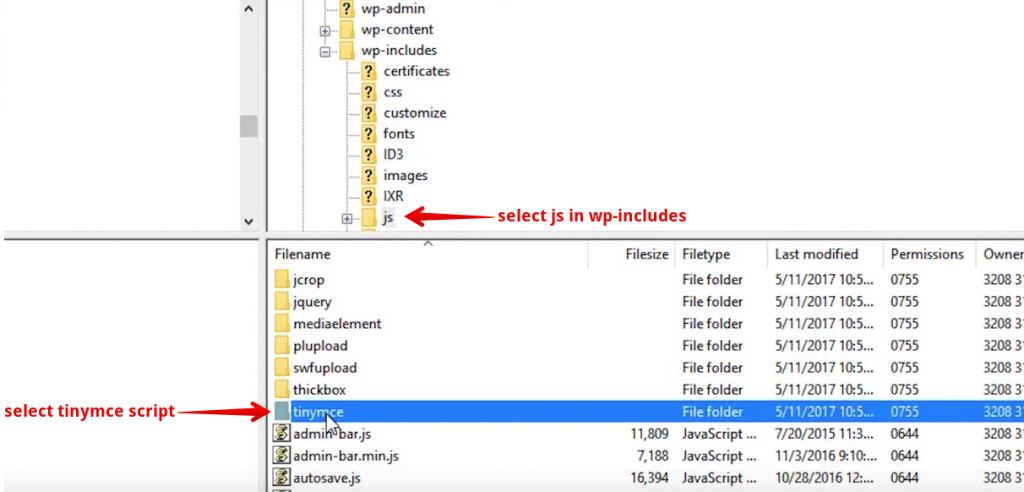
Upload a new copy of js TinyMCE file.
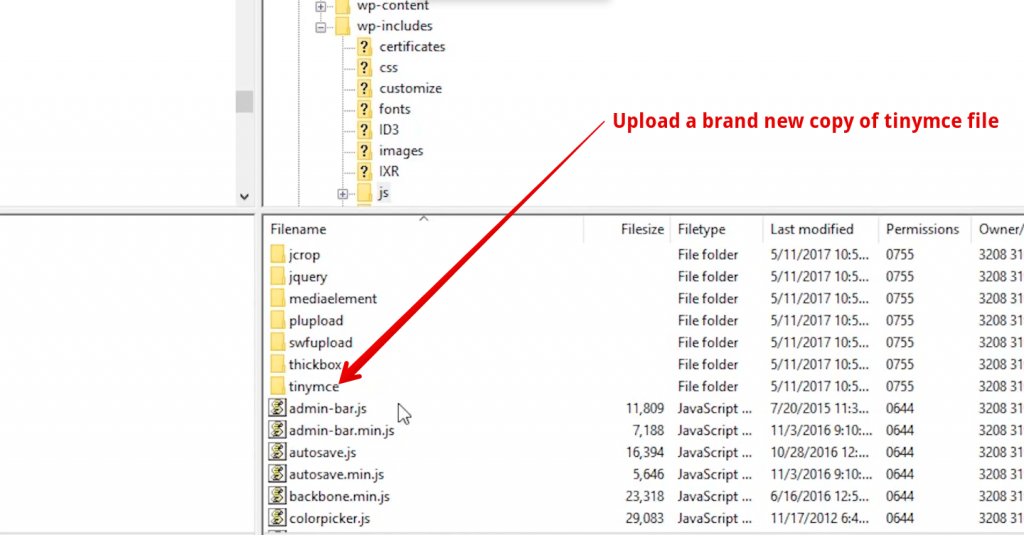
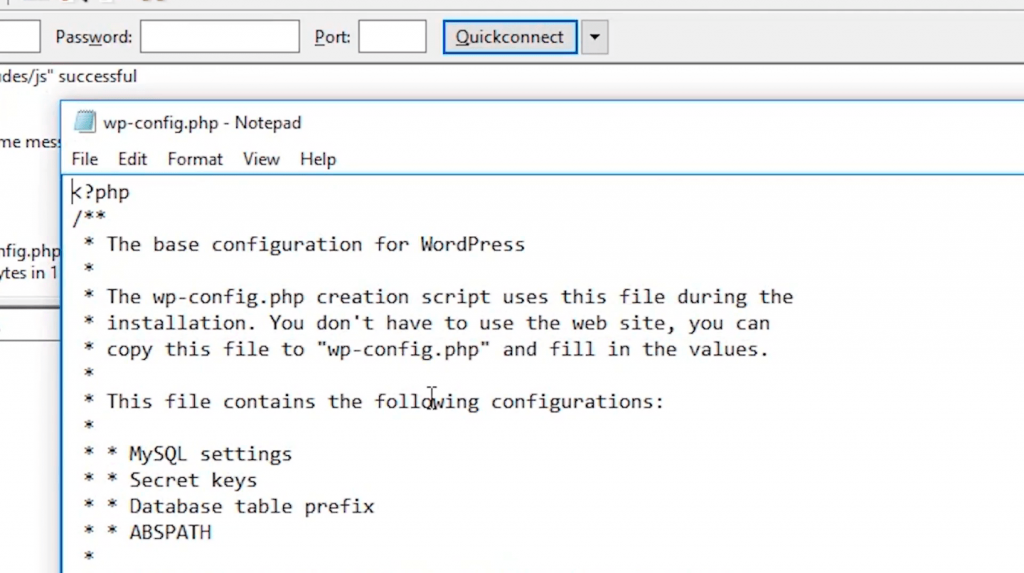
It should fix the issue. If it doesn’t, then go to the wp-config.php folder and click on view/edit.
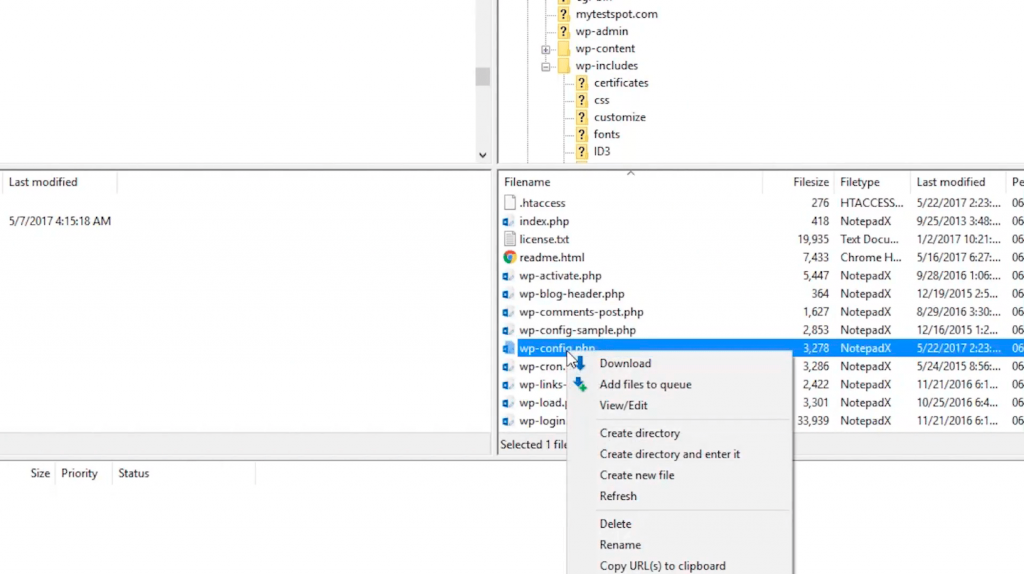
The text editor will open just like the below screenshot.
Paste this code just after the opening PHP tag – define( ‘CONCATENATE_SCRIPTS’, false);
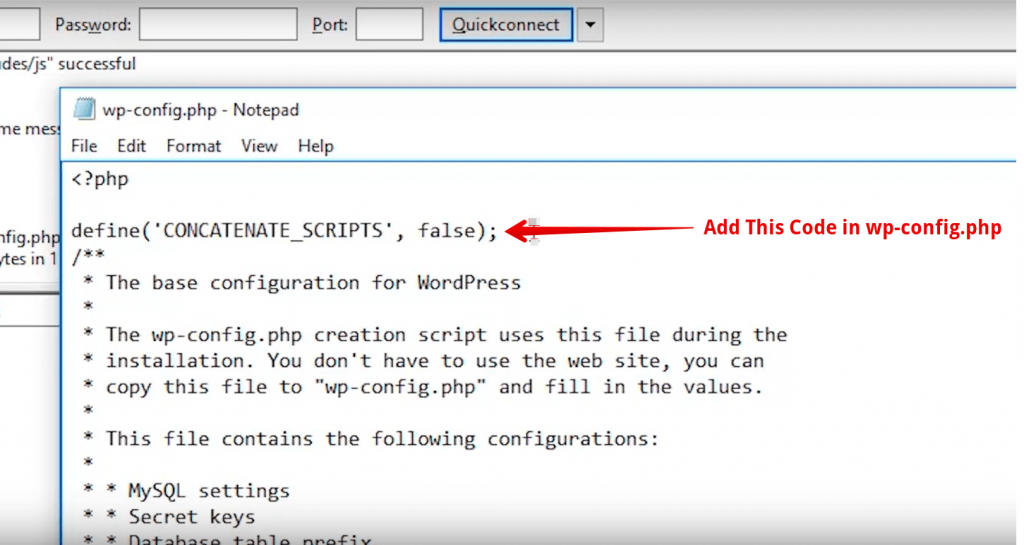
Now save it and refresh the website. This should help you resolve the error once and for all.
12. Memory Exhausted Error in WordPress
Memory exhausted error is very common in WordPress especially for sites that are hosted in low priced shared hosting plans.
When the bandwidth is very low, and the resources of the server hosting of your site are strained, it may result to this error. This error show as a white screen of death, or it could indicate it’s a fatal error with a path indicating that the allowed memory size has been exhausted.

Fix Memory Exhausted Error in WordPress
To fix the memory exhausted error in WordPress edit the wp-config.php file on your WordPress site. Just open the the file with the help of FTP client or file manager in your web hosting control panel. Now paste the following code in wp-config.php file just before the line that says ‘That’s all, stop editing! Happy blogging.’
define( 'WP_MEMORY_LIMIT', '256M' );
This code will increase the PHP memory limit to 256MB.
Once done, you need to save the changes and upload the wp-config.php file back to your server.
You can now visit your WordPress site and memory exhausted error should disappear now.

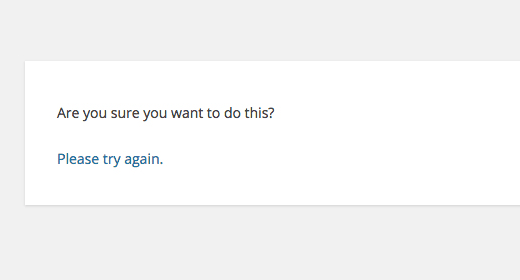
13. “Are You Sure You Want to Do This” Error in WordPress
Unlike other WordPress errors like the establishing database connection error or memory exhausted error; the “Are you sure you want to do this” error does not let you know what triggered the error.
You may have been working on a different tasks; maybe you were creating a post, maybe you were resizing images, maybe you were customizing your theme, maybe you were uploading a theme or a plugin or working on a WordPress core file, and this triggered the error.
In many cases, the error occurs when you are trying to complete an action that requires the certain use of permissions, but WordPress is not able to verify that you have access. WordPress uses security tokens often called nonces. They are used to validate a user just like to verify that he is the owner of the website.
If WordPress is not able to verify the security tokens, then this error will be shown.
Fix “Are You Sure You Want to Do This” Error in WordPress
Please make sure you have a backup of your WordPress site or WordPress site server so that if something goes wrong, you can go back to a stable state.
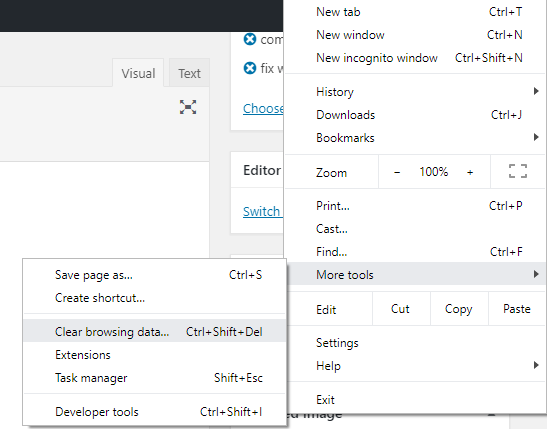
So let’s fix the error with the simplest solution first, and that is simply clearing your cache.
It does not matter which browser you are using whether it is Chrome, Internet Explorer, Safari, Mozilla Firefox or other browser. Just go to the tool settings of your browser and you can delete your browsing history and clear your cache.
The second solution is to look at your plugins and themes, possibly a WordPress file or folder you uploaded, and it did not work correctly. Sometimes if you are uploading a plugin or a theme, and you are transferring it via FTP or whatever method you are using, sometimes there might be a file that is missing.
Probably it didn’t upload correctly and you just simply have to go back and possibly try to re-upload that same file again to see if it overwrites whatever was missing.
Our third solution to fix the issue is to increase the PHP memory limit. See the solution just above.
Our next solution is to look at your themes. And again if you were working on a theme, and you were uploading a theme when this error was triggered, you need to start there as fast as possible.
If you are uploading a theme and it causes some sort of issue, and this triggered the “Are you sure you want to do this?” error; then let’s look at the themes.
While you are logged in via FTP, simply look for your theme folder. Now if you can spot the theme that you were previously uploading, try to download that to your computer as a backup in case something goes wrong.
Once you have backed up the theme to your computer or you have another copy on your computer; just go ahead and delete that theme from your website server. Now, you should be able to log back into your dashboard.
It should let you know that the active theme is broken which reverts you automatically back to the default theme.
Just like the WordPress themes; we are going to look at the WordPress plugins.
So let’s log in again via FTP. Go to your plugin folder and simply delete or rename your plugins folder.
If you know which plugin you were presently working with that could have caused this issue; you might want to start with that one first. There are two main ways that you can approach this. You can go plugin-by-plugin and rename or delete each one to find the one that’s causing the issue, or you can simply rename the entire plugin folder. It will automatically deactivate all the plugins.
If you deactivate all the plugins, it is hard to know which one was causing the issue. So, if you can go plugin by plugin, refreshing each time; you will be able to find out which one is causing the error. Simply click on the plugin that you like and rename it; this will automatically deactivate the plugin.
In our final troubleshooting fix; we are going to look to reset security keys.
Now, although this sounds a little confusing and a little technical; it’s not so hard at all. Again, while you are logged in to your website server via FTP. Find wp-config.php file.
Simply view or download this file.
Now open it. If you scroll down; you will get some authentication keys. These keys could be 60+ in characters including numbers, letters, upper case, lower case, and symbols. All you need to do is to create a new unique phrase. Just search for a key generator, and it will help you create a brand new key that you can use for these areas.
14. WordPress RSS Feed Errors
The main reason of WordPress RSS Feed errors is poor formatting. The most common form of WordPress RSS Feed error is like:
XML Parsing Error: XML or text declaration not at start of entity
Location: http://example.com/feed
Line Number 2, Column 1:
Depending on browser your RSS feed error message may vary. You can also see this error message when visiting your feed in a web browser.
Warning: Cannot modify header information – headers already sent by (output started at /home/username/example.com/wp-content/themes/twentysixteen/functions.php:433) in /home/username/example.com/wp-includes/pluggable.php on line 1228
Fix WordPress RSS Feed Errors
Let’s take a look how to fix WordPress RSS Feed errors.
Manual Fixing
Poor formatting can be caused by a blank space after closing php tag in a plugin or in your theme’s functions.php file. If you recently added a code snippet to your theme or child theme‘s functions.php file. Then you have to edit your functions file.
If there is a closing php tag at the end of your functions.php file, make sure that there is no extra space or line breaks after it.
Ideally, the closing php tag is not required at the end of the functions file. This is why it will be best if you remove the closing php tag altogether.
This should fix the problem in most cases.
Fixing With Plugin
If manual fixing not work, then install and activate the Fix My Feed RSS Repair plugin.
After activation, just go to Tools > RSS Feed Fix page.
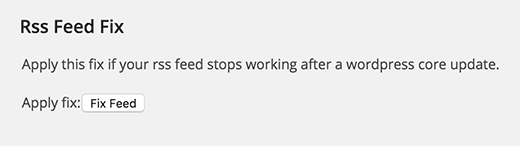
Just click on the Fix feed button and that’s all.
15. 403 Forbidden Error in WordPress
403 Forbidden errors arise when your site has permission settings that are incorrect. Every file and folder has a permission access number that can control whether the content is readable, writable or executable. The most common form of 403 Forbidden error is:
403 Forbidden – You don’t have permission to access ‘/’ on this server.
Additionally, a 403 Forbidden error was encountered while trying to use an ErrorDocument to handle the request.

Even though 403 forbidden errors on a WordPress site can be problematic, they are actually very easy to identify and fix.
There are different scenarios of this error. Like:
- Access denied on wp-admin or WordPress login page.
- During WordPress install.
- 403 Forbidden error when visiting any page on your WordPress site.
- It is also possible that you only get to see ‘Access Denied’ instead of full 403 Forbidden status.
- You may also see ‘Access to yourdomain.com was denied. You don’t have authorization to view this page.’
Fixing 403 Forbidden Error in WordPress
Please make sure you have a backup of your WordPress site or WordPress site server.
- Fixing 403 Forbidden Error Caused by a Plugin
First you have to temporarily deactivate all WordPress plugins. If it resolved the problems then it means one of your plugin on your site was causing this error.
You can also find out which plugin was causing this error after activating one by one.
- Fix 403 Forbidden Error Caused by Corrupt .htaccess File
403 error may caused by a corrupt .htaccess file in your WordPress site.
Repairing this file is very easy.
First you have to connect to your website using a FTP client or file manager in cPanel.
Locate the .htaccess file in the root folder of your WordPress site.
Now download the .htaccess file to your computer so that you have a fresh backup of it. After that, you have to delete the file from your server.
Now reload your website. If 403 forbidden error is resolved, then this means that your .htaccess file was corrupted.
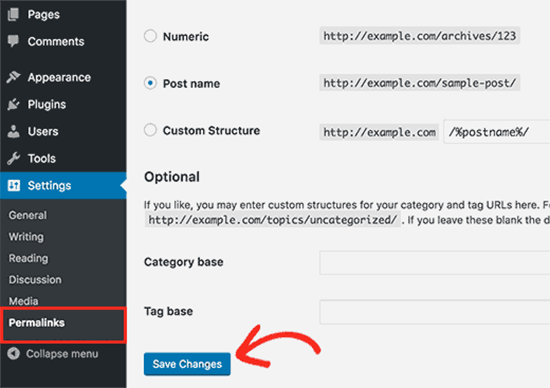
To generate a fresh .htaccess file logging into your WordPress admin panel and go to Settings > Permalinks page.
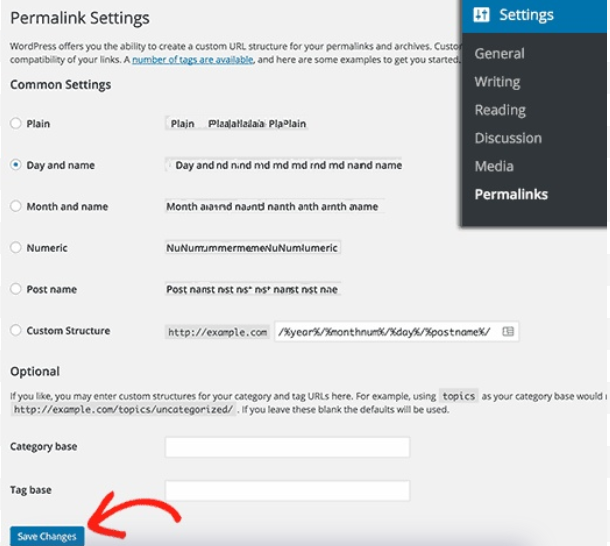
Just click on the Save Changes button at the bottom of the page and WordPress will generate a fresh .htaccess file.
- Fix 403 Forbidden Error Caused by File Permissions in WordPress
All files stored on your website have file permissions. These file permissions control who can access those files and folders on your website.
Wrong file permissions can cause 403 forbidden error. It makes your web server thinks that you do not have the right to access those files.
If the above two solutions do not solve the 403 forbidden error, then incorrect file permissions can be the most likely cause.
You can ask your WordPress hosting provider to check for the correct file permissions.
If you want to do it by yourself, then here is how you can check your file permissions.
Simply connect to your WordPress site using an FTP client. Go to the root folder containing all your WordPress files.

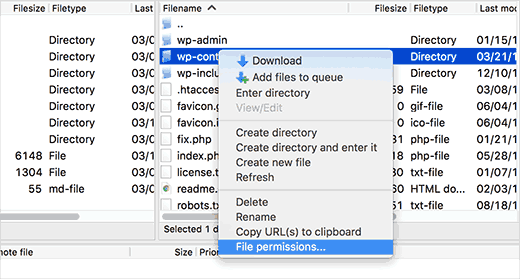
Simply left click to select a folder, right click and then select File Permissions from the menu.
Your FTP client will show you a file permissions dialog box like the following:
All folders on your WordPress website should have a file permission of 744 or 755.
All files on your WordPress website should have a file permission of 644 or 640.
You can set the file permission to the root directories to 744 or 755. Check the box next to ‘Recurse into subdirectories’ and then check the option that says ‘apply to directories only’.
Click OK button. FTP client will now start setting permissions to all subdirectories in that folder.
Once done, you need to repeat the process for all the files. This time you have to use file permission of 644 or 640 and don’t forget to select ‘Recurse into subdirectories’ and ‘apply to files only’ options.
Click OK button and your FTP client will start setting file permissions for all the selected files.
Try accessing your site now, and 403 forbidden error should be resolved now.
16. “Upload: Failed to Write File to Disk” Error in WordPress
This error may occur due to various reasons. The most common reason is incorrect folder permission. Each folder and file on your WordPress site has a set of permissions. Incorrect permissions of folder and file can take away your ability to write files on server.
Incorrect permissions may show one of the following error messages:
- WordPress failed to write file to disk error
- WordPress has failed to upload due to an error failed to write file to disk
- Unable to create directory wp-content/uploads/2016/03. Is its parent directory writable by the server?
FIX “Upload: Failed to Write File to Disk” Error in WordPress
Simply connect to your WordPress site using an FTP client. Go to the wp-content folder and select file permissions.
FTP client will show you a file permissions dialog box like the following:
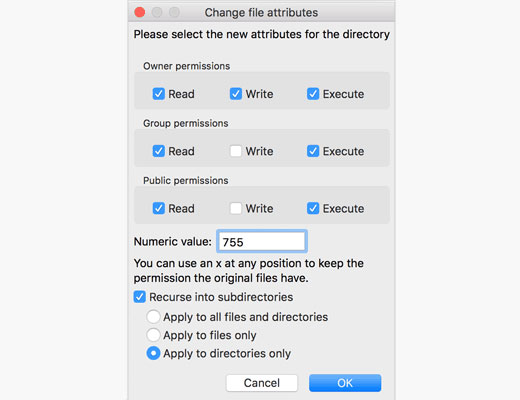
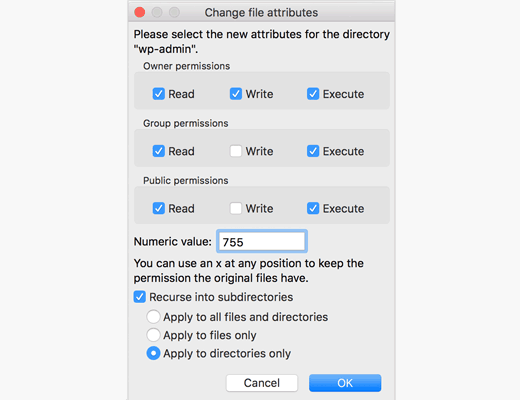
Now enter 755 in the numeric value field.
Then, you have to check the box next to ‘Recurse into subdirectories’.
Finally, you have to click on ‘Apply to directories only’ option.
Now click on the OK button to continue.
Once again, right click on wp-content folder and choose file permissions. This time you have to change permissions for files.
Now enter 644 in the numeric value and then check the box next to ‘Recurse into subdirectories’.
Finally, you have to click on ‘Apply to files only’ option.
Now click on the OK button to continue.
Now visit your WordPress site and try uploading files.
17. “This site ahead contains harmful programs” Error in WordPress
This type of error message is shown when your website is hacked and is now used to distribute malicious code. Another reason is showing ads from low quality advertising networks. These networks may sometime display ads linking to websites distributing malicious code.
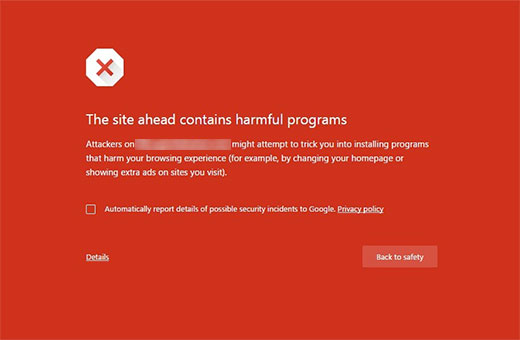
Fix “This Site Ahead Contains Malware” Red Screen
To fix this error, you have to install plugins of malware and fix your site security.
Warning! Before you implement any of the steps below, ensure you have a very recent backup of your WordPress site.
- WordFence
It is a Malware Removal Plugin. With this plugin, you can scan your site, rid it of malware, and ensure ongoing website security.
First login to your WordPress site and go to Plugins > Add New. In the search box, type “WordFence” when appears click Install.
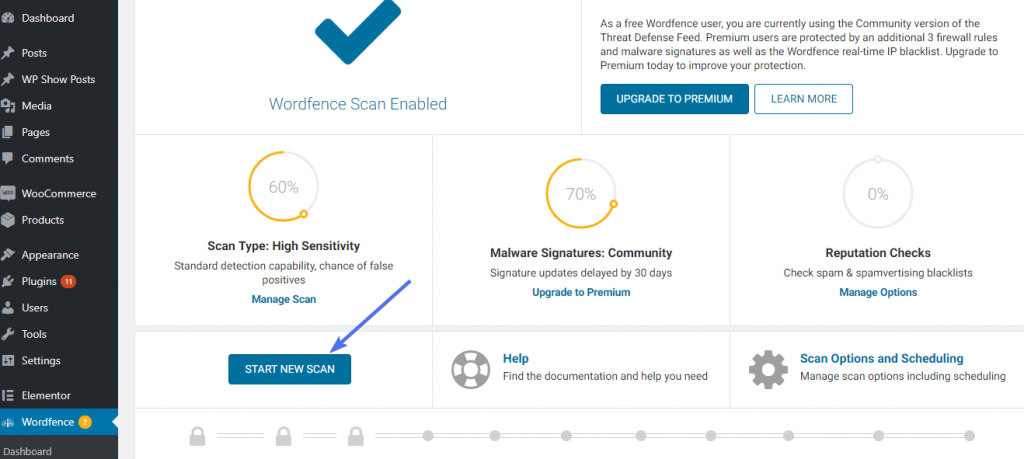
One done, go to WordFence > Scan. In the scan page, click on Scan Options and Scheduling.

If you suspect that your site might hacked, set the scan type to “High Sensitivity”. Now, click Save Changes, and when the changes are saved then click Back to Scan.
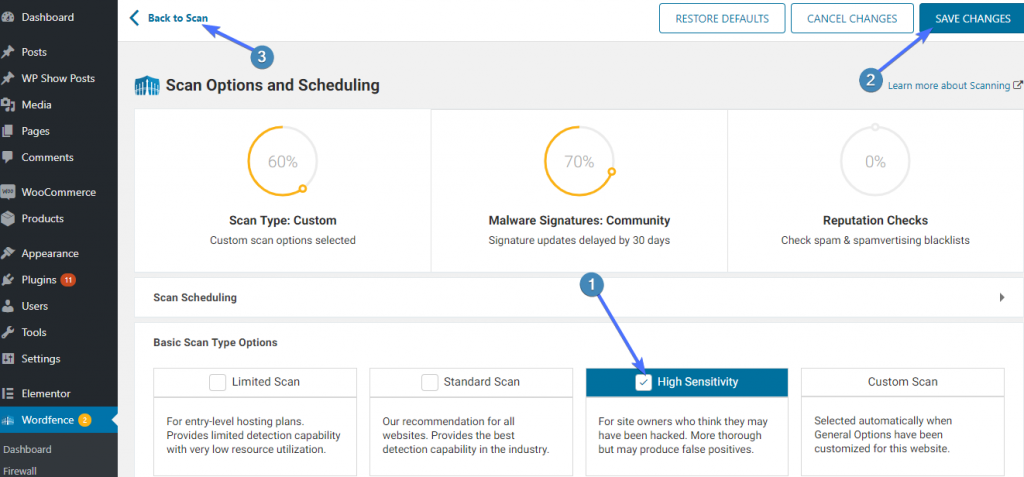
Now click Start New Scan. Depending on the size of your site, the scan might take time.
When the scan completes, WordFence gives a scan report like the following:
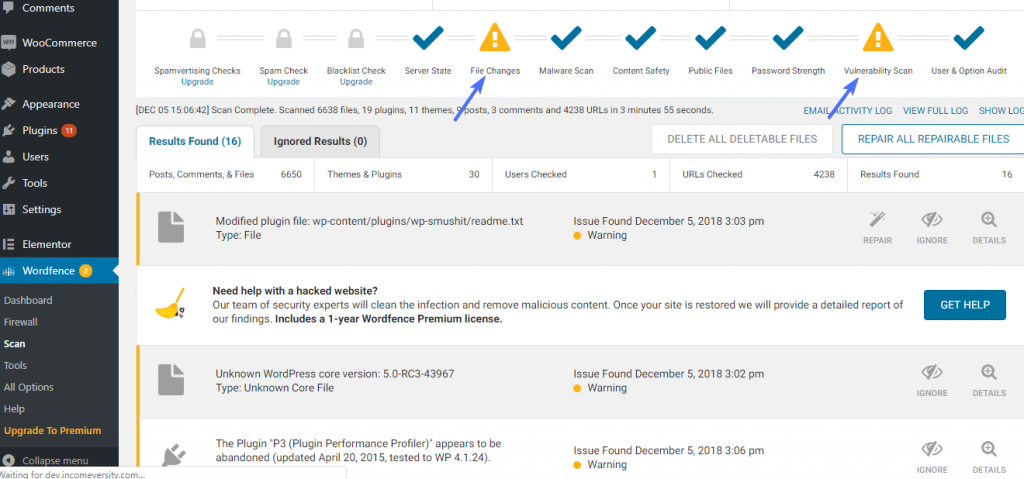
To proceed, just click Repair All Repairable Files.
If the repair completes successfully, you will get a success message.
However, your site may contain some unwanted software that cannot be repaired. In this case, you can click on Delete All Deletable Files to get rid of them.
- Google Search Console
You can also use Google Search Console to remove the warning.
To add your site, just go to Google Search Console and login with your Google account. Once you are in, go to the search console and click on Add Property button.
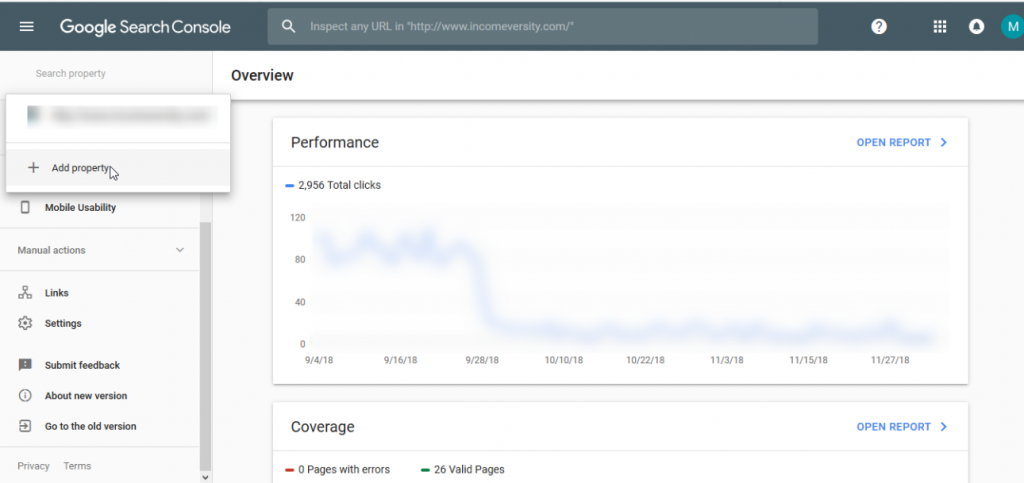
Now, type your site url and click Continue.
Google will ask you to verify the ownership of your website. Download HTML file to your computer.
17. Missed Schedule Post Error in WordPress
WordPress has some wonderful features. One of the wonderful feature is schedule posts to be automatically published at a specified time.
But when your scheduled WordPress post does not get published properly, your dashboard will give you the ‘Missed Schedule Error’. This means that while you were away, despite setting up your post to publish at a specific time, it did not. This can happen for a number of reasons, although the most common reason we found was due to a failed cron job.

Fixing the WordPress Missed Schedule Error
The easiest way to fix the missed schedule error in your WordPress dashboard is to use a nifty plugin called WP Missed Schedule Fix Future Posts Failed.
WP Missed Schedule plugin will allow you to check the posts that were scheduled that would have been considered “missed” had the plugin not caught the fail beforehand and corrected it. Simply go to Plugins > Installed Plugins and scroll down to WP Missed Schedule. Then click on ‘Miss” and see what posts were corrected. This assures you that the plugin is working perfectly.
After activating WP Missed Schedule plugin your website is ready to check for failed cron jobs at all times.
18. Fatal Error: Maximum Execution Time Exceeded in WordPress
If you see a message like “fatal error: maximum execution time exceeded” when you try to access your WordPress site, it means a part of your WordPress code is taking too long to execute and your server is stopping the execution.
Servers set a time limit on how long a script can run. This is done to prevent the server from abuse. Since WordPress is made up of PHP scripts, each script has to run completely within the time limit that set.
This time limit is usually 30 seconds, and this is more than enough time for a script to run. However, if a PHP script runs for longer than the set time limit, PHP short the execution. It then returns a message like the fatal error: maximum execution time exceeded.
The words “Fatal Error” can be alarming, but you can fix this problem with a little effort.
Fix Fatal Error: Maximum Execution Time Exceeded in WordPress
There are two ways to fix the error.
- With Plugin
The easiest way to increase the limit is by installing WP Maximum Execution Time Exceeded plugin. All you need to do is just install the plugin and your time limit is increased. If in near future, you want to reset the time limit to default values, simply uninstall the plugin.
This plugin increase your execution time limit by adding a configuration to your .htacess file.
- Manually
You can also directly configure .htacess file directly. To do so, connect to your WordPress site using an FTP client and open the folder containing your WordPress files.
Search .htaccess file in this folder. Once found right click on it, and click View/Edit.

Next, add this line to the bottom of the file. This will increase the time limit from 30 seconds to 2 minutes:
php_value max_execution_time 120
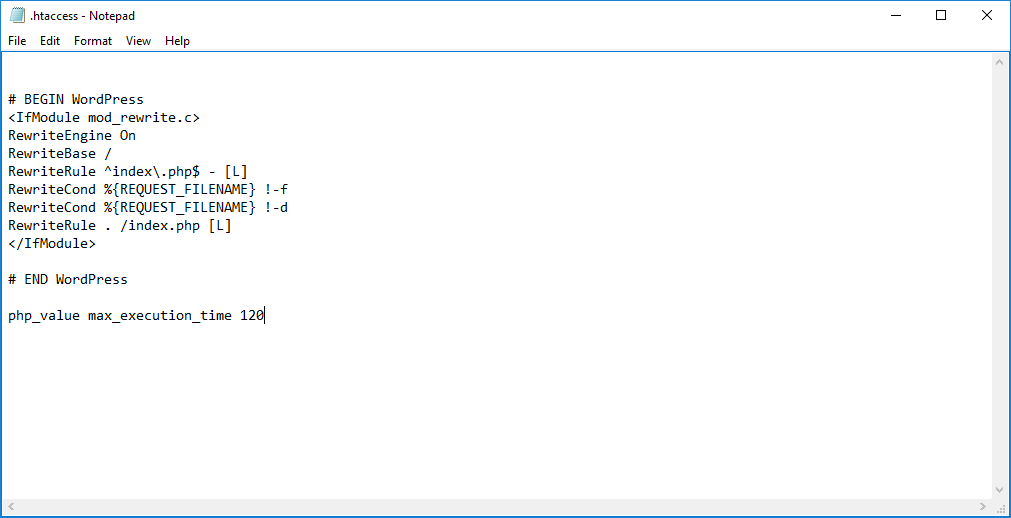
Now save this file and close it. Your FTP server will prompt you to upload the new file. Click Yes.
And that’s it to manually increase the execution time limit.
19. Facebook Incorrect Thumbnail Issue in WordPress
Most of the WordPress users are facing the wrong thumbnail display issues while trying to share any post on Facebook. There is no specific reason why Facebook shows this type of incorrect thumbnail image. The most possible reason is that Facebook works with Open Graph (OG) tag which set the multiple images for the og: image tag. Many WordPress plugins like WordPress SEO by Yoast automatically adds them to your site to prevent missing thumbnail issue.
Other possible reasons are caching plugins, CDN issues, missing open graph (og) meta tag for the thumbnail image, etc.
Since, there are several reasons for this issues so it’s quite hard to find the right issue. That’s why you have to go for the few methods to find the right solution of the problem.
Fixing Facebook Incorrect Thumbnail Issue in WordPress
Let’s take a look how to solve the incorrect facebook thumbnail issue.
- Upload Thumbnail Image Manually
One of the easiest and the quickest way to solve the issue is to upload the thumbnail image by yourself.
If you share post on Facebook page and it doesn’t display the correct thumbnail then simply click on the add image box and upload the desired image for the post and select it as the thumbnail image.
Unfortunately, this method still not work for the people who want to share your post on Facebook because it may still show the wrong thumbnail in their shared post. That’s why this is one of the simplest and easiest method but not a reliable one.
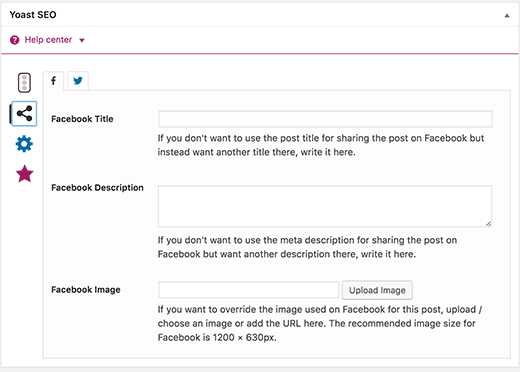
- Use WordPress SEO by Yoast Plugin
By installing and using WordPress SEO by Yoast SEO plugin, you can fix the thumbnail image issue for Facebook issue. Just scroll down the yoast meta box post editor, you will find the social tab on the left side. Click on it then you can get the Facebook image upload button where you have to add the Facebook thumbnail image.
If this method also show the incorrect thumbnail image then it that case then you have to reset the Facebook cache.
- Use the Facebook Debug Tool
To reset the Facebook cache, you can use the Facebook debug tool that troubleshoots facebook open graph implementation on your WordPress site. It is also the easiest, quickest and reliable method to fix the thumbnail issue.
Just open the Debug Tool and copy the URL of your WordPress post and paste in the debugger tool. The most common error that you will see is:
Provided og:image is not big enough. Please use an image that’s at least 200×200 px. Image ‘http://example.com/uploads/2014/06/some-image-from-article.jpg’; will be used instead.
Just press the debug button again then this error will disappear itself.
20. WordPress Keeps Logging Out Problem
When you login to your WordPress site, it sets a browser cookie with which it authenticates your login session. If there are any errors with this cookie, such as dissimilarities between the URL set in the cookie and the URL with which you are accessing your site, WordPress will be unable to authenticate your session and will thus log you out. Generally, you will see a message like “your session has expired”.
Fixing WordPress Keeps Logging Out Problem
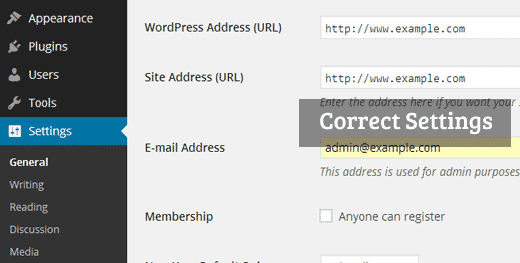
A simple fix for this login issue is to make sure that you have typed the same URL in your site address and WordPress address fields in your WordPress settings. This means that you have to choose either www or a non-www URL in the both fields.
Login to your WordPress dashboard and go to Settings > General.
If you are unable to access your admin dashboard, you can make these changes by accessing your site files with FTP and editing your wp-config file to include the following information. Add the following code just above the line That’s all, stop editing! Happy blogging.
define('WP_HOME','http://yoursite.com);define('WP_SITEURL','http://yoursite.com);If you prefer to use www in URL, then use this code instead:
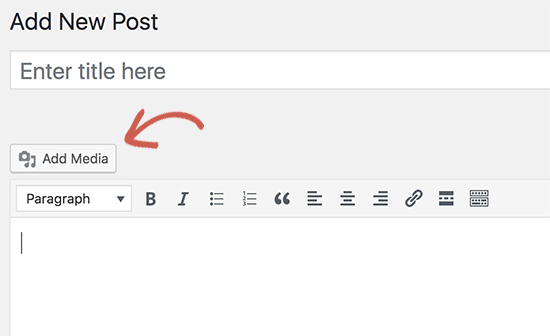
define('WP_HOME','http://www.yoursite.com);define('WP_SITEURL','http://www.yoursite.com);21. Add Media Button Not Working in WordPress
The most common cause of this problem is script conflicts among your themes and plugins. JavaScript runs a lot of features in the WordPress admin including the Add Media button.
When the Java script that runs the Add Media button collides with any other script, it fails to process and disable the Add Media button.
A closely related problem – the Insert into post button not working – is caused by the permission errors on a folder.
How to Fix WordPress Add Media Button Not Working
Using FTP server access your WordPress root directory and open the wp-config.php file for editing.
Now just add the following code to just before the line that says “That’s all, stop editing! Happy blogging.”
define('CONCATENATE_SCRIPTS', false);Save changes to your wp-config.php file. Log out from your WordPress site and clear all of your caches i.e. browser, plugin, 3rd-party, and server cache.
Log in back to your WordPress admin dashboard and check if the Add Media button is working.
22. 502 Bad Gateway Error in WordPress
A 502 bad gateway error specifically means that one server, while acting as a gateway or proxy, has received an invalid response from an inbound server.
Due to the various browsers, web servers, and operating systems, 502 bad gateway error can present itself in a number of different ways. But they all have the same meaning.

How to Fix the 502 Bad Gateway Error
A 502 bad gateway error is typically a problem with the server, however, it can also be a client-side issue. So we’ll dive into both. Check out these common causes and ways to fix the 502 bad gateway error.
- Try Reloading the Page
One of the easiest try when encountering a 502 bad gateway error is to simply wait a minute and reload the page (F5 or Ctrl + F5). It could be that the host or server is overloaded and the site will come right back. While you’re waiting, you could also try a different browser to check.
Another thing you can do is simply paste the website into downforeveryoneorjustme.com. This website will tell you if the site is down or if it’s a problem on your browser.
- Clear Your Browser Cache
Whenever you encounter this type of issues it can be good to clear your browser cache.
Once you clear your WordPress cache, try reloading the website.
- DNS Issue
A 502 gateway error could also occur due to DNS issue, such as the domain is not resolving to the correct IP. If you have just migrated your WordPress site to a new host, is it important to wait for things to fully propagate, which can take up to 24 hours in some cases. This depends upon the TTL value of your DNS records.
You can also try flush your local DNS cache. This is similar to clearing your browser cache.
In Windows simply open up Command Prompt and enter the following:
ipconfig /flushdns
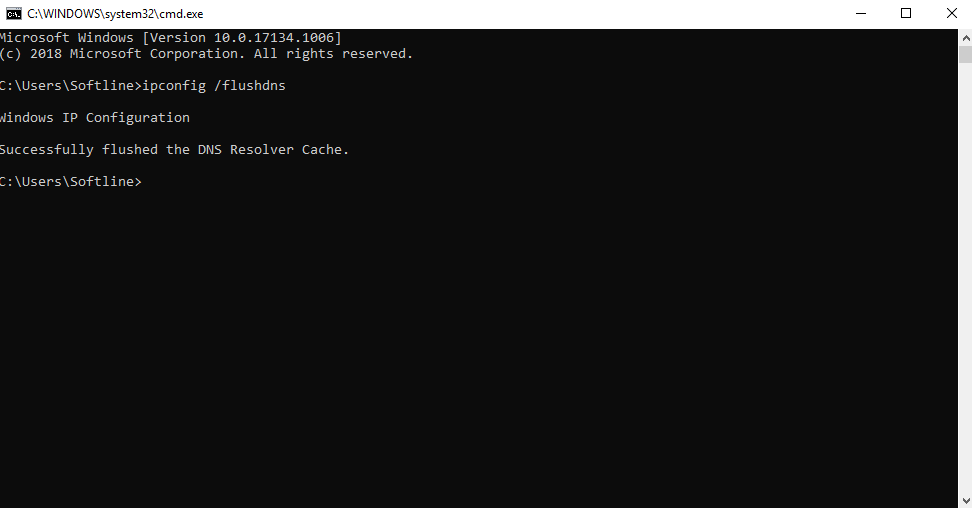
You will see a “Successfully flushed the DNS resolver Cache” if it worked.
- Disable the CDN or Firewall
If you are using a CDN service or website firewall on your WordPress site, then it is possible that their servers are acting up. To check this, you will need to temporarily disable the CDN service.
Once disabled, it will remove the additional layer between your browser and the hosting server. Your website will now load entirely from your server and if the issue was caused by the CDN / firewall, then it will get resolved now.
You can then contact your CDN service provider for their support. Once the issue is resolved, you can enable the CDN again.
- Check Your Plugins and Themes
If this error still continue, then check your installed plugins and themes.
For that purpose, you have to deactivate all WordPress plugins via FTP server. If this fixes the issue you’ll have to find out the culprit. Start activating them one by one, reload the site after each activation. When you see the 502 gateway error return, you will find the misbehaving plugin. You can then reach out to the plugin developer for help.
If deactivating plugins didn’t solve this issue, then you have to check your WordPress theme. You have to switch WordPress theme via phpMyAdmin.
After switching your default WordPress theme, visit your website to see if it’s working. If you are still getting the error, then continue reading.
Always make sure that your plugins, themes, and WordPress core are up to date. And check to ensure that you are running a supported version of PHP. You can always reach out to your hosting provider for assistance.
- Check With Your Host
The primary reason we typically see a 502 bad gateway error is due to an issue with the web host service. Sometimes a query, script, or request will take too long and so it is canceled or killed by the web server. A lot of hosts implement what they call a “kill script.” Basically what this does is it terminate a request after a certain period of time so that it doesn’t take a site down or impact other users.
Another reason you could see a 502 gateway error with your host is due to the fact that the server is simply not reachable, either because it is down or there is no connectivity.
23. 503 Service Unavailable Error in WordPress
A 503 service unavailable error occurs when your web server is unable to get a proper response from a PHP script. This PHP script may be a WordPress plugin, a theme, or a misbehaving custom code snippet.
If the error is caused by heavy usage, a server defect, or a DDoS attack, then it could automatically disappear in a few minutes.
How to Fix the 503 Service Unavailable Error in WordPress
Let’s check how to fix the 503 service unavailable error in WordPress.
- Manually Disable All WordPress Plugins
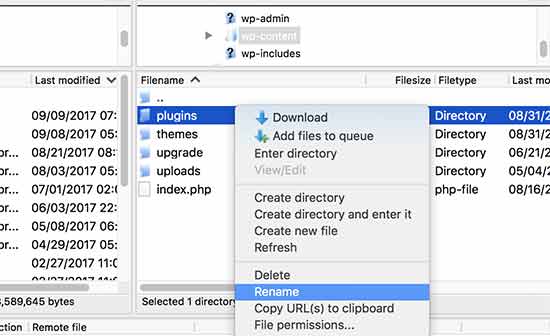
To figure out if the error is caused by a plugin, you have to disable all of the plugins. You can manually disable all the plugins from the server by simply renaming the WordPress plugins folder.
For that purpose just login to your server to find all the WordPress files related to your website.
You can login to your server by using either the web-based CPanel File Manager or use a FTP client.
Once connected, go to /wp-content/ folder and rename the plugins folder to plugins-bad.
Now create a new empty folder and name it as plugins.
Now you visit your WordPress site to see if this error resolved.
If it did, then this means a plugin installed on your website was causing that error.
Now go back to the WP-Content folder, delete the empty plugins folder that you’ve just created and rename the old plugins-bad folder to its original state to just plugins.
This will restore all the plugins that were installed previously. However, these plugins will remain deactivated.
Now login to your WordPress admin dashboard again and reactivate your plugins, one by one until you find which plugin is causing the issue.
- Change Your Theme to Default WordPress Theme
If disabling the plugins didn’t fix the issue, then it’s likely caused by a bad script on your WordPress theme. Let’s try to change your theme to default.
Just connect to your WordPress site using an FTP server or File Manager in cPanel. Once connected, go to /wp-content/themes/ folder.
Download your currently active WordPress theme to your computer as backup. Now go ahead and delete the folder related to your default theme.
This will force WordPress to automatically revert your website back to use the default WordPress theme such as TwentyNineteen.
Once done, check to see if your website works. If it works, there’s something wrong with your theme. Contact with the theme developer and ask them to fix the issue.
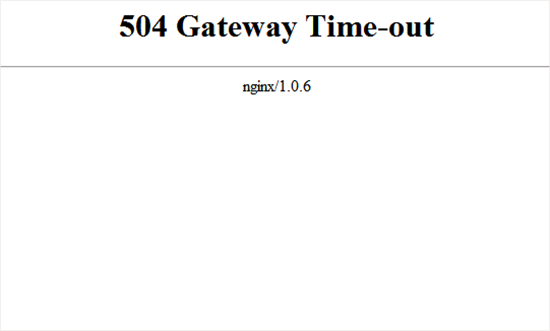
24. 504 Gateway Timeout Error in WordPress
504 gateway timeout error is an HTTP status code which appears when the server was unable to complete your request within the given time frame.
504 gateway timeout can come in different shapes and sizes. For example:
- 504 Gateway Timeout nginx
- Gateway Timeout Error
- HTTP Error 504
- 504 Gateway Time-out – The server didn’t respond in time
- HTTP Error 504 – Gateway Timeout
How to Fix 504 Gateway Timeout Error
While in most of the cases the cause of 504 gateway timeout errors come from the server-side, they may also pop up due to issues or mis-configurations from the user-side. Thus, we’ll go through the basic troubleshooting steps with both options.
- Refresh the Page
The first step to fix 504 gateway timeout error is the simplest one. Wait a couple of minutes and refresh the web page. It might be that the server is receiving more requests than usual at the same time and is unable to handle more.
While you wait, you can simply paste the website into downforeveryoneorjustme.com. This website will tell you if the site is down or if it’s a problem on your browser.
- Try a Different Browser
In case the website is up, but you still see the 504 gateway timeout error, try different browser. Clearing browser cache or using incognito mode can also help verify if the issue is browser related.
- Flush DNS
504 gateway timeout can sometimes be a result of incorrect or outdated DNS cache, but it is not very hard to clear it.
In Windows simply open up Command Prompt and enter the following:
ipconfig /flushdns
You will see a “Successfully flushed the DNS resolver Cache” if it worked.
- Test with Different Devices
Try loading the website from different computer, network connection, or a mobile phone. In case none of the above solutions fixed the 504 gateway timeout error, this step will let you confirm if it is a local issue or a server-end problem.
- Check Error Log
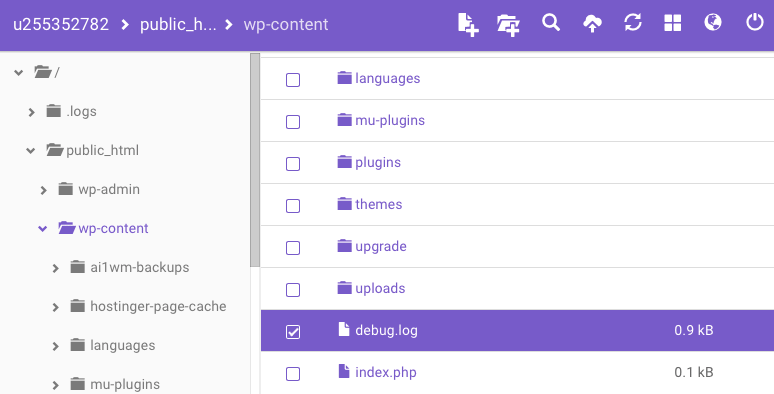
The 504 gateway timeout error may also be a cause of recent website changes or updates. The quickest way to find out is by checking the error log files for any hints. WordPress users can enable error log by adding the following lines to the wp-config.php file:
define( 'WP_DEBUG', true );
define( 'WP_DEBUG_LOG', true );
define( 'WP_DEBUG_DISPLAY', false );
Once done, all generated entries will appear in the wp-contents/debug.log file.
- Check Plugins
To figure out if the error is caused by a plugin, you have to disable all of the plugins. You can manually disable all the plugins from the server by simply renaming the WordPress plugins folder.
For that purpose just login to your server to find all the WordPress files related to your website.
You can login to your server by using either the web-based CPanel File Manager or use a FTP client.
Once connected, go to /wp-content/ folder and rename the plugins folder to plugins-bad.
Now create a new empty folder and name it as plugins.
Now you visit your WordPress site to see if this error resolved.
If it did, then this means a plugin installed on your website was causing that error.
Now go back to the WP-Content folder, delete the empty plugins folder that you’ve just created and rename the old plugins-bad folder to its original state to just plugins.
This will restore all the plugins that were installed previously. However, these plugins will remain deactivated.
Now login to your WordPress admin dashboard again and reactivate your plugins, one by one until you find which plugin is causing the issue.
- Check CDN
If you are using a CDN service or website firewall on your WordPress site, then it is possible that their servers are acting up. To check this, you will need to temporarily disable the CDN service.
Once disabled, it will remove the additional layer between your browser and the hosting server. Your website will now load entirely from your server and if the issue was caused by the CDN / firewall, then it will get resolved now.
You can then contact your CDN service provider for their support. Once the issue is resolved, you can enable the CDN again.
- Tweak Server Settings
If you’re using VPS hosting, there are a few things you can try to fix the 504 gateway timeout error.
Apache
Apache users can increase the default timeout value in the httpd.conf file. For example:
# Timeout: The number of seconds before receives and sends time out.
Timeout 600
Furthermore, increasing the max_execution_time limit in php.ini can also fix the issue:
max_execution_time 300
Save the changes, restart apache, and re-load the site. The 504 gateway timeout error should gone.
Nginx
If your VPS utilizes Nginx, try to increase the following values in /etc/nginx/conf.d/timeout.conf:
proxy_connect_timeout 600;
proxy_send_timeout 600;
proxy_read_timeout 600;
send_timeout 600;
It’s also advisable to increase the max_execution_time in php.ini:
max_execution_time 300
Once the changes are saved, restart Nginx and try to reload the website again.
25. WordPress Failed to Open Stream Error
The error is caused whenever WordPress is unable to load the file that is mentioned in the appeared code. After the error occurs, WordPress may continue loading and show a warning or a fatal error and refuse to load anything else. Fortunately, due to the message phrasing, you might have clues where the error occurred in the code and the most likely reason why.
The message may look like the following:
Warning: require (/home/website/wp-includes/load.php): failed to open stream: No such file or directory in /home/website/wp-settings.php on line 19
Fatal error: require(): Failed opening required ‘/home/website/wp-includes/load.php’ (include_path=‘.:/usr/share/php/:/usr/share/php5/’) in /home/website/wp-settings.php on line 19
How to Fix the WordPress Failed to Open Stream Error
If the reason is for instance ‘no such file or directory’, that means you need to look at the code to figure out which file is mentioned in error. If a plugin or a theme is said, then that means that it was probably deleted or not installed properly, reinstall it and see if it fixes the issue.
However, the problem may be as a result of a missing .htaccess file. You may go to your WordPress dashboard, then go to settings > permalinks and hit the save changes button to recreate the .htaccess file.
- Permission denied error
If the error message is about permission, like permission denied. Your WordPress website does not have sufficient rights to access the file shown in the error code. To fix this particular type of error, you have to connect to your WordPress site using an FTP client. Just go to the root folder of your site and select all folders. Right-click on the selected files and select properties.
You have to make sure that in the numeric value field, you have the number 755. Make sure that for owner permissions, the read, write and execute check boxes are checked. For group permissions and public permissions only the write checkbox should be unchecked.
Now select all the files root folders included. And click on properties.
Leave the numeric value field only. Make sure that under the owner permissions the read and write check boxes are checked. For the group and public permissions only the read checkbox should be checked.
Now click OK to continue, and your FTP client will begin to set file permissions to the selected files on your WordPress site.
- Plugin errors
Some plugins load scripts from sources such as google analytics and google maps while some may require authentication to access them. Failure to follow the instructions given for using them may result in your WordPress site not opening the files needed hence the error occurred.
To fix this, you will have to contact the plugin author for support. They will be able to help you to fix the error.
26. WordPress 429 Too Many Requests Error
The most common reason of 429 too many requests error is when a user, or a script tries to make too many requests to the servers. It is a measure to prevent DDoS attacks on websites.
Sometimes the error is occurred when a script on your website is making too many requests to another website or service using an API. In that case, the API would respond back with a 429 error code.
How to Resolve WordPress Error 429 Too Many Requests
This error may be caused by various factors. We will show you multiple ways to troubleshoot and fix the error.
- Check Your Plugins
Plugins may be causing the problem. The problem is to identify which one. It is always recommended to use as few plugins as possible. Too much plugins not only can slow down your website, but having a lot of them can make it difficult to determine a problem. We will show you how to deactivate your plugins.
On the left-hand site of your admin panel, click on Plugins and select the Installed Plugins option. If you have not set up automatic updates, make sure all of your plugins are up to date.
The process is very simple. Just go through each plugin one at a time. Deactivate the plugin you want and see if the error message is resolved, if it is not, reactivate the plugin and try the next one.
If you have found that one of your plugins is causing the issue, check to see if you have changed any settings that would cause this and, if not, contact the plugin developer to alert them about the error.
- Check Your Theme
Many web developers feel that built-in plugins can feel restriction and website should avoid these. These built-in plugins may cause this error.
On the left-side admin panel, click on Appearance and select the Themes option.
Change your premium theme to another theme or default theme that does not have built-in features.
Reload your site to see if this has fixed your error. If it has, let the theme’s developer know about the issue.
- Contact Your Web Host
If these steps do not fix the issue, then it is most likely not your fault. Contact your web host provider to find out what is going on. It could be a DDoS attack, but it is also likely that a third party service is responsible. It is not secret that search engines use bots to properly determine the rank of your website. Sometimes things can go wrong and they could send too many requests.
27. 413 Request Entity Too large Error in WordPress
If you encounter the 413 Request Entity Too large error in WordPress, the most likely cause is that you’re trying to upload a file whose size exceeds the maximum file upload limit on your site. The most common reason of the error is during plugin or theme uploads.
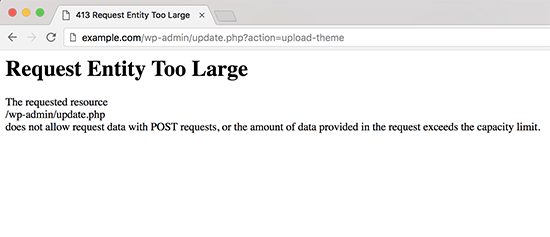
Fix the 413 Request Entity Too large Error in WordPress
To resolve the issue, you can increase your website’s maximum upload file size. There are a various methods available to achieve this – let’s take a look at each.
- Increase Upload File Size Limit via Functions File
Simply add the following code to your theme’s functions.php file.
@ini_set( 'upload_max_size' , '64M' );
@ini_set( 'post_max_size', '64M');
@ini_set( 'max_execution_time', '300' );
You can increase the values in upload_max_size and post_max_size more than the file you are trying to upload. You will also need to increase the max_execution_time to the time you think it would take for the file to upload. If you are not sure, then you can try doubling this value.
- Increase Upload File Size Limit via .htacces File
For this method, you will have to edit the .htaccess file and add the following code at the bottom:
php_value upload_max_filesize 64M;
php_value post_max_size 64M;
php_value max_execution_time 300;
php_value max_input_time 300;- Manually Upload File via FTP
If the 413 error only occurs when you are uploading one particular file, then you can consider uploading the file manually via FTP.
28. PHP Errors in WordPress
Most of the time, line warnings in PHP files happen because of outdated plugins or themes. This is because core files often change with WordPress updates, which makes some parts of code obsolete.
Themes and plugins can also cause warning messages when used with something that is incompatible. It’s possible for two current plugins which work well by themselves to have issues when paired together. This is because every developer is different, and not everyone uses the same syntax when developing site files.
Luckily, these warnings don’t necessarily mean that the site is broken. They just look odd to an unsuspecting visitor. Sometimes the developer create an update to fix the warning, but it’s not always quick.
PHP warnings in WordPress look something like the following:
“/wp-content/plugins/siteplugin.php on line 30”
This doesn’t mean the plugin is damaged. It just means part of the file is incompatible with WordPress, the theme or another plugin that is in use.
How to Turn Off PHP Errors in WordPress
To turn off you have to edit the wp-config.php file.
Inside your wp-config.php file, find the following line:
define('WP_DEBUG', true);If this line is already set to false. In that case, you’ll see the following code:
define('WP_DEBUG', false);In that case, you need to replace this line with the following code:
ini_set('display_errors','Off');
ini_set('error_reporting', E_ALL );
define('WP_DEBUG', false);
define('WP_DEBUG_DISPLAY', false);
Save your changes and upload your wp-config.php file back to the server.
You can now visit your website to confirm that the PHP errors, notices, and warnings have disappeared from your site.
Turning on PHP Errors in WordPress
If you are working on a website on local server, then you may want to turn on error report. In that case you have to edit your wp-config.php file and replace the code you added earlier with the following code:
define('WP_DEBUG', true);
define('WP_DEBUG_DISPLAY', true);
This code will allow WordPress to start display PHP errors, warnings, and notices again.
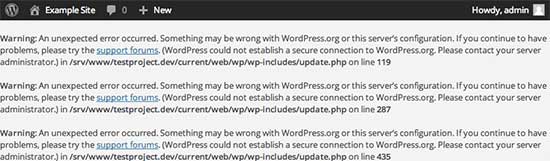
29. Secure Connection Error in WordPress
WordPress secure connection error usually occurs when you’re trying to install or update plugins and themes from WordPress.org. If you ever run into it, you’ll see a message like this one:
An unexpected error occurred. Something may be wrong with WordPress.org or this server’s configuration. If you continue to have problems, please try the support forums. (WordPress could not establish a secure connection to WordPress.org. Please contact your server administrator.) in /home/username/public_html/wp-admin/includes/update.php on line 122
Let’s see how to quickly fix secure connection error in WordPress.
Fix the WordPress Secure Connection Error
There are various ways to fix the unexpected secure connection error in WordPress. You can pick one of the following solutions based on your situation.
- Server Related Issues
Depending on your web hosting environment, there are few possible ways to approach on solving this problem. If you are on a Shared Hosting server, it might be that the server is currently under heavy users or under a DDoS attack. This will most likely result in a timeout while trying to connect to the WordPress.org server resulting in the secure connection errors. If this is a case you can wait for some time before trying again, or you can try to contact your hosting company so they can investigate the issue. This error can also occur as a result of some DNS related issue. If you have Virtual Private Server (VPS) and you have an SSH access to the server, you can fix this by editing your server’s host files. To do this, first, you have to connect to your server via SSH. Once you are successfully connected, you can execute the following command:
nano /etc/hosts
This will open the /etc/hosts file with the nano text editor. Place the following code at the end of the file :
66.155.40.202 api.wordpress.org
Once you save the file, return to your WordPress dashboard and try to check for updates again and see if the Unable to establish secure connection error has been solved.
- cURL Extension for PHP
In order for your WordPress site to be able to connect to WordPress.org and check and download the required updates or plugins, you will have to make sure that the cURL PHP extension is installed and enabled. For example, to install the cURL extension for PHP 7.0 or later on Ubuntu server you can use the following command:
apt-get install php7.0-curl
On CentOS you can do it by executing:
yum install php7.0-curl
After you do this, make sure that you restart your web server (Apache or Nginx) with the following commands:
systemctl restart apache2
or
systemctl restart nginx
- Check Your Firewall
If you have a Firewall service installed on your server you will have to check that the ports used by your web server are not blocked by any firewall rules. The default server ports used by Apache or Nginx are 80 or 8080 for HTTP and/or 433 for HTTPS. If you are using the UFW firewall, you can use the following commands to open these port. For Apache:
ufw allow 'Apache Full'
For Nginx:
ufw allow 'Nginx Full'
You can then check the status of your firewall and verify that the changes are applied with the following command:
ufw status
You can now go back to your WordPress site and try to load again to see if the secure connection error has been fixed.
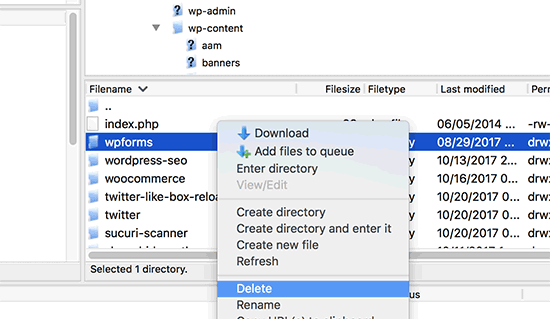
30. Destination Folder Already Exists Error in WordPress
The most common cause of the “Destination folder already exists” error is during a theme or plugin installation. The error is due to WordPress extracting the plugin or theme’s zip file to folder with the same name as in the archive file.
Destination folder already exists. /home/user/example.com/wp-content/plugins/wpforms/
Plugin install failed.
Fix Destination Folder Already Exists Error in WordPress
To resolve the issue, first you have to check if the theme or plugin is already installed. If so, a folder will already exist on your server, which will cause this error.
For that purpose, you have to connect to your WordPress site using an FTP client or cPanel File Manager.
Once connected, you have to go to the /wp-content/plugins/ or /wp-content/themes/ folder.
Now, look for the folder name after the plugin or theme that you were trying to install and then delete it.
Now go back to your WordPress admin area and retry installing the plugin or theme like you would normally do.
You should be able to install your WordPress plugin or theme without this error.
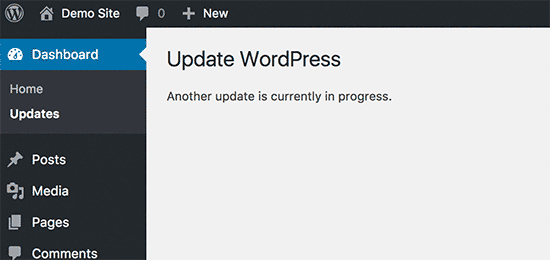
31. ‘Another Update in Process’ Error in WordPress
‘Another Update in Process’ error commonly occurs when an user initiate an update process while the core WordPress platform is being updated.
The database lock should be removed automatically once the update is complete, but if you find that the error keeps occurring, you can manually remove the lock.
Solution to fix ‘Another Update in Process’ error in WordPress
Let’s see how to fix ‘Another update currently in process’ error in WordPress.
- With Plugin
The simplest method to fix the issue is to download and install the Fix Another Update in Progress plugin.
After successful installation go to Settings > Fix Another Update In Progress page. If updates on your website are locked, then you will see a message just like the following:
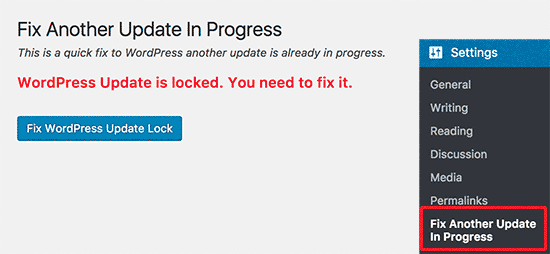
Just click on ‘Fix WordPress Update Lock’ button to continue.
- Manual Fixing
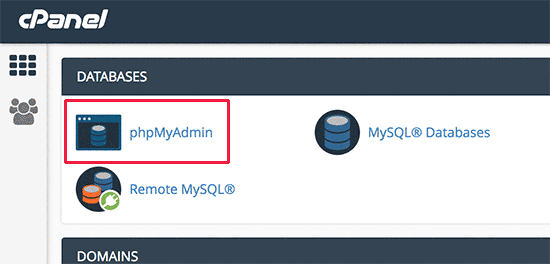
If you want to remove the lock directly in the database, first visit the cPanel dashboard. Now select Databases > phpMyAdmin from the cPanel menu.
Click on the Browse button next to the WordPress options database table (wp_options).
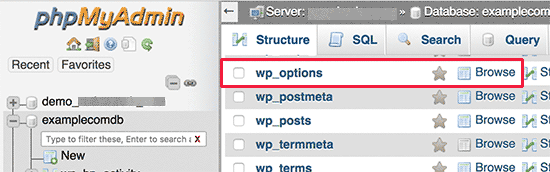
In the database rows that appear, look for ‘core_updater.lock’ and select the Delete button to remove.

It will now delete the row from your WordPress database.
Now load your WordPress website and proceed with updating your WordPress website.
32. Password Reset Key Error in WordPress
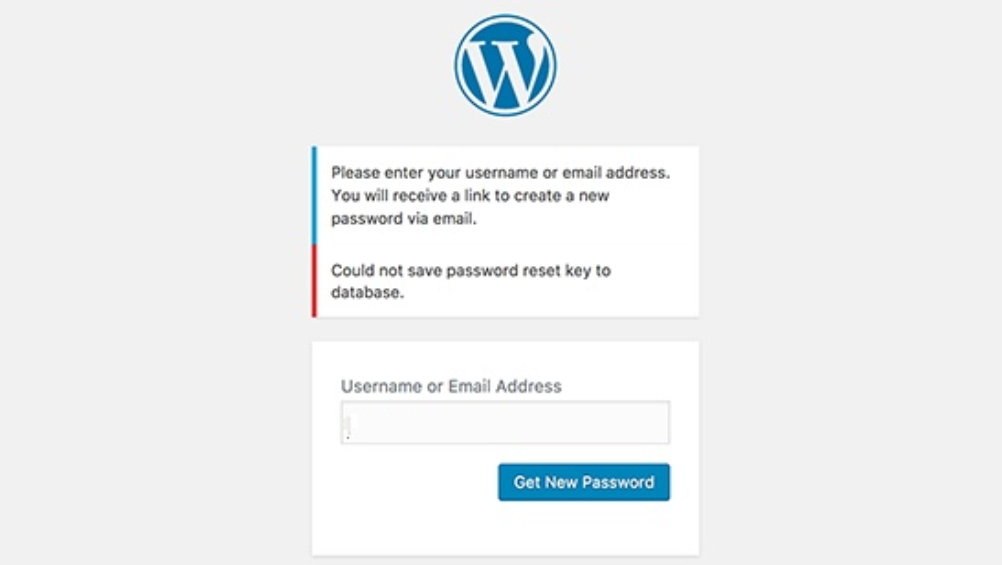
If you try to reset the password, you will see an error message like ‘Could not save password reset key in database’.
If you do not see this error message, then your login failure issue may be due to other issues.
This type of error message indicates that the WordPress is not being able to write new information into the database. If your WordPress hosting account has used all the disk space allocated to your account then this may occur.
Solution to Fix Password Reset Key Error in WordPress
Here is how to fix password reset key error step by step:
- To fix this error, you have to connect to your WordPress site by using FTP client or file manager in cPanel.
- After that, go to /wp-content/uploads/folder and delete some large image files to free some space.
Be sure to download those files as backups on your computer before deleting those files.
- Now visit your WordPress site and try to log in again.
- Once you logged in, you can review your WordPress files and see if there are any files that are unnecessary and taking too much disk space. Mostly these types of files are stored in /wp-content/ or /wp-content/uploads/folder.
- Cache plugins can consume disk space allocated for your WordPress hosting account.
- However, another common culprit can be your WordPress backup plugins. In case, you are storing WordPress backup files on your server, then all stored backups are taking unnecessary disk space on your hosting account. You should always store your backup files on the third-party cloud storage service such as Google Drive or Dropbox.
- If you cannot clear more space now, it may be time to upgrade to VPS hosting or a managed WordPress hosting account.
33. “Missing a Temporary Folder” Error in WordPress
Most likely this error is occurred due to the incorrect folder permission in your hosting environment.
Fixing Missing Temporary Folder Error in WordPress
Fixing missing temporary folder error in WordPress is easy.
- Connect to your WordPress site by using FTP client.
- Find the wp-config.php file and open it to edit. It is located in WordPress root installation folder (usually public_html).

- Once opened the file, paste the following code before the line that says ‘That’s all, stop editing! Happy blogging’.
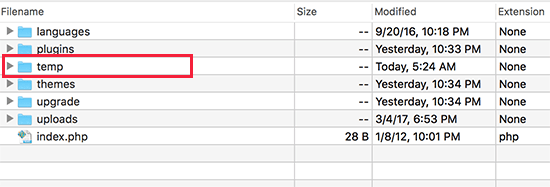
define(‘WP_TEMP_DIR’,dirname(_FILE_). ‘/wp-content/temp/’);- Now, save the file, and upload the updated wp-config.php on your site again.
- Next, go to the /wp-content folder and add a new folder inside it and name it as temp.
- Login to your WordPress dashboard, and try uploading files.
- And you are done!
34. Pluggable.php File Errors in WordPress
Pluggable.php file error is not so common yet many users notice it while making any kind of changes to their site’s PHP code.
The main reason of pluggable.php file error is when a new function isn’t able to handle the override of the default WordPress functions.
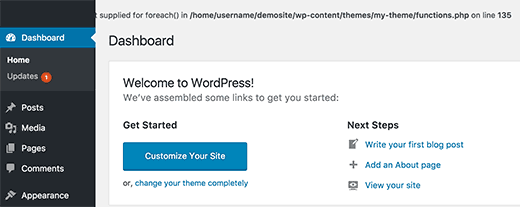
Warning: Cannot modify header information – headers already sent by (output started at /home/username/demosite/wp-content/themes/mytheme/functions.php:1035) in /home/username/demosite/wp-includes/pluggable.php on line 1179
How to Fix Pluggable.php File Errors in WordPress
In order to fix thi type of error, just look at the first location mentioned in the error.
Warning: Cannot modify header information – headers already sent by (output started at /home/username/demosite/wp-content/themes/mytheme/functions.php:1035) in /home/username/demosite/wp-includes/pluggable.php on line 1179
In the above example, the error is located in the theme’s functions.php file at line 1035.
This means you need to edit your theme’s functions.php file and change or remove the code that causing this error.
Sometimes the headers already sent error is caused by an extra space after closing or ending the php ?> tag, so you can just remove that, and it will fix the issue.
35. Email Sending Problems
Another very common WordPress errors in email sending problem. One of the most common scenarios of this problem is not receiving any emails from your website. No WordPress notification emails, no contact form emails.

Email sending problem happens because many shared hosting providers limits or disable sending emails to prevent their servers from abuse.
You can use different mail sending services to solve the issue. For example, you can use any of the following services to send emails.
- Mailgun
- Sendinblue
- SendGrid
- Sparkpost
- MailJet
- Postmark
Cost Comparison of 40,000 Emails per month
- SendGrid – $9.95 / month
- AmazonSES – $4 / month
- SendinBlue – $7.37 / month
- Mailgun – $15 / month
- MailJet – $17.49 / month
- Postmark – $30 / month
Wrap Up on WordPress Errors
The issues mentioned above are some of the most common errors while using WordPress. Other than this there are many more problems.
But before solving any error, one must make sure that WordPress backup is done frequently. Otherwise, there is a risk of losing data. Also, follow our WordPress Security Guide to make sure your site is safe from hackers.
Disclosure: WP Hive earns a commission when you buy through partner links. It does not influence the unbiased opinions of our writers. Learn more →
Share:
https://wphive.com/tutorials/how-to-fix-most-common-wordpress-errors/
Saif Hassan
Product Manager by passion & profession. Lead Product Manager at weDevs, former PM @ Poptin. Passionate about writing & tech. He's an advocate of Human-Centered Design and believes that websites and the tools used to build them should be well crafted, intuitive, and accessible. Cyclist. Reader. A WordPress ninja 🥷, HCI expert & a design thinker 💡

