How to Migrate from Medium to WordPress without Any Downtime
Medium is a great platform to publish articles, blog posts, and art-directed stories. But, recently people are migrating away from Medium to other platforms like WordPress. In this article, we’ll show you how to migrate your blog from Medium to WordPress.
Why Migrate from Medium to WordPress?
While migrating away from Medium to WordPress may seem a bit daunting at first, it’s actually simple to do. There are many benefits from Medium to a self-hosted WordPress website. Some of the main benefits are:
- The absolute ownership of the content on a self-hosted WordPress website with compared to a community-based platform like Medium.
- Full control of Brand and content promotion.
- Full control in design and customization with themes, CSS, and plugins.
- The ability to add and manage multiple users and content editors/moderators.
As you know, WordPress is a very popular CMS platform. In fact, 34% of today’s websites and blogs are running on WordPress.
According to W3Techs, At the start of 2011, WordPress powered 13.1% of all websites. Till today, WordPress made it to the current market share of 34.5%.
| 2011 1 Jan | 2012 1 Jan | 2013 1 Jan | 2014 1 Jan | 2015 1 Jan | 2016 1 Jan | 2017 1 Jan | 2018 1 Jan | 2019 1 Jan | 2019 19 Aug |
| 13.1% | 15.8% | 17.4% | 21.0% | 23.3% | 25.6% | 27.3% | 29.2% | 32.7% | 34.5% |
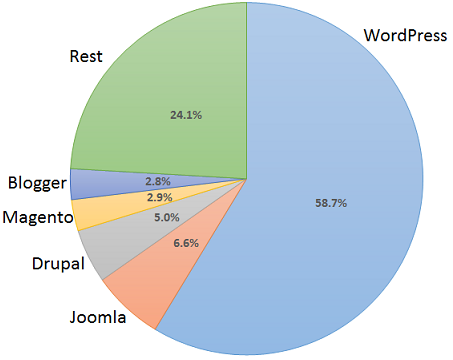
The dominance of WordPress in the CMS market is amazing. The two closest competitors, Joomla, and Drupal combined are used by 4.9%, less than a fifth of WordPress.
The market share of WordPress among the 300+ content management system is now 58.7%.
Keep in mind that there are two kinds of WordPress. We are referring to self-hosted WordPress, not WordPress.com. You can learn more about the differences between the two platforms in our WordPress.org vs. WordPress.com comparison. You can also learn more on which is the best blogging platform, WordPress or Medium.
Quick Navigation
How to Migrate from Medium to WordPress
This step-by-step tutorial will show you everything you need to consider when migrating your content from Medium to WordPress.
Pre-migration Steps
Before you start migrating your content over, you’ll need to take care of a few things.
Registering a new domain name
If you are not using a custom domain on Medium (e.g. https://medium.com/@wphive), you will need to register a new domain name for your new WordPress site.
For new domain name registering NameCheap and GoDaddy will work fine.
If you are using a custom domain on Medium, you’ll just need to update your DNS to point to your new WordPress site.
Purchasing web hosting
Since WordPress is a self-hosted platform, you’ll need to get web hosting. A web host provides you with space on a computer server which is linked to your domain name via the internet.
There are many web hosting company available. Among them, Bluehost or Kinsta are some of the popular for web hosting.
Installing WordPress
Now that you have a domain name and web hosting account, you’re ready to install WordPress.
Most WordPress web hosting companies offer 1-click install options that you can use to instantly install WordPress. If you can’t find it, then ask your web hosting provider’s support, and they will set it up for you.
You can also do it on your own. See our complete guide on how to Install WordPress on cPanel.
Medium to WordPress Migration
Exporting your content from Medium
Moving contents from Medium to WordPress is easy with the help of the Medium to WordPress Importer tool. It will help you to take all your content from Medium and export it to a file which is compatible with WordPress.
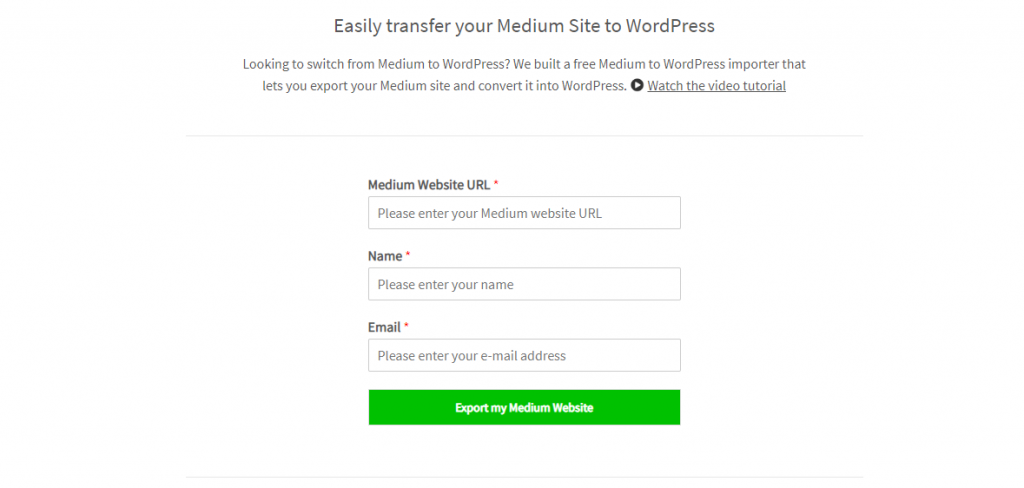
First, go to the Medium to WordPress Importer tool website. The processing time to export your file varies depending on whether you’re using a custom domain or not.
For custom domain – If you are using a custom domain e.g. http://mysite.com or like that, simply enter your Medium website URL, name and email address. Then, click on the Export my Medium Website button.
For medium domain – If you’re not using a custom domain on Medium, the tool will ask you to upload your Medium export file.
How to Export from Medium and Import to WordPress
To get the medium export file, do the following:
- First, log in to your Medium account.
- Go to “Settings,” which you can find at the profile icon at the top right corner.
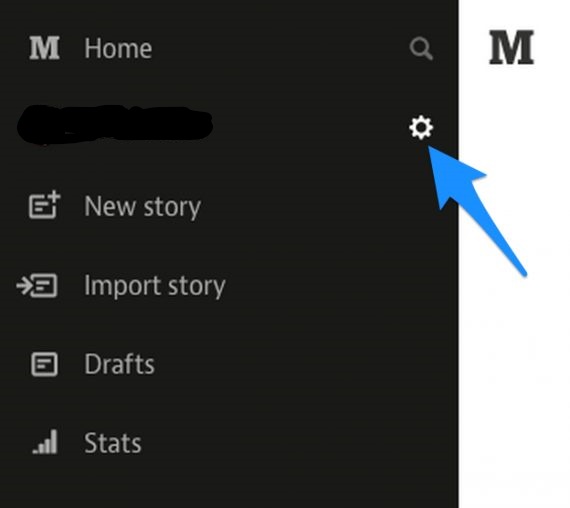
- In the “Settings,” look for the “Download Your Information” area and click on the “Download .zip” button.
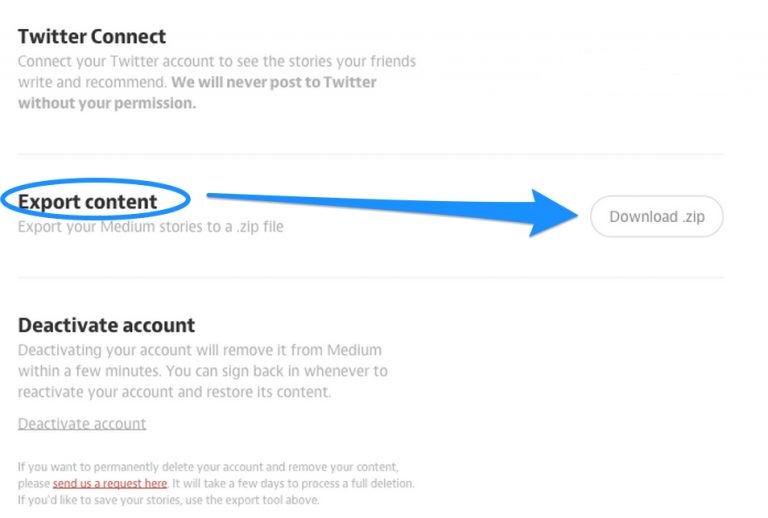
- Now click on the “Export” button and Medium will gather your content and send you a link via email.
- Click on the link in the email and download your export file.
Once you’ve downloaded the Medium export file, you’re ready to go back to the Medium to WordPress Importer site.
- Now, enter your Medium website URL, upload the export file, enter your name and email address. Then, hit on the Export my Medium Website button. The Medium to WordPress Importer tool will now prepare your export file. Once it’s ready, you will get a success message and a download button.
- Click on the button and download your WordPress-compatible Medium export file. You’ll need this in the next step to import your content to WordPress.
Importing your Medium content to WordPress
So, you are now ready to import your Medium content to WordPress. Log in to your WordPress site Dashboard and go to Tools > Import in the left sidebar.
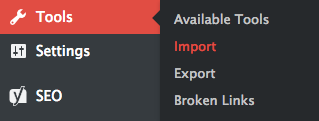
There are a number of different import tools available in this section, but you have to use the ‘WordPress‘ at the bottom. Now, click on the “Install Now” link below it.

Once the WordPress importer is installed, click on the “Run Importer” link which will take you to the WordPress importer page.

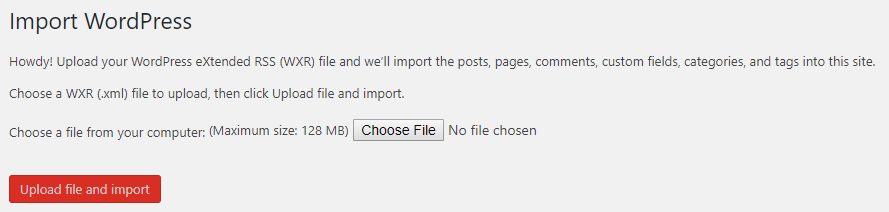
Here, you have to click on the Choose File button and locate the Medium export file that you converted with the Medium to WordPress Importer tool. Once you’ve selected the file, click on the Upload file and import button.
You will be asked to assign authors for the imported content. You can either import the author from Medium, create a new user or assign your posts to an existing WordPress user.

Expert Tip: It’s easiest to simply assign your posts to your main WordPress administrator account that you created during WordPress installation.
Make sure to put a tick to Download and import file attachments box.
Once all set click on the Submit button to start importing. When the import process will complete you will get a success message.
Now, you can go to your WordPress dashboard and check to make sure all posts and content have been properly imported.
Troubleshooting
What if the import stops? – If for some reason the import process stops, you can simply start it again. The WordPress Importer will not import duplicate content.
What if media files didn’t import? – When you import content from Medium to WordPress, sometimes images and other media content fail to show up in the posts. The best way to fix this issue is a manual process.
Just go to Media > Library in the left-hand sidebar of your dashboard. Check if all the images from Medium are in your WordPress media library.
If there are any missing images, you’ll have to try and import them again. For that purpose, just go to Plugins > Add New, and search for Auto Upload Images. Once you find it, install and activate the plugin.
The plugin will automatically pull all images from a given URL or from other external sources.
Though it’s not a perfect solution, it can make the task of fixing missing media files a lot faster and easier.
Post-migration Steps
Create Redirects in WordPress
If you are using a custom domain on your Medium blog, you can set up redirects to your new site. This will ensure that people who click on links to your old Medium posts will land on the equivalent content on your WordPress site.
If you are using a medium.com domain on your old site, then you WILL NOT be able to use redirects.
In order to set up the redirects from your custom Medium domain to your new WordPress site, follow the steps below:
- Copy all of your Medium content URLs and save them in a text file.
- Install any Redirection plugin on your new WordPress site.
- Now, go to Tools > Redirection and click Add New.
- In Source URL, add your old Medium content URL.
- Under Target URL, enter the new WordPress URL.
- Choose Redirection in the Group drop-down menu.
- Click on the Add Redirect button.
Repeat the above process for all of your old Medium contents until each of them properly redirect to your new WordPress site.
Install a New WordPress Theme
So, you’ve successfully moved your site to WordPress. Now you have to set the appearance of your WordPress site. The most beauty of WordPress is that you have access to thousands of themes and a good number is free to use.
However, if you are serious about your site appearance, a paid version is most likely better because of the control and additional features.
The WordPress Theme Directory has more than 6,500 free themes to choose from, and there are countless themes available through 3rd party vendors as well, including:
- StudioPress
- Themeforest
- Colorlib
- Elegant Themes
- Themefuse
- Themezilla
When searching for themes, it’s best to find and choose a theme that goes with your industry.
Installing a theme is also a very straightforward process. If you want to install from theme directory, just go to Appearance > Themes, then click on the Add New button at the top of the page. Navigate to the theme you want and click on Install button.
If you’re using a theme from 3rd party vendor, then you’ll need to download it first to your PC and then to upload it. For uploading, again go to Appearance> Themes and click on Add New. At the top of the page, you’ll see an Upload Theme button.
Click on the button, locate the theme file on your PC and click the Install Now button.
Creating Navigation Menus
After choosing a theme, you can create a navigation menu to provide a better user experience to your users. It’s important to make it easy for your visitors to navigate your site with the well organized main menu.
To create a menu, go to Appearance > Menus. Give a name to the new menu and click Create Menu. Then, add pages, posts, categories, custom links, and other items you want to it.
When the new menu will be created you can now specify where you want to display it.
Different themes use different names for the Main Menu, like Header Menu or Top Menu.
Click on the Manage Locations tab at the top of the page. Here, you have to select your new menu from the drop-down list next to Header Menu and click Save Changes.
Once you’ve done adding your menu and choosing the proper location for it, take a look at your site and adjust it if required.
Setting up widgets
Widgets are a block of content that can be placed on your site. Different theme features widgets have different locations.
You can easily add or remove widgets by navigating to Appearance > Widgets of your WordPress dashboard.
Following are some of the list of widgets you can add to your site:
- Archives – displays a monthly archive of your contents.
- Audio – adds an audio player.
- Calendar – shows your site’s contents visually in a calendar.
- Categories – a list or drop-down of categories.
- Contact Details & Maps – displays contact details as well as map.
- Content – shows text and/or images in a flexible grid.
- Custom HTML – lets you add HTML code.
- Custom Menu – adds a custom menu.
- Image – displays an image you choose.
- Meta – shows Login, RSS and WordPress.org site links.
- Pages – displays a list of your site’s pages.
- Posts – shows your blog posts in a flexible grid.
- Recent Comments – displays recent comments on your site.
- Recent Posts – shows a list of your site’s recent posts.
- RSS – displays entries from an RSS or Atom feed.
- Search – insert a search form.
- Tag Cloud – shows your most used tags.
- Text – used to display text or HTML.
- Video – insert a video from your media library or a video hosting site such as YouTube.
Install Some must-have Plugins
WordPress allows you to install a lot of useful plugins on your site. These plugins can offer more features, better control and/or make your tasks a lot easier. In fact, the WordPress plugins directory has compiled a list of more than 55,000 plugins that are free to use, and this list keeps growing.
There are plenty of plugins that you can use. Here’s a list of the best WordPress plugins
Before installing and activating any plugin, you should check when it was last updated and read some reviews about it.
Optimizing permalinks
When you build your new WordPress site, you have to make sure that you’re using best practices. This includes optimized URL structure.
In most of the cases, the Post name structure will work well for your site. Learn how to implement the best permalink structure in WordPress
- Head over to Permalink Settings
- Choose Post name
- Click Save Changes
Finding and Repairing Broken Internal Links
After migrating your site, you should check all of your internal links whether all are working well or not. It includes both posts and media. If you are using a different permalink structure and the location of your images has changed on your new WordPress site then you will have some broken links within your content.
Make sure that you go through all your posts and update any links that need to be fixed. If you have a lot of posts and don’t want to go through everything manually, you can use the Broken Link Checker plugin.
Important: Once you fix all of your broken links, you should deactivate and delete the Broken Link Checker plugin. It uses a good amount of server resources that will hamper your site performance.
Making Sure that Your Site Works Properly
After you’ve moved all your content and posts over, you should check out the following items to make sure everything works as it should:
- Navigation menu
- All plugins
- Internal and external links
- Links to media items
Final Words
Migrating your site from Medium to self-hosted WordPress may seem like a complicated task, but it doesn’t have to be. During migration you may face some problem.
Here we’ve point out some major ones and also tried to give their solution.
What if the import stops? – If for some reason the import process stops, you can simply start it again. The WordPress Importer will not import duplicate content.
What if media files didn’t import? – When you import content from Medium to WordPress, sometimes images and other media content fail to show up in the posts. The best way to fix this issue is a manual process.
Just go to Media > Library in the left-hand sidebar of your dashboard. Check if all the images from Medium are in your WordPress media library.
If there are any missing images, you’ll have to try and import them again. For that purpose, just go to Plugins > Add New, and search for Auto Upload Images. Once you find it, install and activate the plugin.
The plugin will automatically pull all images from a given URL or from other external sources.
Though it’s not a perfect solution, it can make the task of fixing missing media files a lot faster and easier.
Hope this tutorial will help you to migrate your site from medium to WordPress safely. If you need help during the migration process or have any suggestions to improve this guide, please feel free to put a comment in the leave a reply box below.
Disclosure: WP Hive earns a commission when you buy through partner links. It does not influence the unbiased opinions of our writers. Learn more →
Share:
https://wphive.com/tutorials/how-to-migrate-from-medium-to-wordpress/
Saif Hassan
Product Manager by passion & profession. Lead Product Manager at weDevs, former PM @ Poptin. Passionate about writing & tech. He's an advocate of Human-Centered Design and believes that websites and the tools used to build them should be well crafted, intuitive, and accessible. Cyclist. Reader. A WordPress ninja 🥷, HCI expert & a design thinker 💡

