How to Test Plugins in Staging Before Adding them to your Live Site?

Ever considered adding a new plugin to your WordPress site but worried it might disrupt your carefully built masterpiece? This is where WordPress staging comes in. It’s a separate testing environment, a safe space to play with plugins before they touch your live site.
In this post, we’ll explore the world of plugin testing in staging and guide you through the process using two methods: creating a fresh staging site with a pre-installed plugin and cloning your live site. So, get ready to unleash the power of plugins with peace of mind!
Plugin Testing in WordPress Staging: Why?
A WordPress staging, also called a pre-production or staging environment, is a server environment that’s nearly identical to a production environment but used to test software before it’s deployed to production.
Staging is a crucial step to ensure a smooth website experience. It lets you test plugins thoroughly before they’re added to your live site, preventing issues that could impact your visitors. This way, you can be confident that your website functions flawlessly.
Here’s why testing plugins in staging is an absolute must:
- Prevent Website Disasters: New plugins can sometimes have unforeseen consequences. Staging allows you to identify and fix any issues before they impact your visitors. This saves you the hassle of troubleshooting a broken live site and potential lost traffic.
- Compatibility Confidence: Will the new plugin fit in with your current theme and other plugins? Staging lets you test for compatibility. Imagine the frustration of installing a plugin that changes your layout only to discover it conflicts with your contact form. Staging helps you avoid these compatibility headaches.
- Features You Can Trust: New plugins often come with a long list of features. But do they actually work well? Staging allows you to thoroughly test each feature and ensure it delivers the promised functionality before it goes live on your site.
- A Smooth User Experience for All: A website with broken features or a clunky interface is a way to lose visitors. Testing plugins in staging helps guarantee a smooth user experience by ensuring everything works flawlessly before it hits the live site.
Guide to Plugin Testing in Staging

New plugins can sometimes introduce bugs, compatibility issues, or even break existing features. This can lead to a frustrating experience for both you and your visitors.
With staging, you can test functionality, compatibility, and performance without any risk. InstaWP offers various solutions to help you create a staging environment quickly and easily.
Step 1: Create a Fresh Staging Instance with InstaWP
Before you can test a plugin, you need a clean environment where you can isolate variables and monitor the plugin’s behavior. InstaWP excels in providing an easy and quick setup for staging WordPress sites. Here’s how to start:
- Visit InstaWP: Go to the InstaWP website and sign in to your account. If you do not have an account yet, create one here.
- Create a New Instance: Choose to create a new staging instance. You can select a specific WordPress version if your testing needs require it.
- Configuration: Configure your instance with the necessary PHP version, database settings, and any other relevant environment settings.
- Launch: Once configured, launch the staging site. It will be ready within seconds, providing a perfect sandbox for testing.
Step 2: Install Your Plugin
Now that you have your staging in WordPress ready, it’s time to install the plugin you want to test.
- Plugin Installation: Navigate to the WordPress admin dashboard of your staging site on InstaWP.
- Add New Plugin: Go to ‘Plugins’ > ‘Add New’. Search for your required plugin and install it.
- Activate Plugin: After installation, activate the plugin to start using it on your staging site.
Step 3: Testing the Plugin
Now comes the exciting part – putting the plugin through its paces while staging in WordPress! Here are some key areas to focus on:
- Functionality Testing: Does the plugin actually deliver what it promises? Test all the features thoroughly and ensure they work as advertised.
- Compatibility Testing: Will the new plugin play nicely with your existing theme and other plugins? Use the staging environment to identify any compatibility issues. Look for visual glitches, conflicts with existing features, or unexpected behavior.
- Performance Testing: Can the plugin impact your website’s loading speed? Run some performance tests on your staging site before deploying the plugin to your live site. This will help you identify any potential performance bottlenecks caused by the plugin.
Is this too much work for you? Well, WP Hive is here to help you out with its automated testing feature!
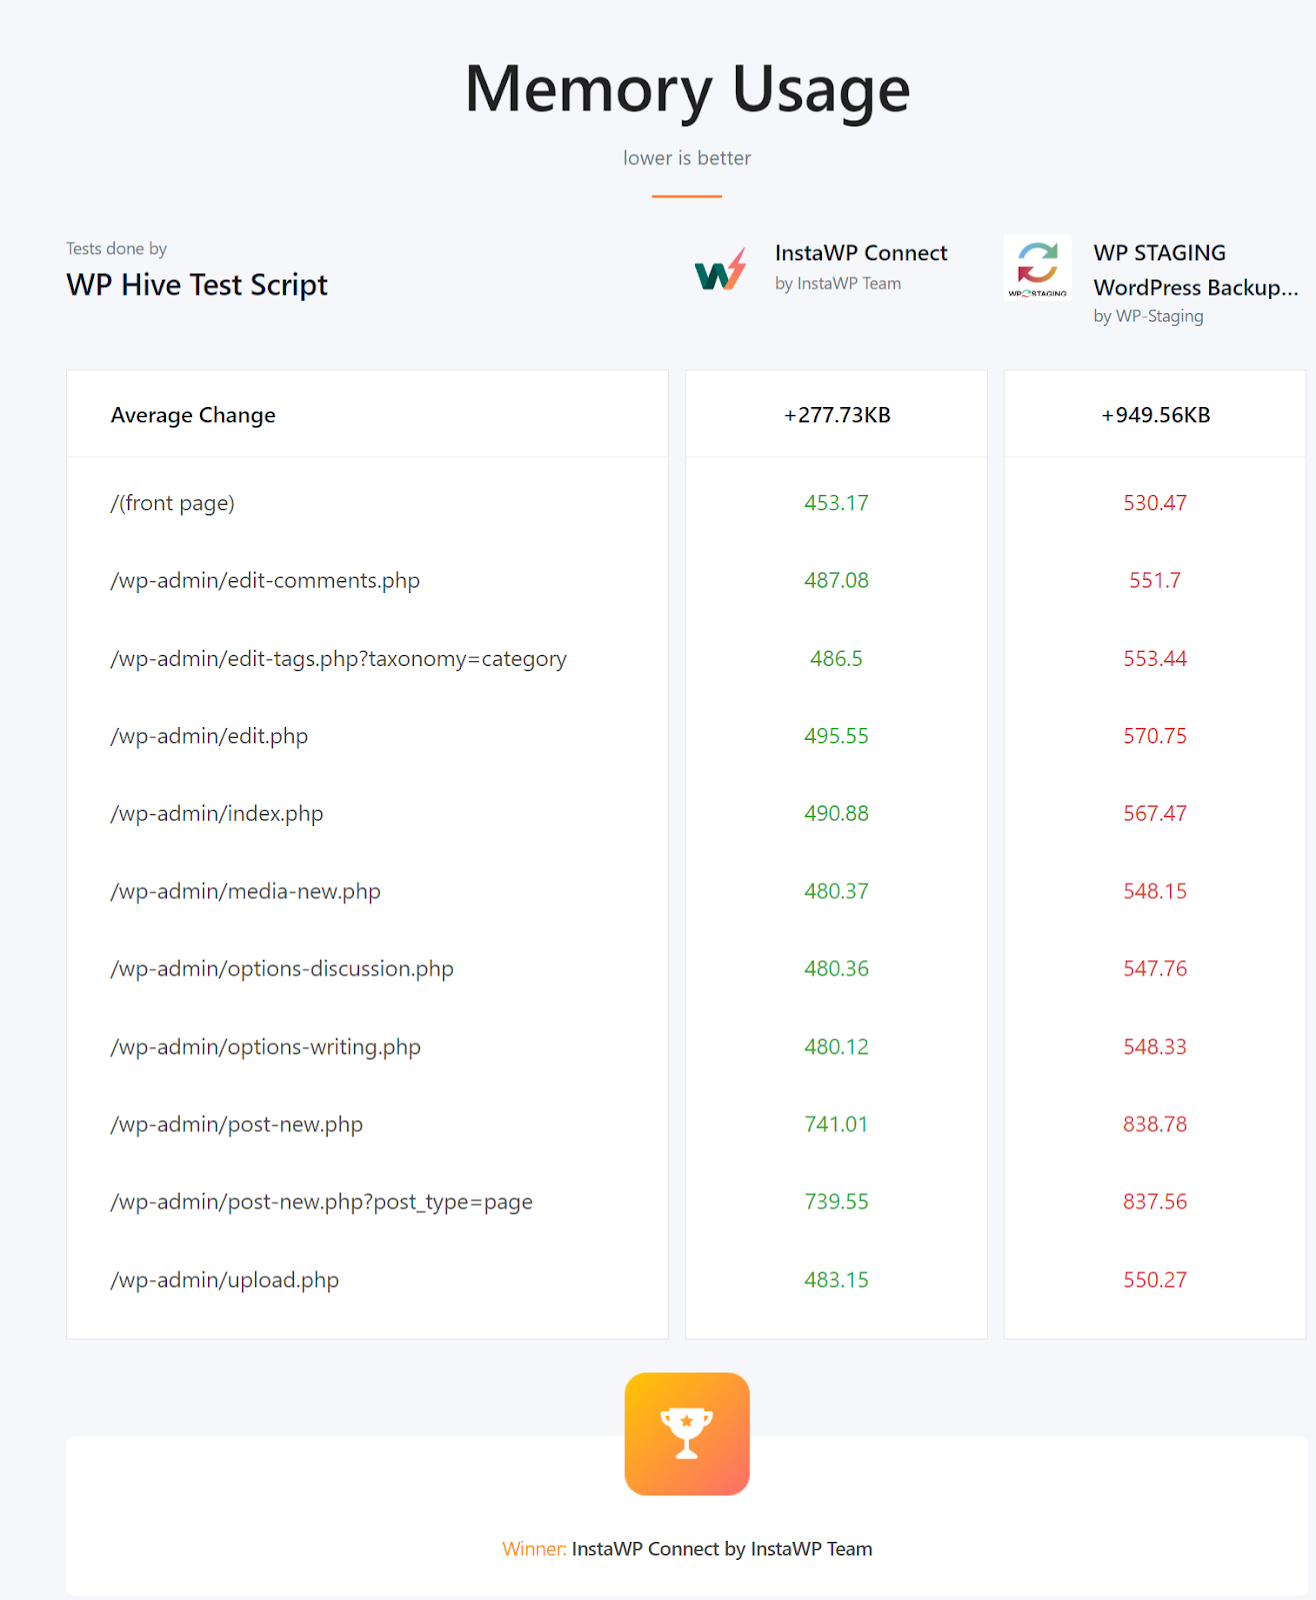
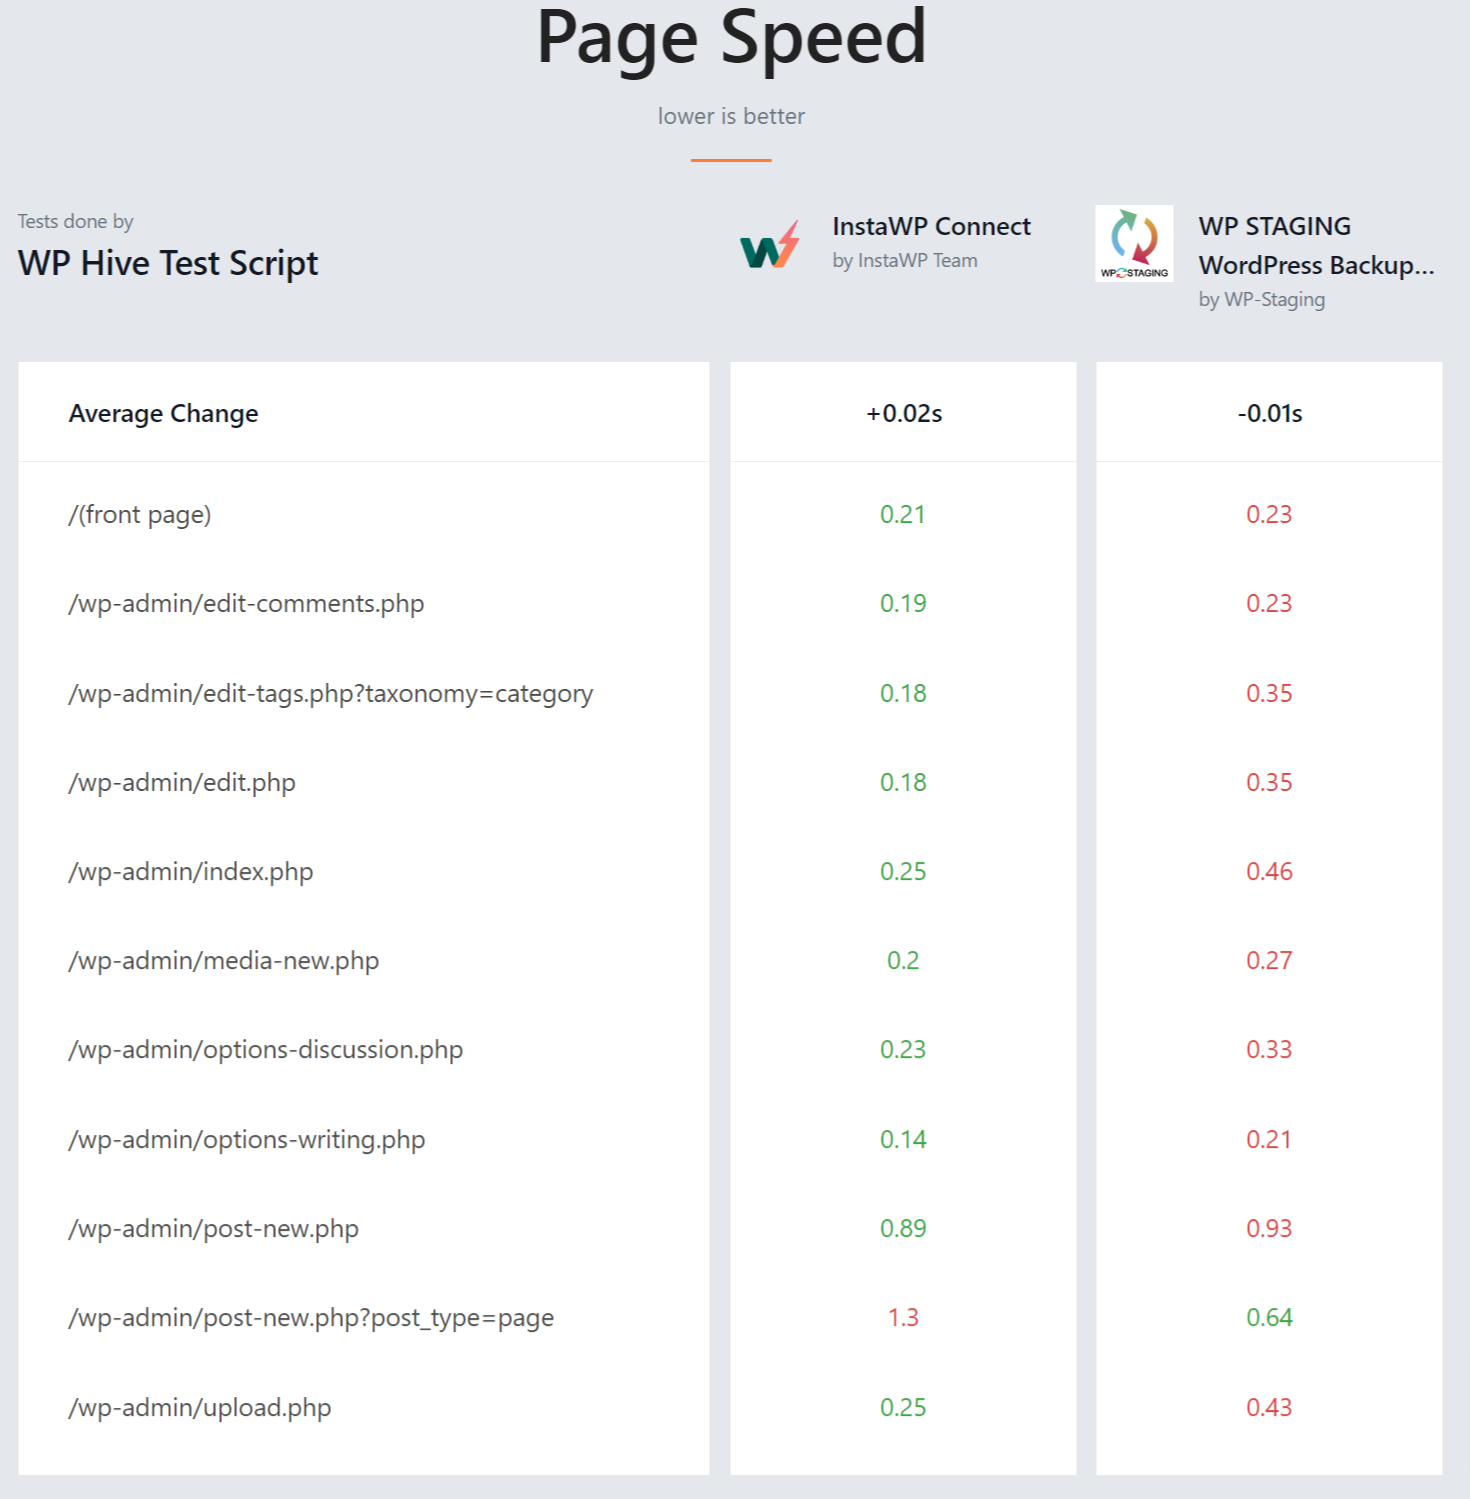
WP Hive’s Plugin Testing tool automatically tests WordPress plugins and provides insights into their performance. WP Hive tests each plugin blindly, activating it on a separate server to gather data such as PHP version compatibility, PHP errors, JavaScript errors, Database footprint, Memory usage, Page speed, and Activations issues.
We tested the InstaWP Connect Plugin, and here are the results:
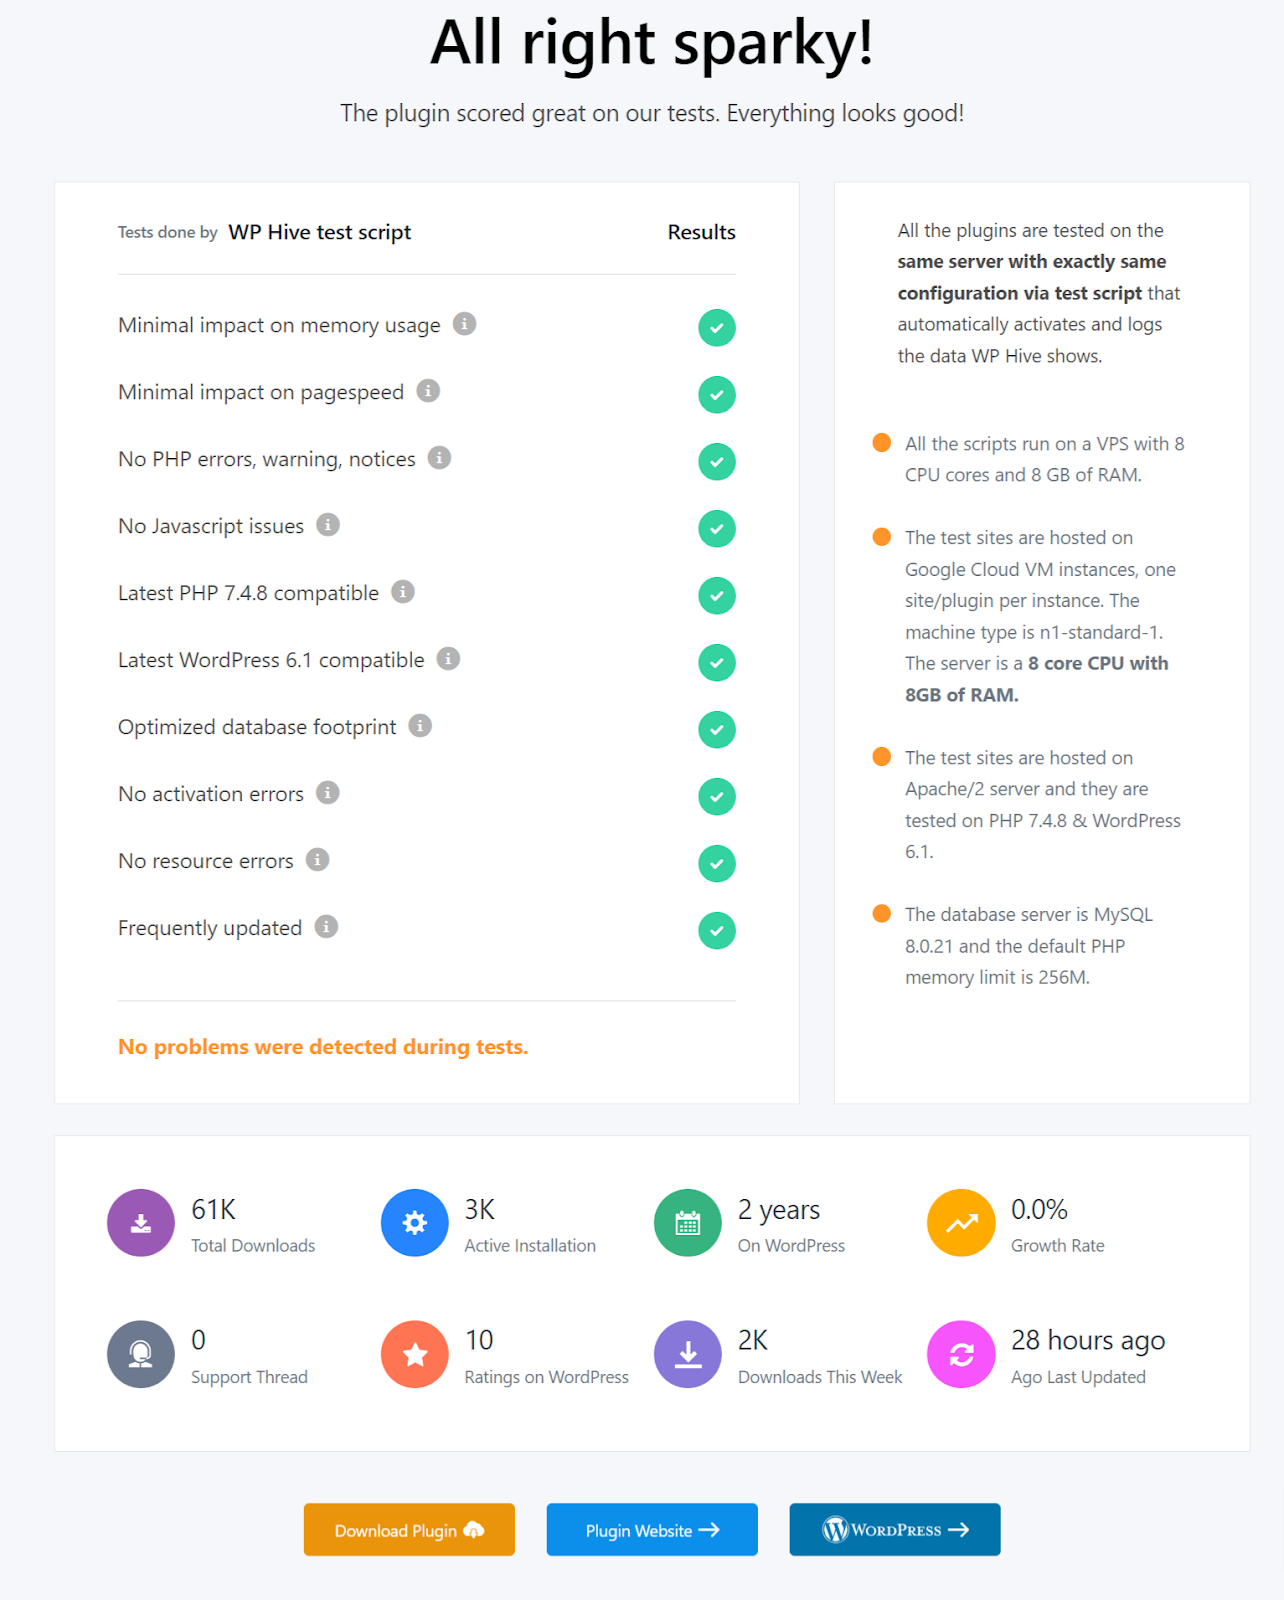
Review the information provided by WP Hive to understand how the plugin behaves under different conditions.
Step 4: Implement Feedback
Based on the test results, implement any necessary changes in the plugin code:
- Adjustments: If the plugin shows high memory usage or conflicts with certain WordPress versions, return to your staging site to make adjustments.
- Retest: After making changes, you can retest the plugin by updating the instance on InstaWP and reviewing the new results on WP Hive.
- Iteration: Repeat this process until the plugin performs optimally across all parameters.
How to Clone Your Live Site in Staging and Test a Plugin with It
Cloning your live WordPress site to a staging environment is a critical step for safely testing plugins without risking the performance or functionality of your live site. This process involves creating an exact replica of your live site where you can implement and test changes without any impact on your actual users.
Step 1: Clone Your Live Site to Staging with InstaWP
Begin by installing the InstaWP Connect plugin on your live WordPress site. This plugin is available directly from the WordPress plugin repository, ensuring ease of access and installation.
- After activating the plugin, locate the InstaWP Connect plugin in your WordPress dashboard.
- Use the “Create Staging” option provided by the InstaWP Connect plugin.
- Click “Connect” to visit the InstaWP login page. Sign in to your existing account or create one to access InstaWP.
- Confirm the request to link your live WordPress website to the InstaWP dashboard after creating the account.
- Go to Staging on the InstaWP dashboard.
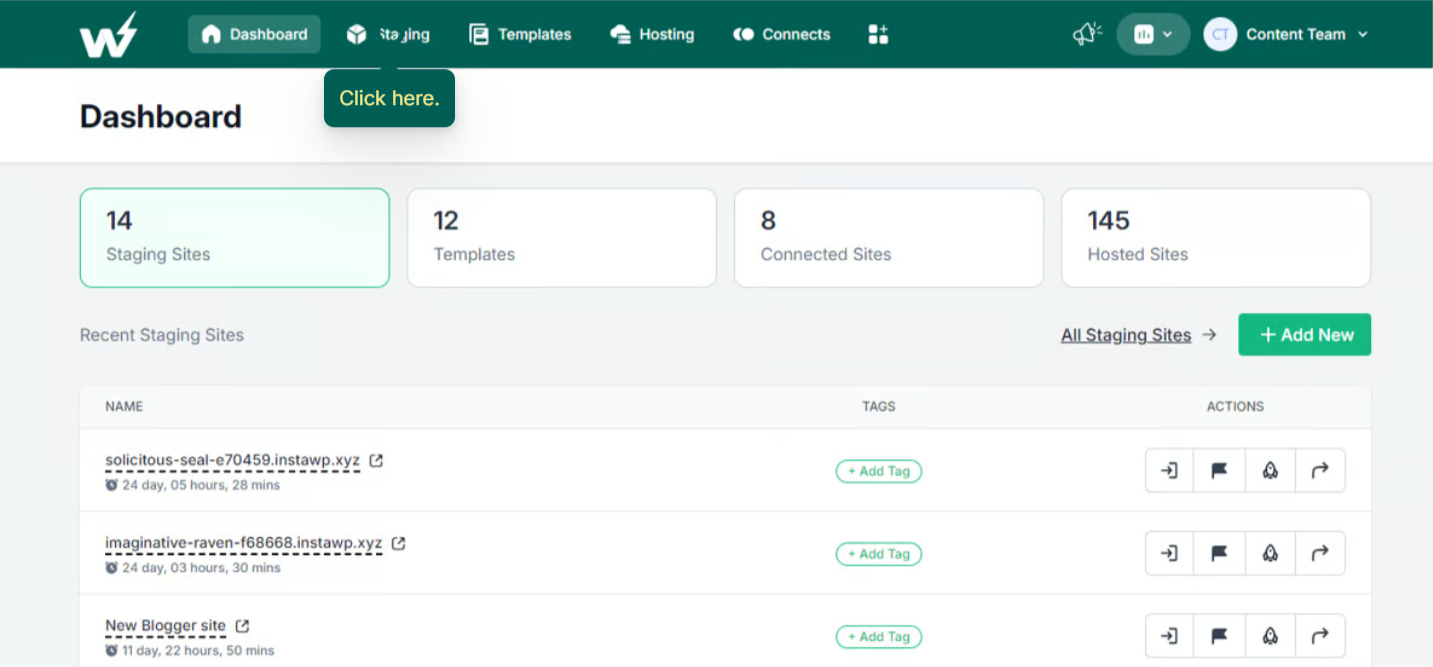
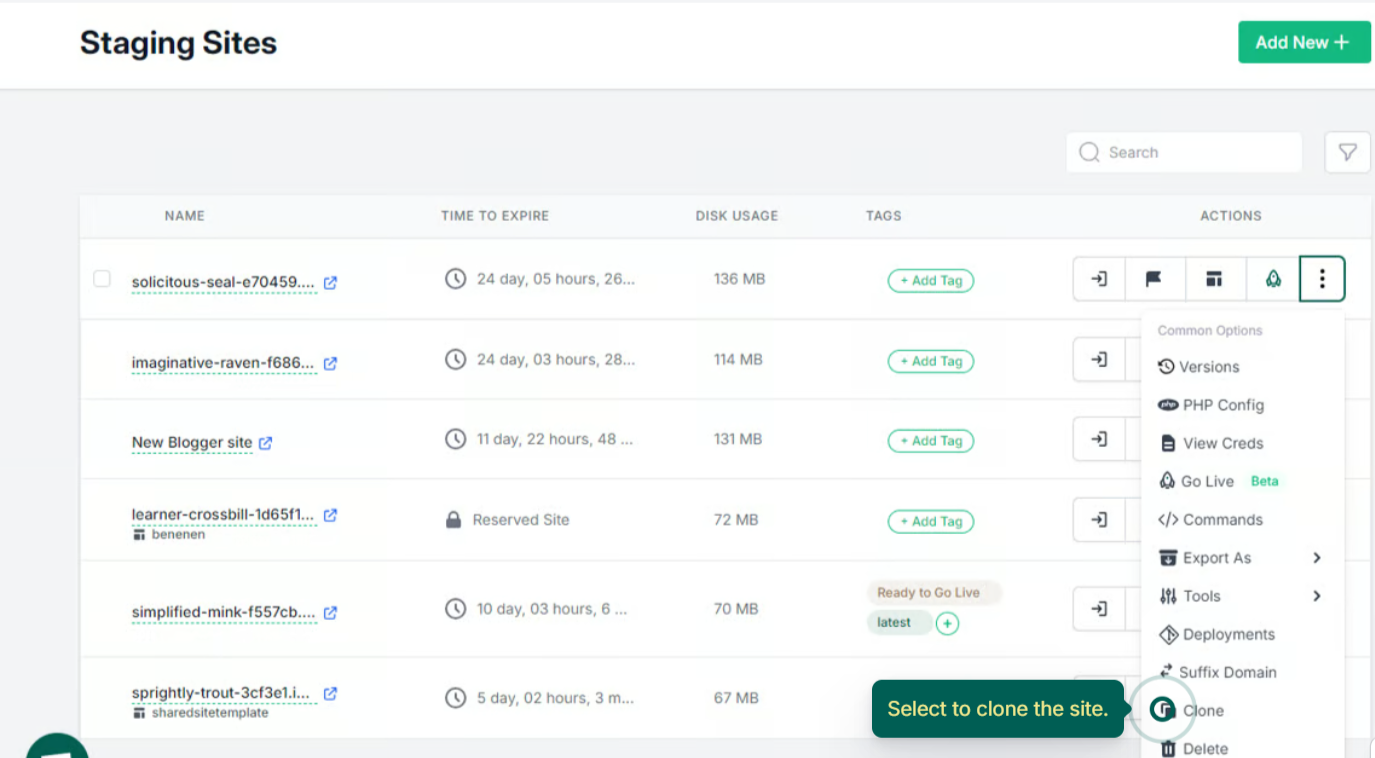
- Go to Action’s ellipsis to expand the menu, and click on clone.
- Enter the site name or let it generate automatically.
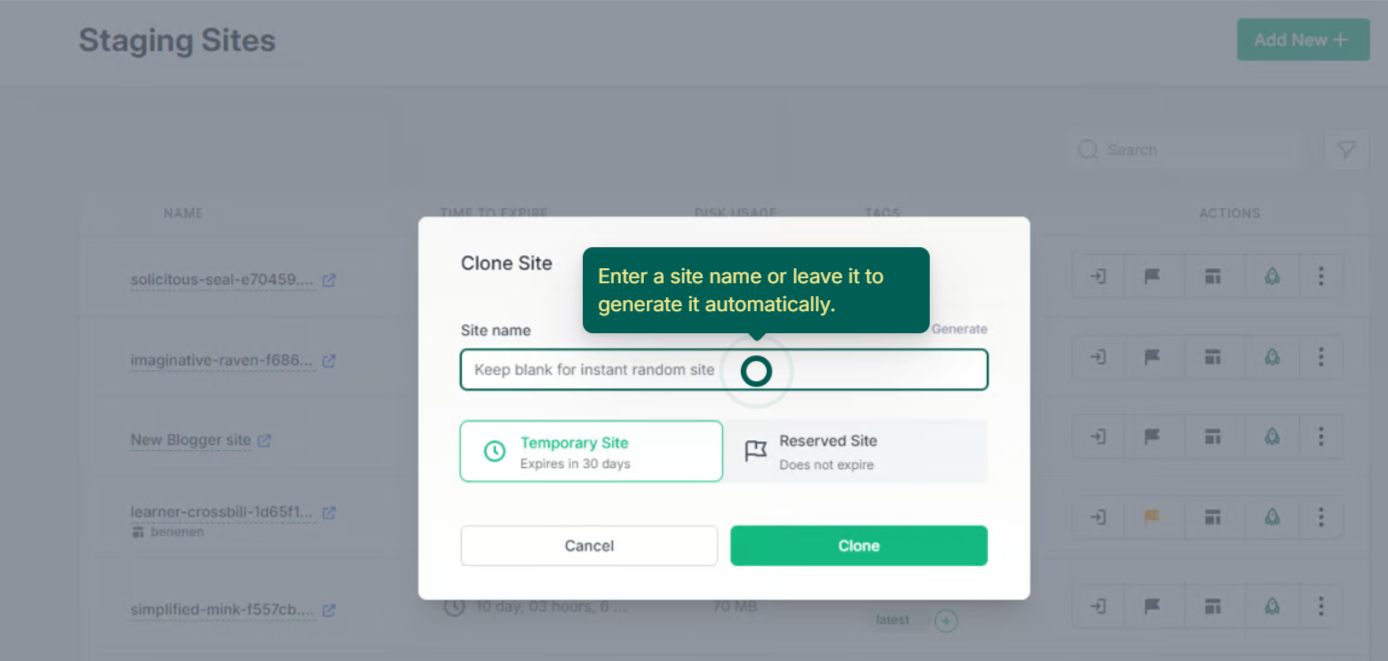
- Mark it reserve if you want, or else click directly on Clone.
- This will create a new site with the same login credentials as the live connected site.
Step 2: Install and Activate the Plugin
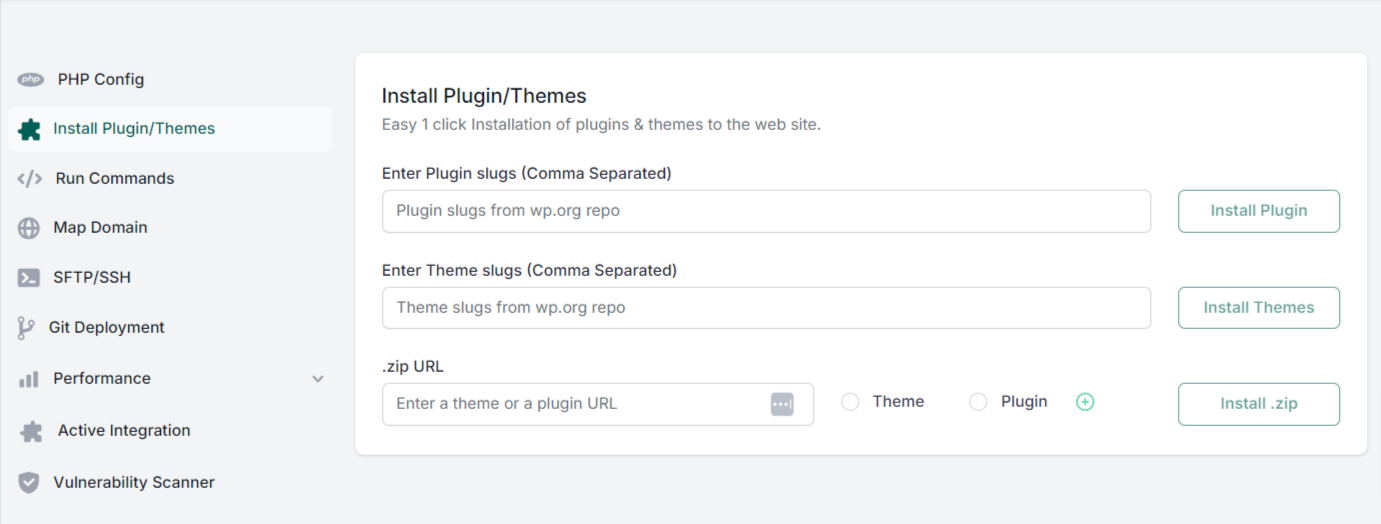
- Plugin Installation: Navigate to Your Staging Dashboard
- Install the Plugin: Go to ‘Install Plugin/Themes’. Enter the plugin slug.
Step 3: Testing the Plugin
- Functional Testing: Check all the features of the plugin to ensure they work as expected. This includes testing any shortcodes, widgets, or settings that come with the plugin.
- Compatibility Testing: Verify that the plugin is compatible with other plugins and themes currently active on your site. Look for any visual irregularities, performance issues, or errors in your site’s error logs.
- Performance Assessment: Monitor the plugin’s impact on your site’s performance. Tools like Google PageSpeed Insights can help you see if the plugin slows down your site.
Step 4: Review and Iterate
- Review Changes: After thorough testing, review any changes the plugin made to the site’s functionality or design. Check if there are any unexpected outcomes.
- Solve Issues: If you encounter issues, you may need to tweak the plugin settings or consult with the plugin’s support team for solutions.
- Test Again: Once adjustments are made, repeat the testing process to ensure all problems are resolved and the plugin functions perfectly.
Step 5: Push to Live
- Final Testing: Conduct a final round of testing to confirm everything works as expected.
- Go Live: If the plugin passes all tests, you can safely deploy it to your live site. This might involve manually installing the plugin on your live site or using a tool to push changes from staging to live.
Comparing Plugins and Choosing the Best Ones
When exploring various plugins within a specific category for your WordPress site, it’s crucial to conduct thorough comparisons to ensure you select the best fit.
But with so many options in each category, choosing the right one can feel overwhelming. Here’s why taking the time to test and compare plugins is crucial:
- Beyond the Feature List: Don’t be fooled by a plugin’s fancy features. Testing allows you to see how those features actually perform in practice. Does the plugin deliver a smooth user experience? Is it intuitive and easy to configure? Testing helps you identify hidden gems or features that might not be readily apparent from just reading the description.
- Compatibility Counts: Plugins don’t exist in a vacuum. They need to play nicely with your existing theme and other plugins. Testing in a staging environment (like the ones offered by InstaWP) allows you to identify any potential compatibility issues before they wreak havoc on your live site. Imagine the frustration of installing a new plugin only to discover it clashes with your contact form, breaking a crucial functionality. Testing prevents these headaches.
- Performance is King: A slow-loading website is a surefire way to lose visitors. Testing plugins help you gauge their impact on your website’s performance. Does the plugin introduce any noticeable lag or slowdowns? Identifying these issues early on allows you to choose a plugin that won’t compromise your site’s speed.
- Real-World User Reviews: While features and descriptions are important, there’s no substitute for real-world user feedback. Tools like WP Hive offer valuable insights through user reviews and ratings. These reviews can reveal potential bugs and compatibility issues or highlight areas where a plugin might fall short in terms of user experience.
You can also save your time by using WP Hive’s Plugin comparison feature. You can simply compare two plugins side by side and resolve all your confusion in seconds!
The comparison is based on various factors like memory usage, page speed, PHP errors, HTTP errors, compatibility issues, and other such criteria.
Adding the Best Plugins to Your Templates
Adding well-tested plugins to your InstaWP templates can significantly enhance the efficiency and consistency of your WordPress development workflow. Here’s how you can strategically incorporate these plugins into their templates:
- Selecting Well-Tested Plugins: After thorough testing, which includes assessing performance, compatibility, and user experience, select plugins that have proven their value. These should be plugins that not only meet the functional requirements but also maintain or improve the site’s performance and user experience.
- Creating Diverse Templates: InstaWP allows developers to create multiple templates tailored for different types of projects or client needs. Each template can include a specific set of plugins optimized for its particular use case, ensuring that you have a ready-to-go setup that can be quickly deployed.
- Utilizing Templates for Consistency: By using templates with pre-selected plugins, developers can ensure a consistent baseline across all projects. This consistency is crucial not only for maintaining quality but also for simplifying maintenance and updates across multiple sites.
- Ease of Deployment: InstaWP templates make the process of deploying new sites incredibly fast and efficient. Once a template is set up with the chosen plugins, creating a new site is as simple as cloning the template. This feature is particularly valuable in a fast-paced development environment where time and consistency are key.
- Customization and Flexibility: While templates provide a standardized starting point, they are also fully customizable. This flexibility allows developers to modify or add additional plugins based on specific project requirements or client requests, making templates a versatile tool in the development arsenal.
By integrating well-chosen plugins into InstaWP templates, you can streamline the workflows, reduce setup times for new projects, and ensure high standards of quality and performance for all their WordPress sites. This strategy not only saves time but also enhances the reliability and functionality of the sites developers create.
Bonus Tool: Test Your Plugins on WordPress Playground
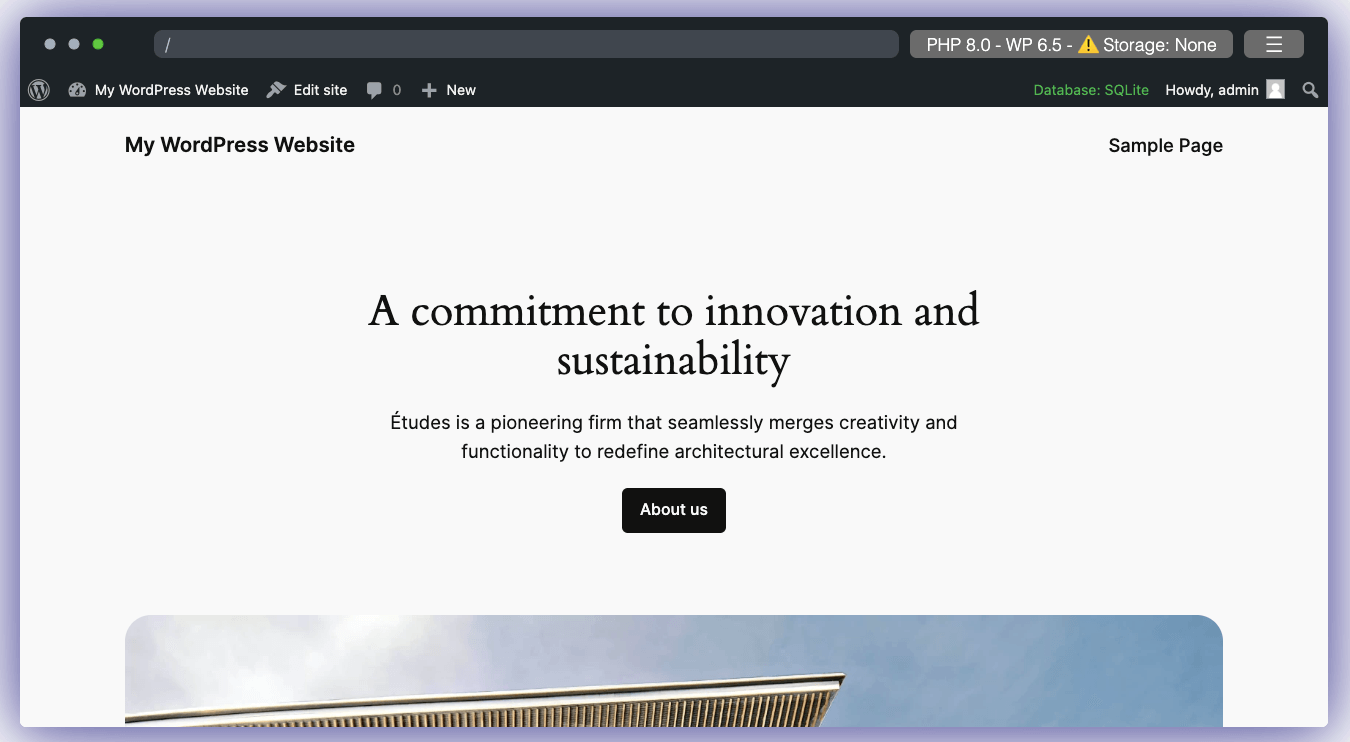
WordPress Playground can be a useful tool for initial plugin testing, although it has limitations. Since WordPress Playground is a web-based environment, you don’t need to set up a separate staging site or install any additional plugins. You can access it directly from your browser.
- Quick Testing: It’s ideal for quickly testing basic functionalities of a plugin to see if it works as advertised. This can help you shortlist plugins before investing time in more thorough testing on a staging site.
- Isolation: Like a staging site, WordPress Playground provides a safe environment to experiment with plugins without affecting your live site.
WordPress Playground is a handy tool for initial plugin exploration, but it shouldn’t replace a full staging environment for thorough testing before deploying plugins to your live website.
Final Note
Effective plugin testing in WordPress staging is essential for maintaining a robust, efficient, and user-friendly website. By methodically testing plugins, comparing multiple options, and integrating successful plugins into your templates, you can enhance your site’s functionality and user experience while minimizing risks.
With tools like InstaWP and WP Hive, WordPress developers have everything they need to optimize their sites and workflow, ensuring that each plugin addition is a step towards a more powerful and reliable website.
Disclosure: WP Hive earns a commission when you buy through partner links. It does not influence the unbiased opinions of our writers. Learn more →
Share:
https://wphive.com/wordpress/how-to-test-plugins-in-staging/
Editorial Staff
Editorials from WP Hive staff.


Add your first comment to this post