If you’re already using Gravity Forms, you’re sitting on a goldmine of data. But what good is that data if it stays locked in the backend?
That’s where GravityView steps in. It turns boring form entries into dynamic, searchable, front-end displays. Think job boards, member directories, project trackers, real estate listings – you name it.
The best part? You don’t need to write a single line of code.
If you’ve ever wanted to build a web app on WordPress without touching PHP or hiring a developer, GravityView is probably what you’ve been looking for. Is it perfect? Not quite. But it’s powerful, flexible, and built for people who want more than just pretty forms.
In this GravityView review, I’ll show you what it can really do, how it stacks up in real-world use cases, and whether it’s worth your money.
Quick Navigation
What Is GravityView?
You know Gravity Forms. It’s that rock-solid form builder everyone trusts for collecting data on WordPress. But once the entries roll in, then what?
Normally, you’d have to copy and paste the info somewhere or hand it off to a developer to build a front-end interface.

GravityView changes that. It lets you take your Gravity Forms data and display it right on your website in a way that actually makes sense to your users. Instead of showing raw, messy entries, you can:
- Build tables, lists, and layouts using your form data.
- Let users search, filter, and view information.
- Even allow people to edit or delete their own submissions.
For example, you can create a job board, a staff directory, a list of student grades, or a product catalog – automatically powered by the info users submit through your form.
It’s like giving your Gravity Forms a superpower. You’re not just collecting data, you’re building mini web applications out of it. No hacks. No shortcuts. Just drag, drop, and done.
Also read: 5 Best Contact Form Plugins for WordPress
Real-Life Use Cases of GravityView (With Examples)
You’re probably wondering, “Okay, cool tool… but what can I actually build with it?” Glad you asked.
GravityView isn’t just for showing off form entries. It’s a quiet workhorse that powers full-on web apps, internal dashboards, and public directories. Here’s what people are using it for right now:
- Job Boards: List openings, let employers submit listings via a form, and manage everything from the WordPress dashboard.
- Member Directories: Let users register via Gravity Forms and display their profiles in searchable grids or lists.
- Real Estate Listings: Property submission form on the backend, dynamic listings with filters and maps on the frontend.
- Event Management: Collect RSVPs, speaker applications, or volunteer sign-ups and display them in calendar or table format.
- Application Trackers: Think scholarships, grants, contests display statuses, allow edits, and keep everything organized.
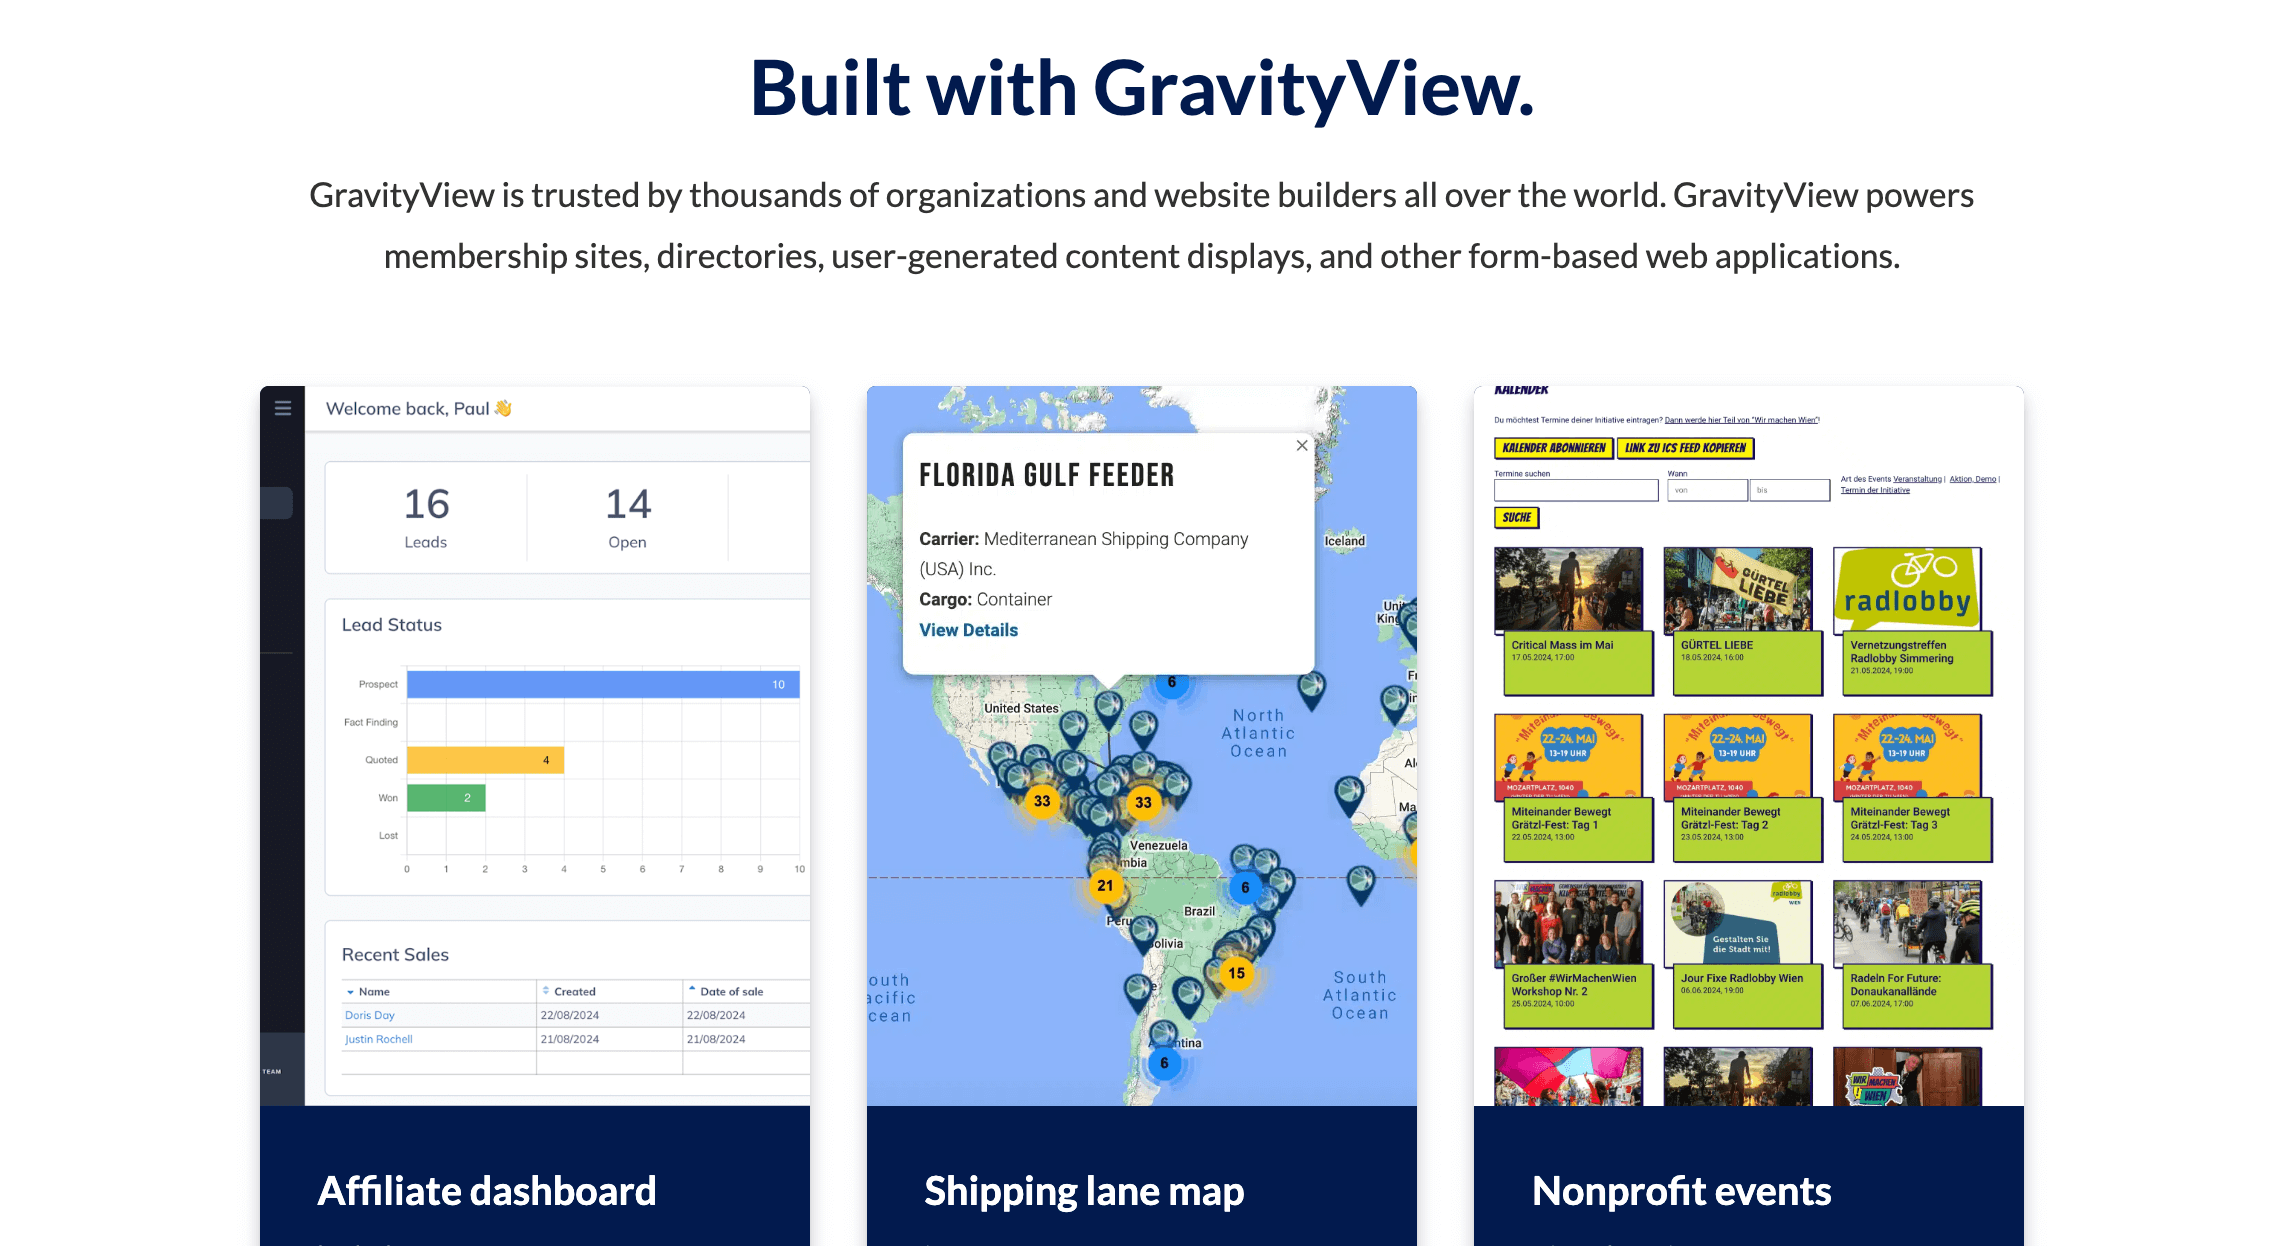
And that’s just scratching the surface. If you can collect it with a form, you can show it with GravityView.
Want inspiration? Check out their Build It library: gravitykit.com/build-it
Hands-On With GravityView: Features That Stand Out
Let’s talk about what GravityView can do. Once you start using it, you’ll notice it’s packed with helpful features. Here’s what really makes it work:
1. Drag-and-Drop View Builder
No code. No stress. Just drag fields from your form into place choose what shows up and where. Layouts update as you build.
2. Flexible Layout Options
Go classic with a table, get visual with a list, or go DIY with a grid layout builder that lets you control rows and columns like a pro.
3. Custom Search & Filtering
Drop in a search bar with filters for any field name, category, date, status you name it. Your users find what they need without hassle.
4. Entry Approval System
Don’t want every form submission going live instantly? No problem. Approve entries manually or set up conditional logic to auto-approve.
5. Data Exports
Need a quick CSV or Excel dump of your entries? One click. Done.
6. Frontend Editing
Let users edit their own entries from the front end no backend access needed. Super useful for account dashboards or applications.
7. Maps, Calendars, & More (Pro)
Display entries on a map, inside an interactive calendar, or with DataTables that support sorting and pagination. You unlock this goodness with GravityView Pro.
Exploring GravityView Advanced Features: Is It Worth Upgrading?
Alright, let’s talk upgrades. The basic version of GravityView is solid, but the Pro version? That’s where it really starts flexing. Here’s what you unlock when you go Pro:
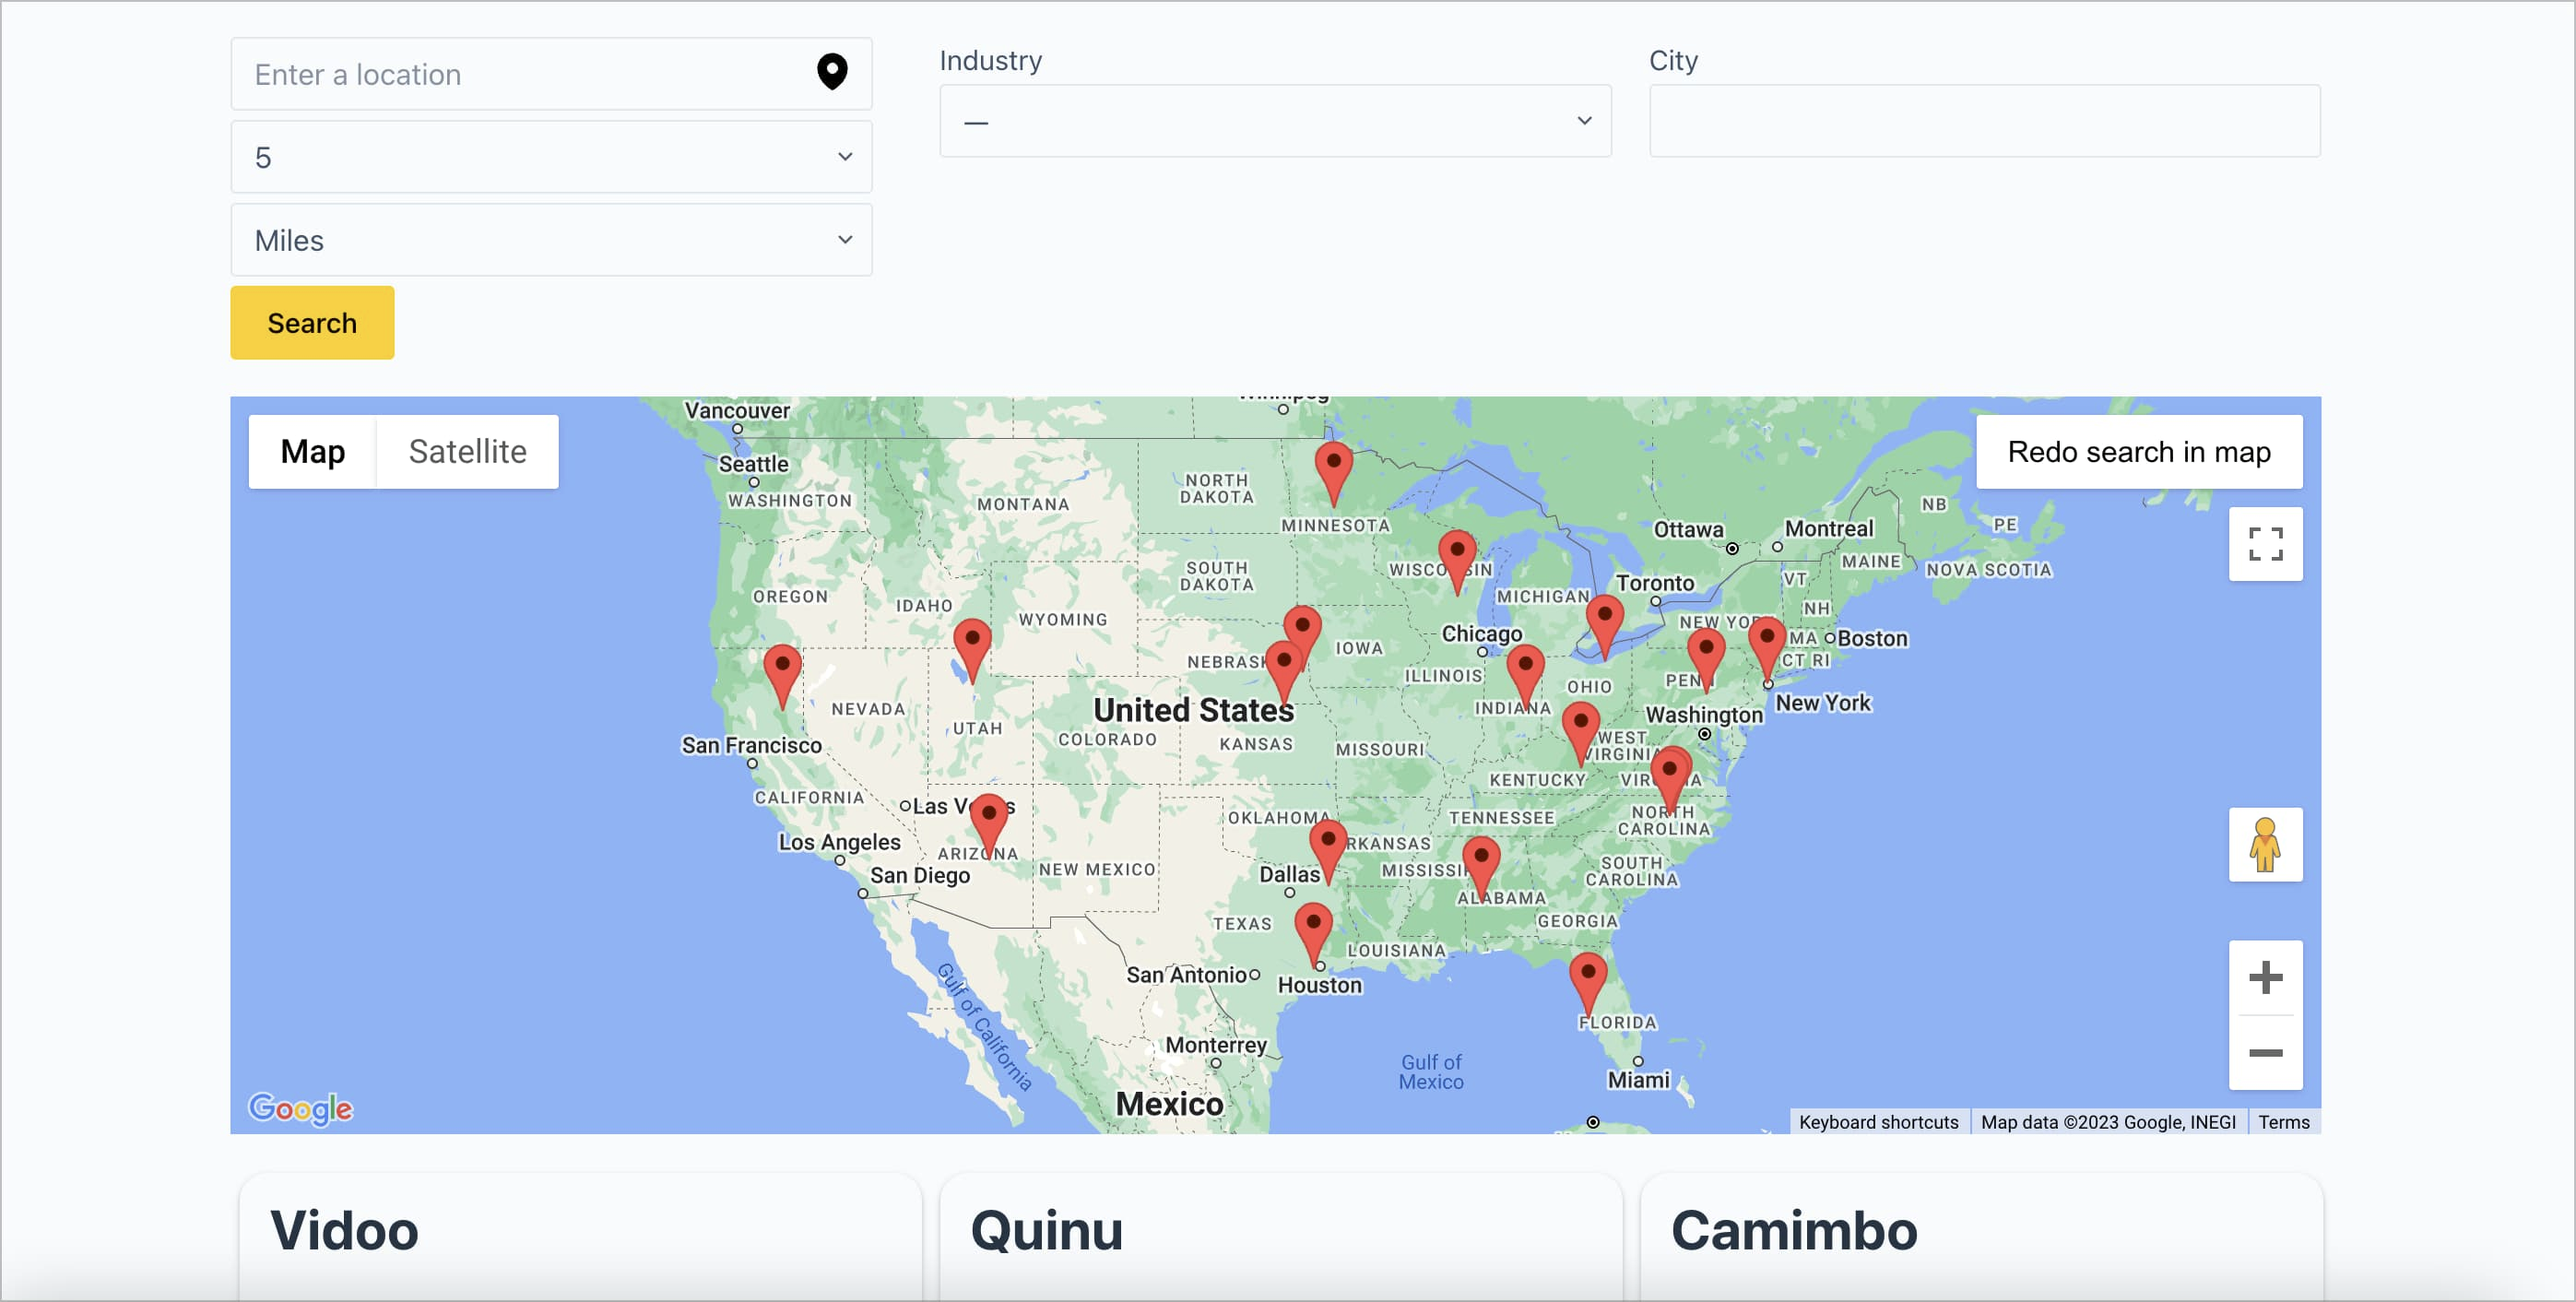
Map View: Got locations in your entries? Drop a Google Map on your site and show entries as clickable pins. Perfect for directories, real estate, or local business listings.
Calendar View: Display entries based on dates. Great for events, bookings, content schedules you name it. Everything’s sorted by day, week, or month.
DataTables Integration: You get all the bells and whistles: pagination, sorting, column filtering, and responsive layouts. Works great for large datasets or anything table-heavy.
Inline Editing: Need to make a quick update to an entry? Just click and edit no need to dig through the backend.
Advanced Filtering: Want to filter entries by multiple conditions? GravityView Pro lets you build smart views that update based on user input or custom logic.
Bonus Extensions: From A-Z sorting widgets to entry revision tracking, GravityView Pro includes a growing set of add-ons that make everything more dynamic and polished.
So, is it worth it?
If you’re running a content-heavy site, managing user submissions, or building anything interactive yep, 100%. Pro gives you the controls, tools, and visuals to make it all feel like a custom-built app.
How to Show Gravity Forms Entries on Your Website Using GravityView
If you’ve been collecting data with Gravity Forms, you might be wondering: How do I show this information on my website? By default, only admins can see form entries in the WordPress dashboard. GravityView lets you display form entries on your site so visitors can see them, like a list of job openings, testimonials, product reviews, or member directories, and more. Here’s how to do it step by step.
Step 1: Create a New View
Go to your WordPress dashboard. Find GravityKit in the left-hand menu. Click New View.
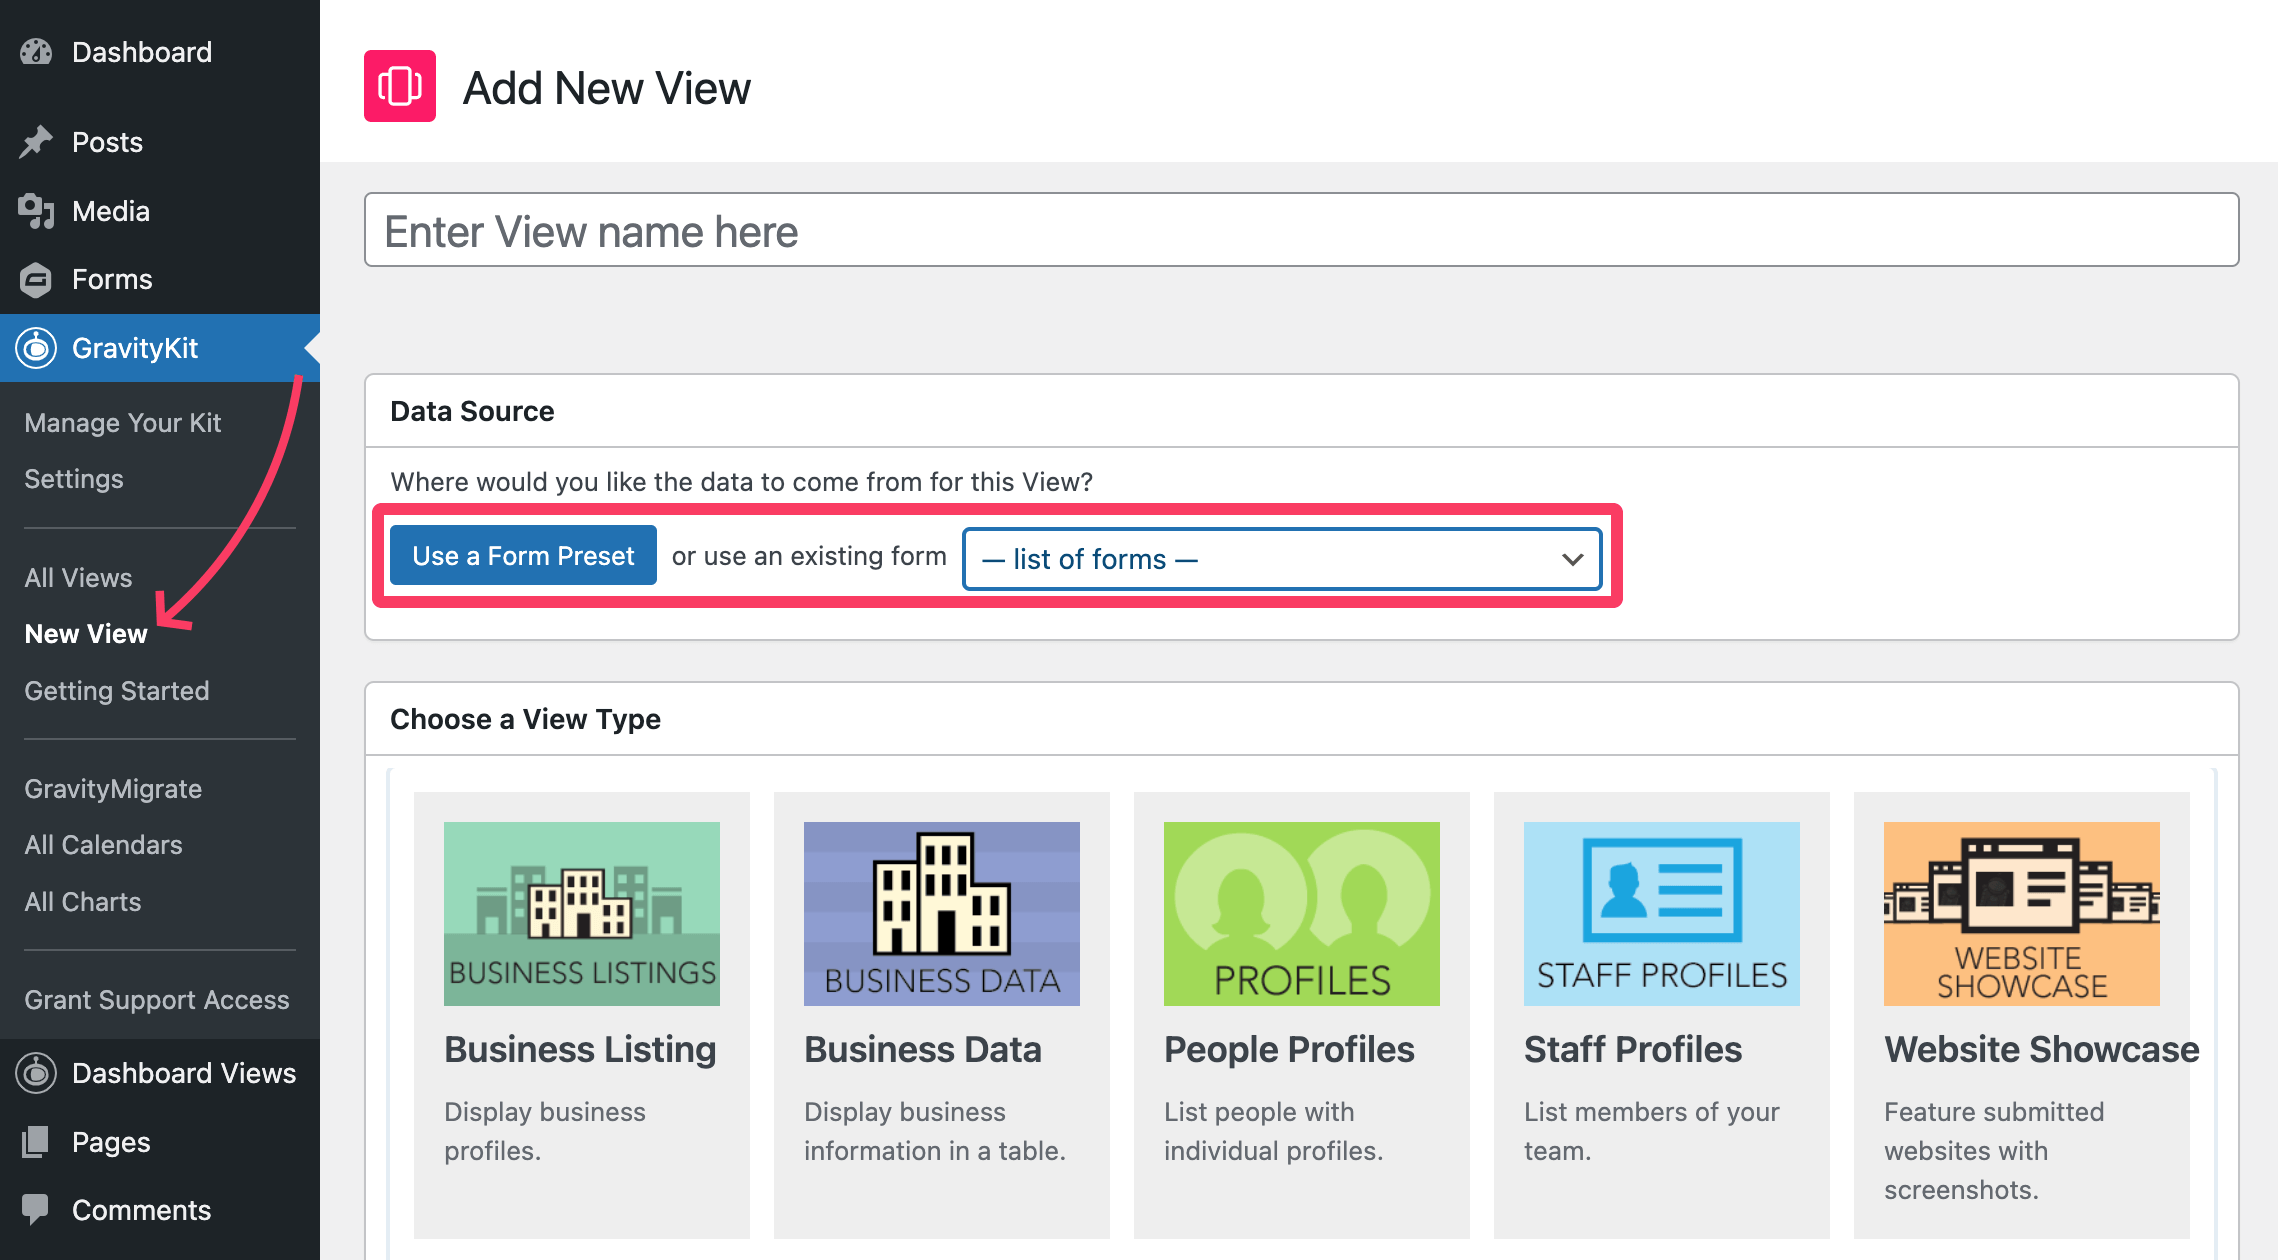
You’ll see two options:
- Use a Form Preset – This helps you create a new form with a ready-made layout.
- Select an Existing Form – If you already have a form collecting entries, pick it from the dropdown list.
Step 2: Choose a View Type
GravityView gives you two main layout styles:
- Table View: Shows data in a simple table, ike a spreadsheet with rows and columns.
- Listing View: Shows data in a more visual style, good for things like staff profiles or product listings.
- Layout Builder (included with GravityView license): Add rows and columns, move elements around with drag and drop.
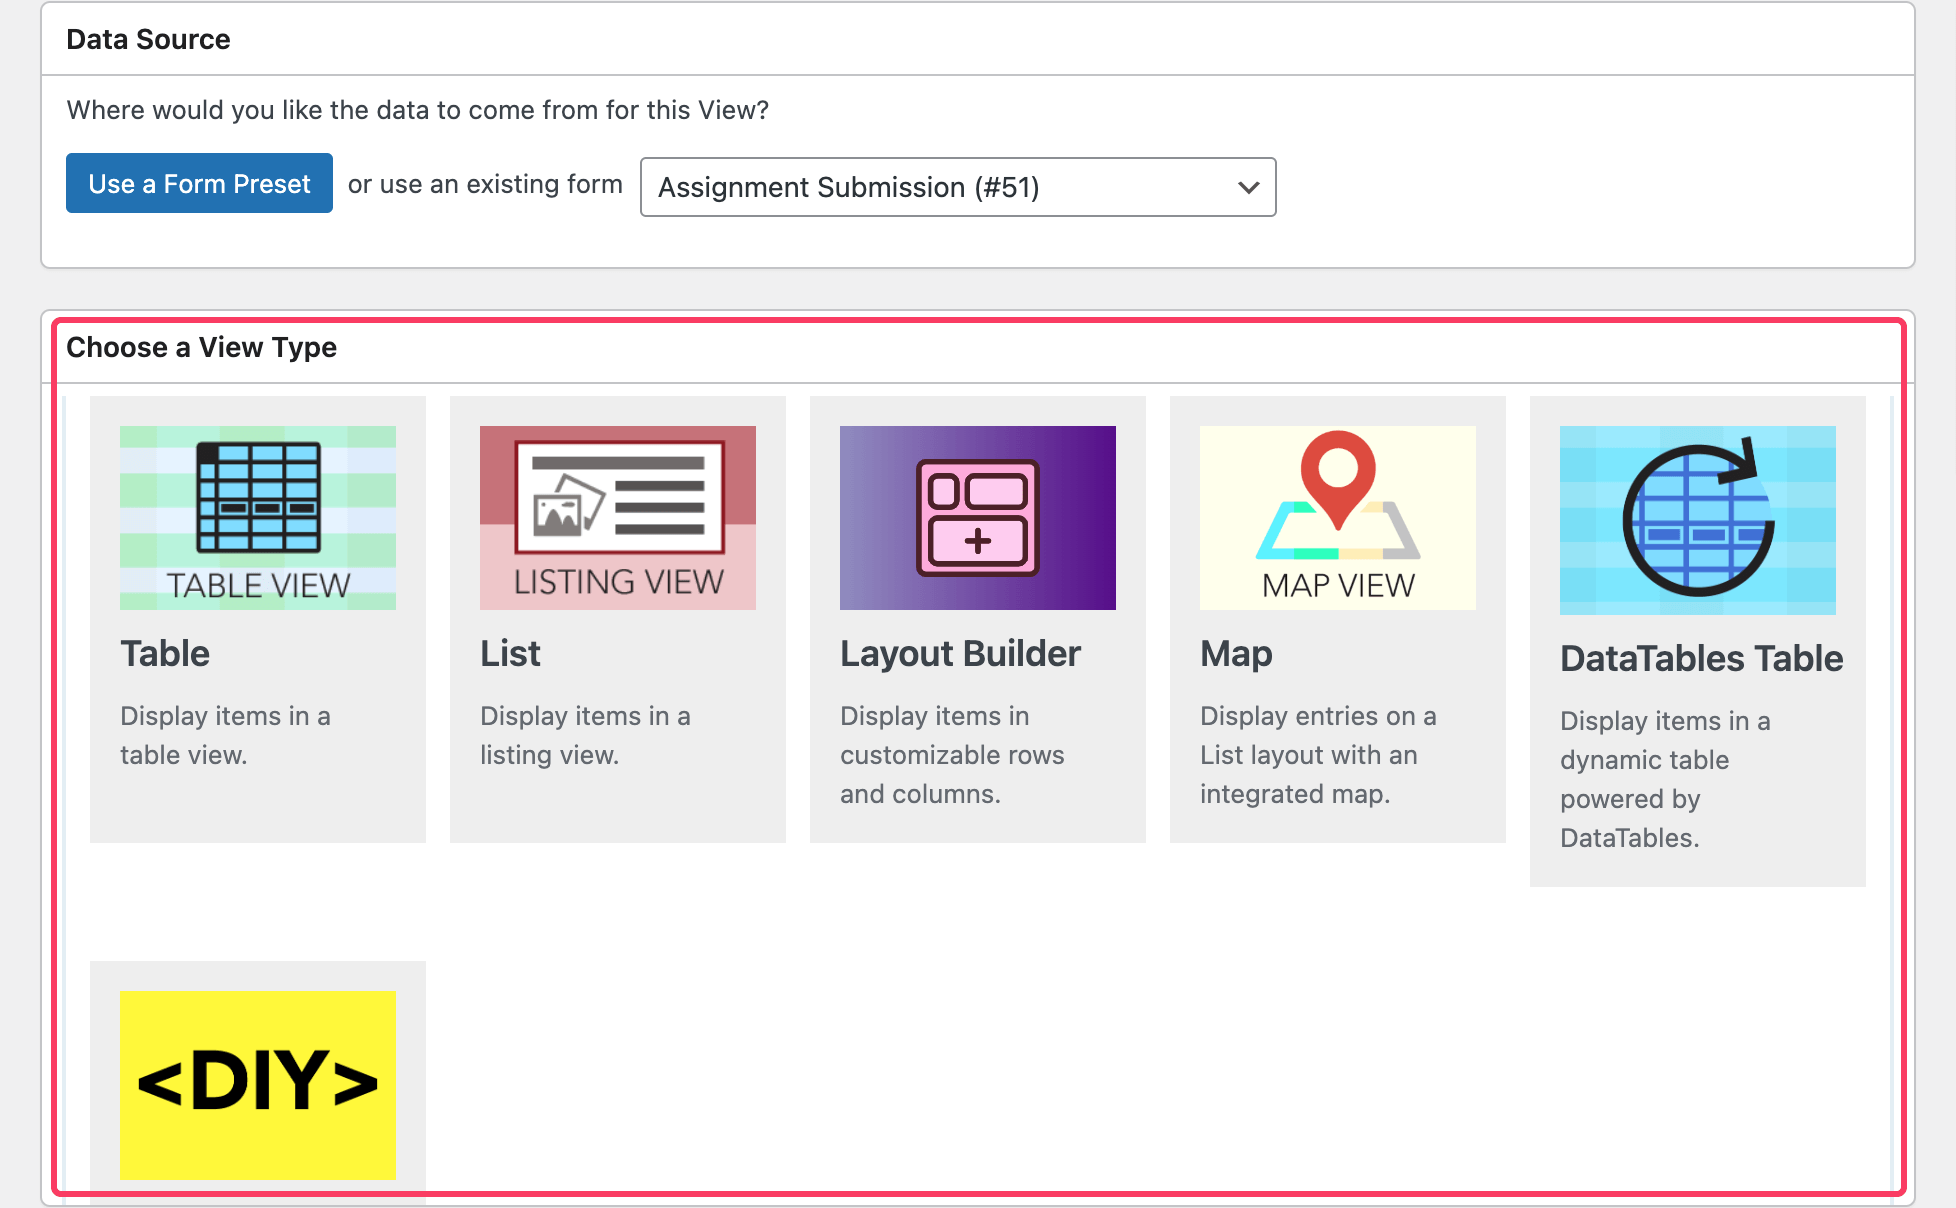
Other Layouts (Pro and All Access licenses only): If you upgrade to GravityView Pro or All Access, you get a few more layout options:
- DataTables View: Adds search, sort, and pagination for large datasets.
- Map View: Show form entries on a map (perfect for directories).
- DIY View: Gives you full control over the layout with custom code.
Pick the one that matches what you’re trying to build.
Step 3: Add Fields to Your View
Once your layout is selected, you’ll enter the View Editor. Here’s where you choose what information gets shown on your website. You’ll see three layout tabs at the top:
- Multiple Entries – Think of this as the main list or directory page.
- Single Entry – This is the detailed page when someone clicks on an item.
- Edit Entry – If you want users to update their own submissions.
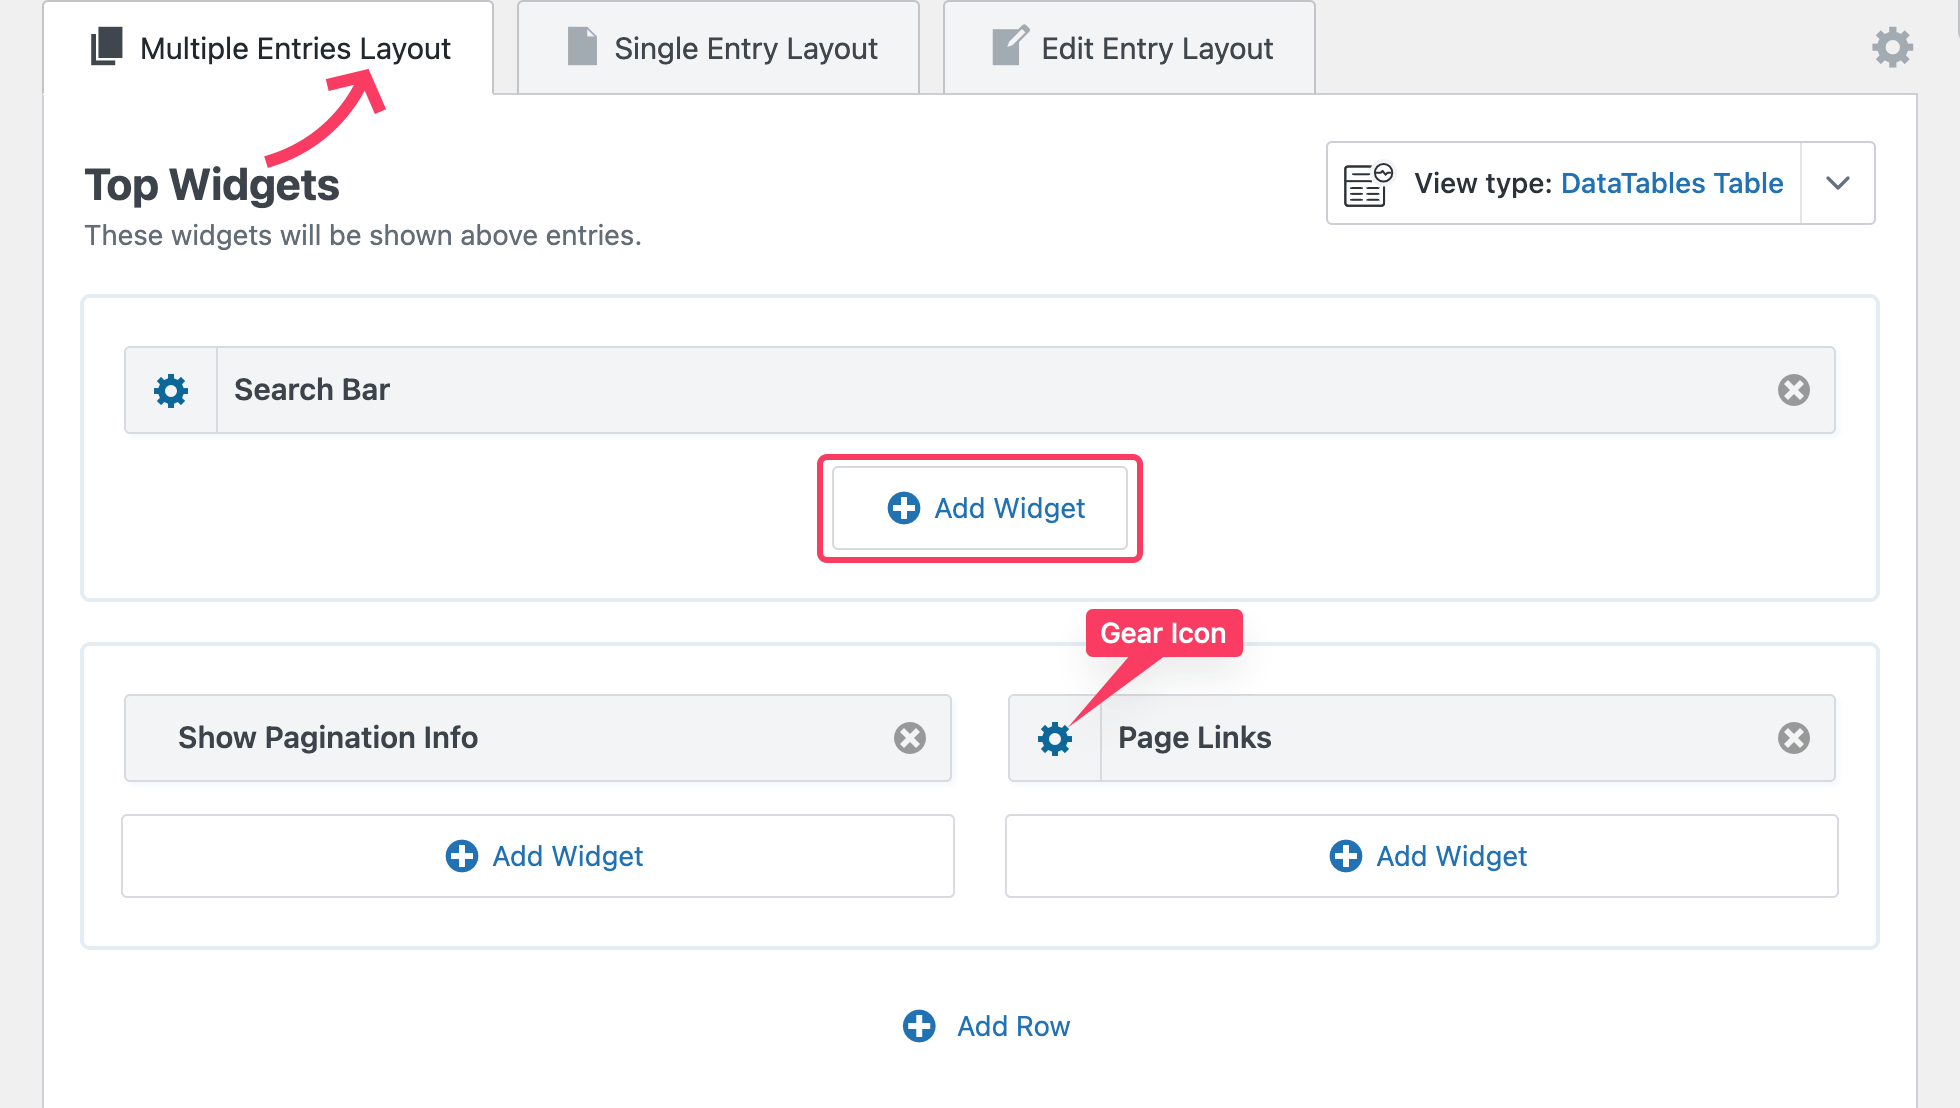
Inside each tab, click + Add Widget to choose which form fields to display (like Name, Email, or Company).
Click the field you want. Want to change the order? Just drag and drop them. Click the gear icon on each field to adjust how it looks or behaves.
Step 4: Adjust the View Settings
Below the editor, you’ll find a Settings box. This is where you control how the View works. There are 8 tabs (sometimes more, if you’re using add-ons):
- View Settings – Set the View name, layout preferences, and what to show when there are no entries.
- Multiple Entries – Control how many entries show per page, whether to include a search bar, etc.
- Single Entry – Change the title or add a back button.
- Edit Entry – Let users edit their own entries. You can also change button labels like “Update” or “Cancel.”
- Delete Entry – Let users delete their entries.
- Filter & Sort – Show only specific entries (like only from today), or sort them (like newest first).
- Permissions – Decide who can see or edit this View.
- Custom Code – Add any custom CSS or JavaScript (optional skip this if it sounds confusing).
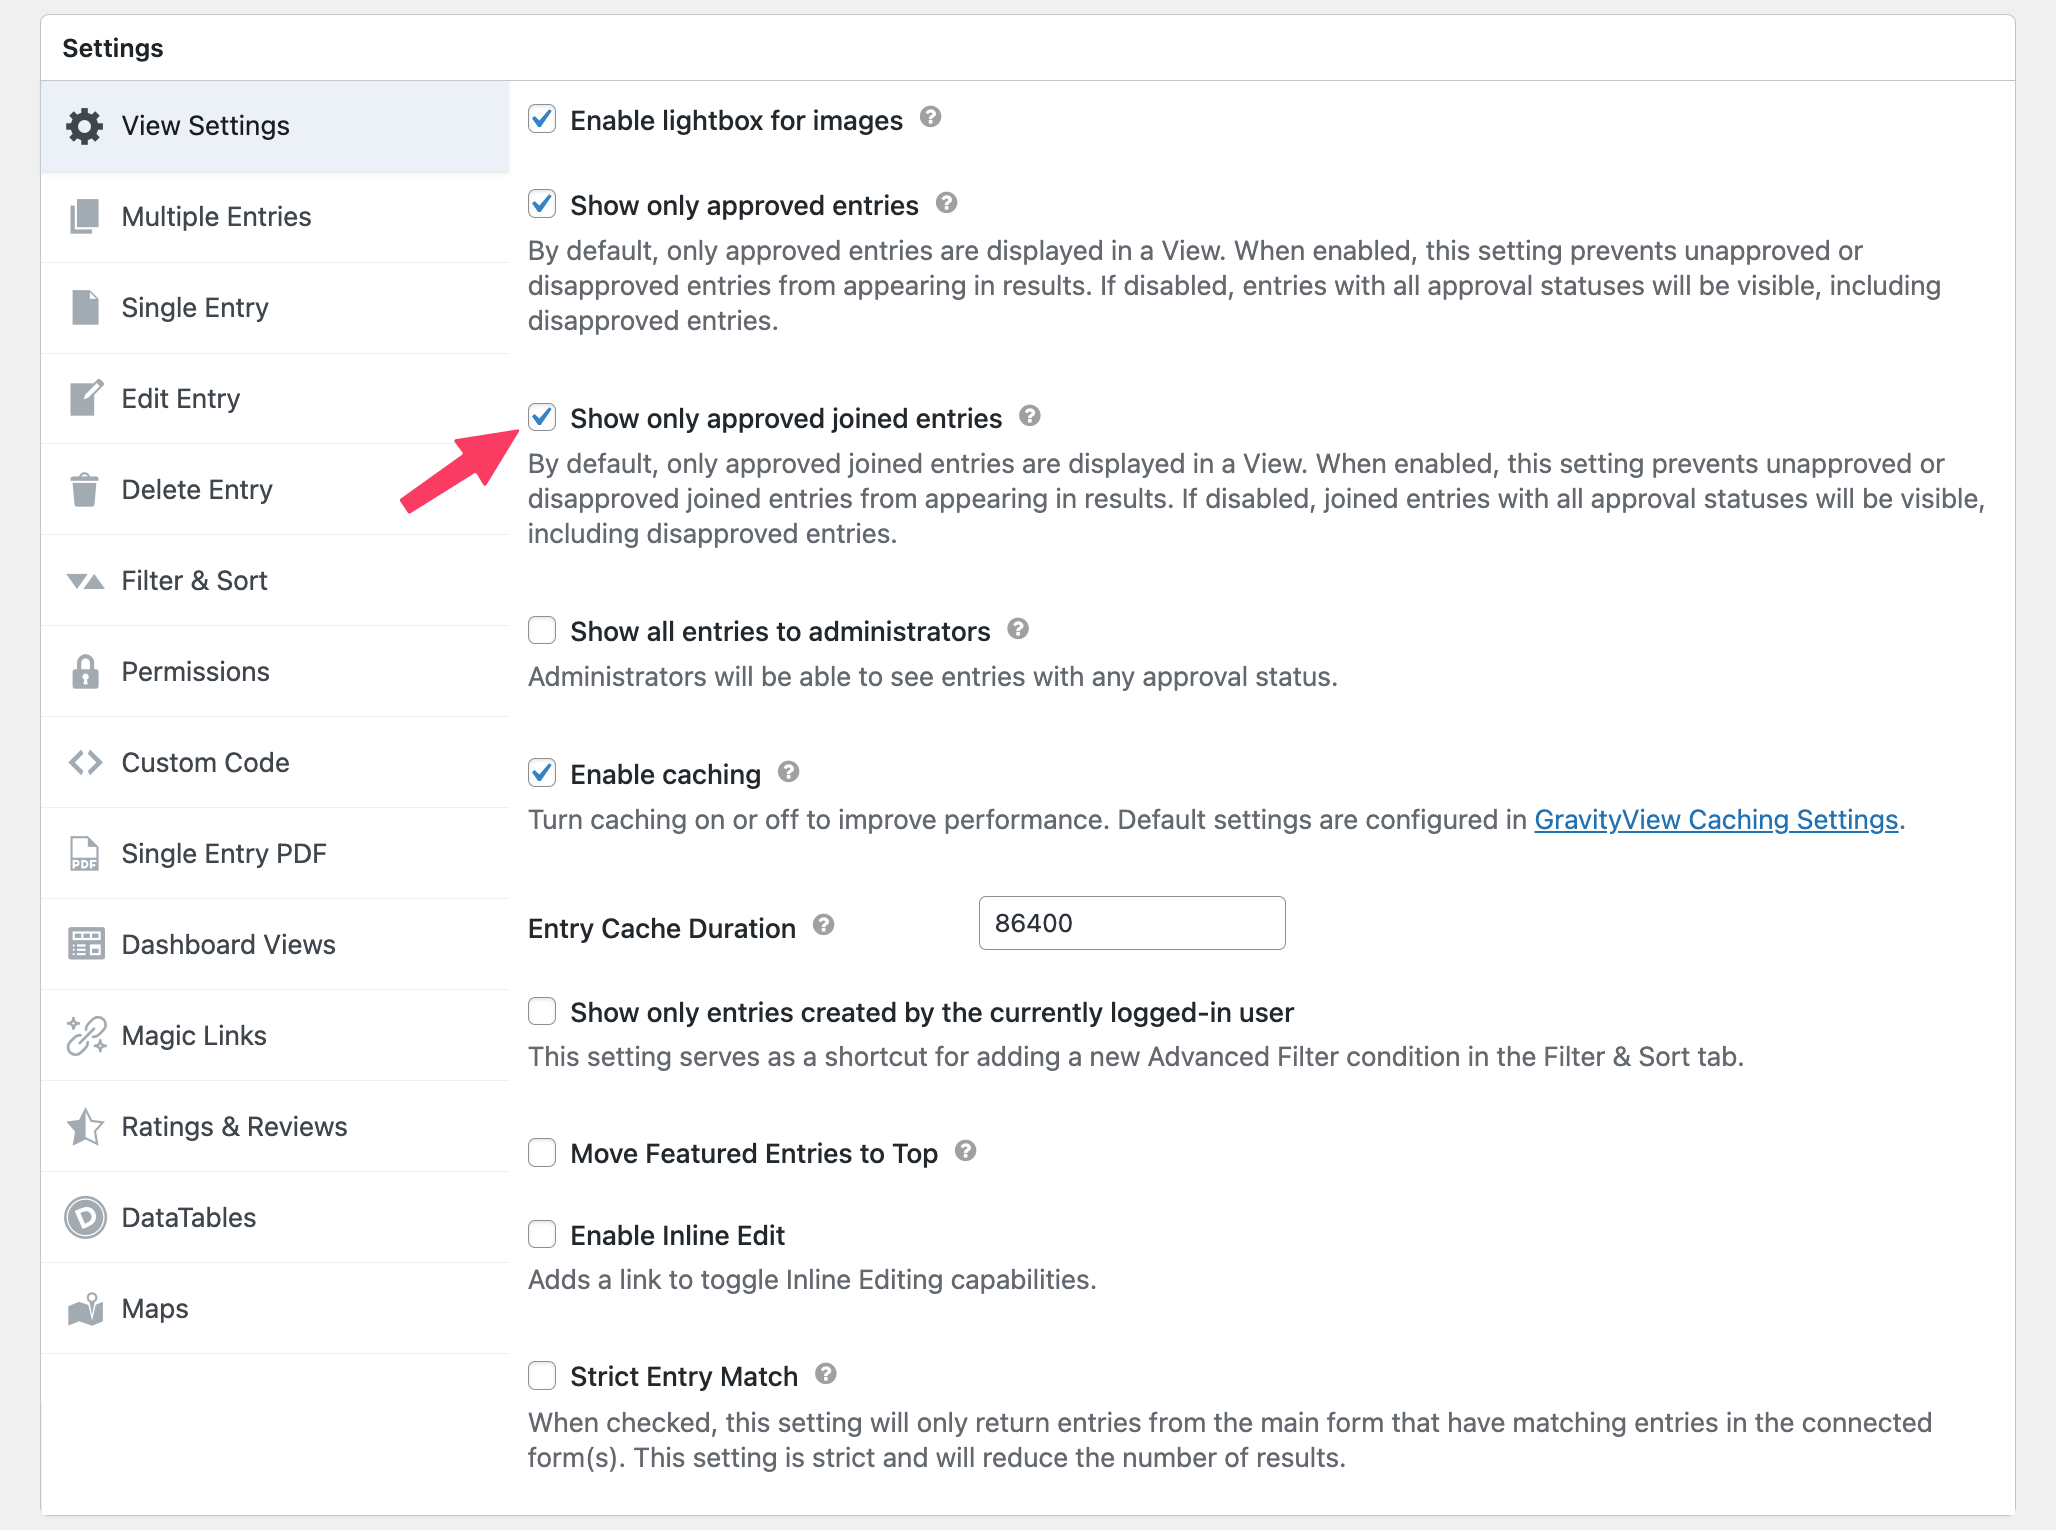
Note: By default, GravityView will only show entries that you’ve approved. That means if someone fills out your form and you haven’t marked their entry as approved yet, it won’t show up on your site.
Step 5: Show Your View on a Page
You’re almost done! Now it’s time to put your View on your website.
If You’re Using the WordPress Block Editor (Gutenberg):
Open the page or post where you want to show the View. Click Add Shortcode at the top of the editor. Use the shortcode you’ll get like this one: [gravityview id="123" secret="abcd123efgh456"]
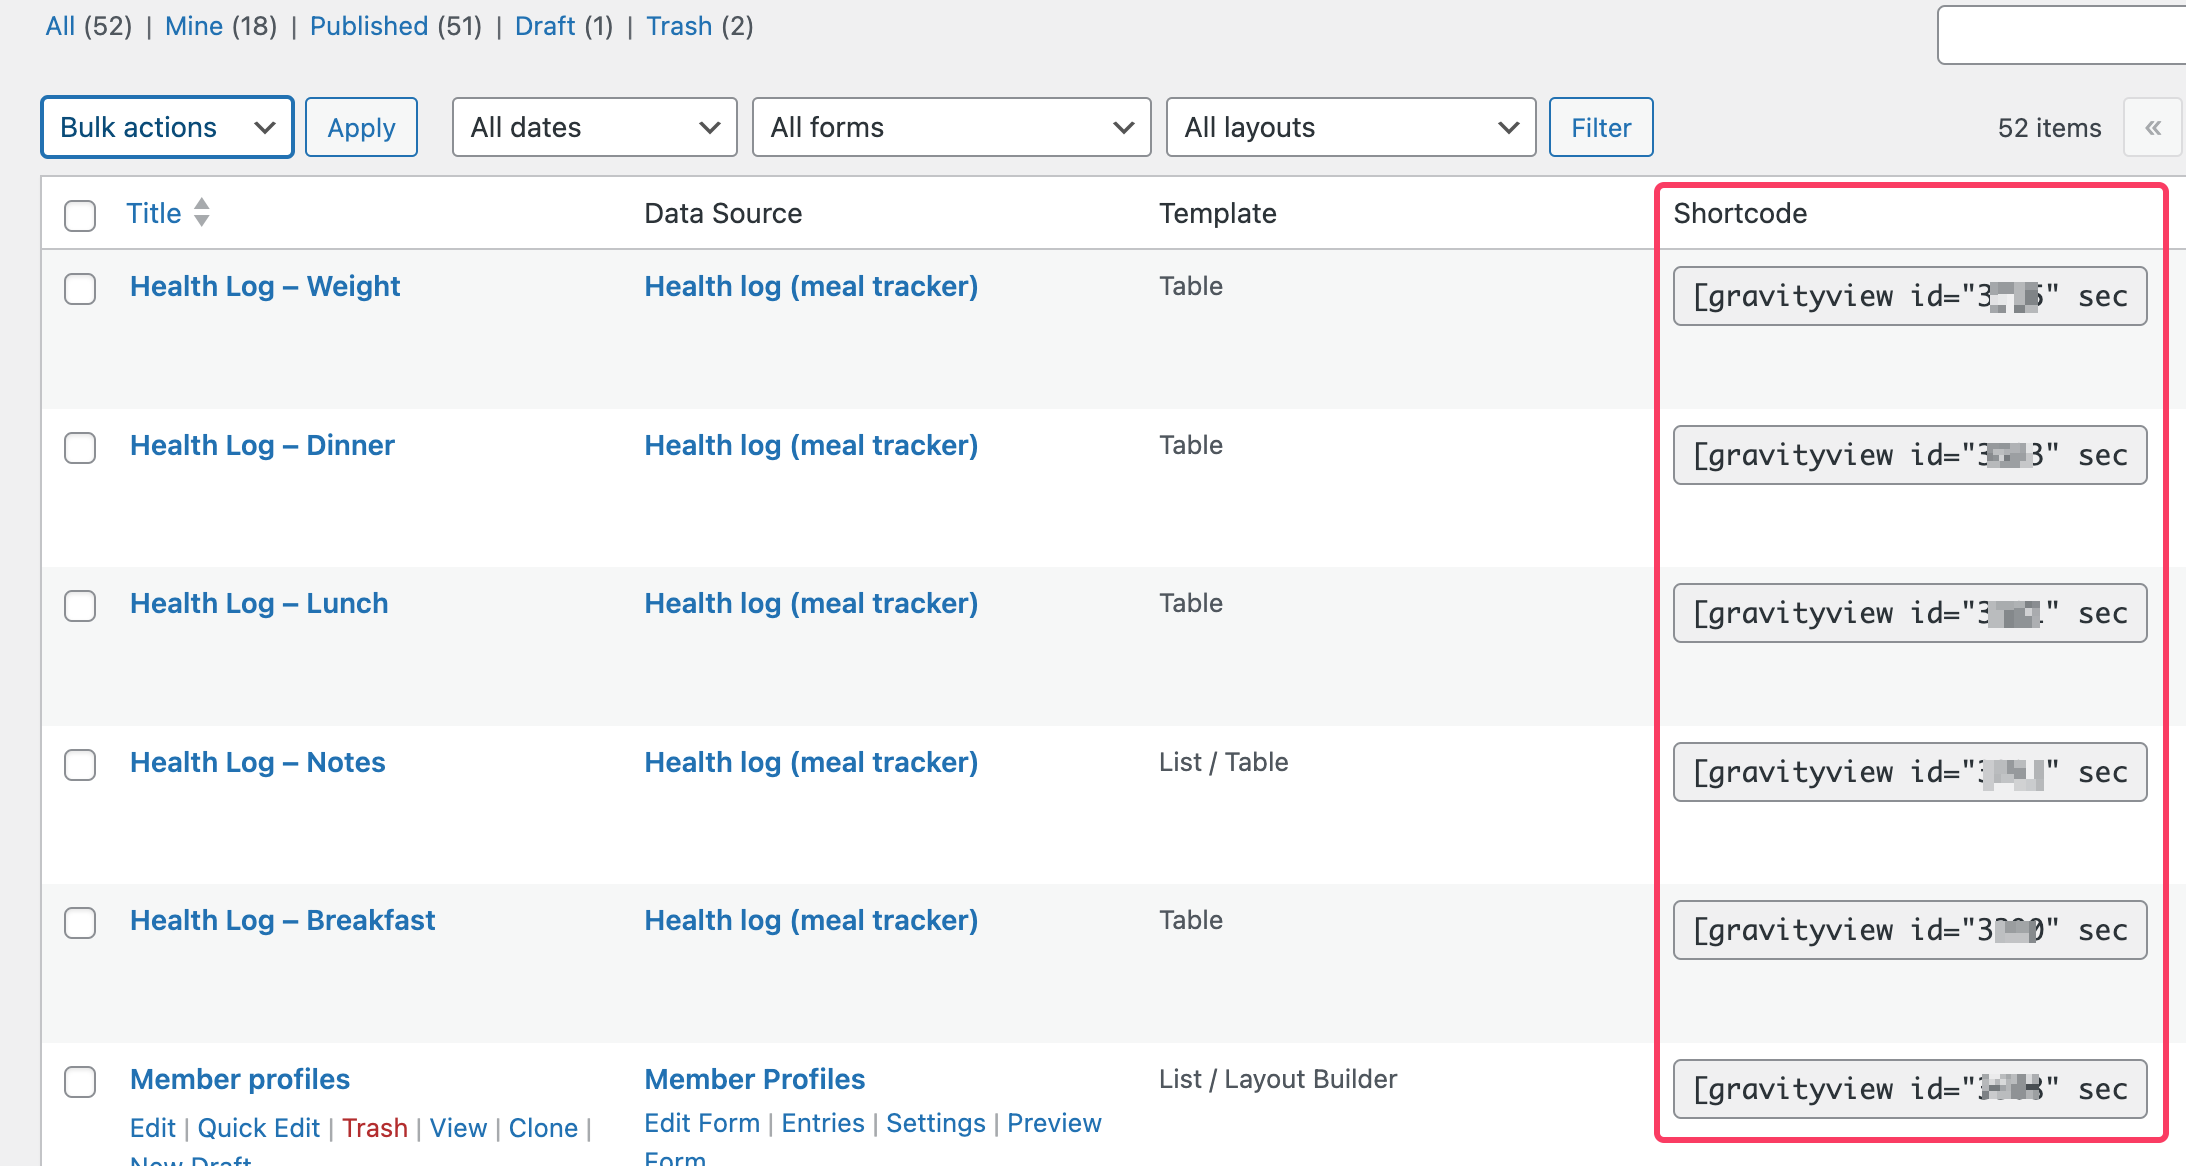
Replace the shortcode with the actual ID and secret key of your View (you’ll see it in the All Views list).
If You’re Using the Classic Editor:
Open the page or post. Click Add View at the top of the editor. Pick your View from the dropdown.
That’s it! Once you publish the page, your form entries will be live on your site no coding needed.
Pros & Cons of GravityView (No Fluff, Just Honest Takes)
Every plugin has its highs and lows. Here’s the real scoop on GravityView:
What It Gets Right
- No-code setup: Build views without touching PHP or hiring devs.
- Super flexible: Tables, lists, grids, calendars, mapsyou’ve got options.
- Deep Gravity Forms integration: Feels native, not tacked on.
- Solid documentation & support: Step-by-step guides, responsive team.
- Scales well: Handles large data sets like a champ (especially with DataTables).
Where It Could Improve
- Not beginner-level simple: There’s a learning curve, especially if you’ve never built Views before.
- Design control is limited without custom CSS: Out of the box, it’s clean, but you’ll want some tweaks if you’re picky about styling.
Dealbreakers?
Not exactly. But if you’re just using Gravity Forms to collect simple contact form submissions like names and emails, and you don’t need to show that data on your website, then you probably won’t need GravityView.
GravityView vs the Competition: Which Tool Fits Your Workflow Best?
There’s no shortage of tools trying to turn form data into front-end displays. But they don’t all hit the same notes. Let’s break down how GravityView stacks up against the usual suspects.
GravityView vs Formidable Views
Formidable Forms has built-in Views too, but there’s a catch it only works with Formidable Forms. If you’re already in the Gravity Forms ecosystem, switching tools means redoing your forms from scratch.
GravityView plays nice with the forms you already use. And its drag-and-drop editor feels smoother and more intuitive, especially for folks who don’t want to mess with shortcodes.
Winner: If you use Gravity Forms, it’s GravityView. No contest.
GravityView vs Entry Blocks (Gravity Wiz)
Entry Blocks is newer and slick, using the WordPress block editor to display entries. It’s great if you live and breathe Gutenberg.
But it’s still a bit limited. GravityView gives you way more layout options, search tools, and add-ons. Entry Blocks is like GravityView Lite with less flexibility.
Winner: Entry Blocks is fine for simple displays. GravityView wins for complex builds.
GravityView vs Ninja Forms Views
Let’s keep this one short: Ninja Forms isn’t known for handling complex data use cases well. Its Views add-on feels more like an afterthought than a robust solution.
Winner: GravityView all the way.
GravityView vs wpDataTables
This one’s tricky. wpDataTables is a beast when it comes to table-based displays, charts, and external data sources like Excel, Google Sheets, or databases.
But it’s not form-focused. If you need to show form entries, GravityView is much more focused and user-friendly. wpDataTables is great for reports and dashboards not so much for dynamic web apps built around form submissions.
Winner: wpDataTables for data analytics. GravityView for user-generated content.
GravityView vs TablePress
TablePress is great if you want to manually build a table or copy-paste spreadsheet data. But it doesn’t work dynamically with form entries at all.
Winner: TablePress is static. GravityView is alive. No comparison.
Pricing: Is GravityView Worth Your Money?

Alright, let’s talk dollars.
GravityView isn’t the cheapest plugin on the block, but if you’re serious about building with Gravity Forms, it earns its keep fast. Here’s how GravityView pricing breaks down:
| Plan | Price | Best For |
|---|---|---|
| GravityView Core | $119/year | Simple views, lists, tables |
| GravityView Pro | $199/year | Extra layouts, entry editing, filtering |
| All Access | $396/year | Everything: Maps, Calendar, DataTables, etc. |
Note: These prices are accurate as of May 2025. Always check the official site for the latest.
The real value? You’re not just buying a display plugin. You’re unlocking the ability to build complex applications without a developer.
Compare that to hiring someone to custom-code a job board or member directory that’s easily hundreds (if not thousands) of dollars. And you get support, updates, and peace of mind. Not a bad trade-off.
Pro Tip: If you’re unsure, demo the plugin first: GravityView Demo
Final Verdict: Should You Use GravityView?
GravityView takes your Gravity Forms data and turns it into something real directories, dashboards, listings, and more. You don’t need to write code. You don’t need ten different plugins. Just pick your form, drag in what you want to show, and go.
Here’s the bottom line. If you’re using Gravity Forms and need a way to show off that data, GravityView is the best tool for the job. It’s not flashy. It’s not hyped-up vaporware. It just works.


Add your first comment to this post