Whether you’re a WordPress pro or just getting started, you need a backup and migration tool to ensure a safety net for your digital assets. WPvivid can come in handy in this regard since this WordPress plugin streamlines the often complex tasks of website backup, migration, and recovery.
From safeguarding against data loss and security breaches to enabling seamless website migrations, investing in a backup plugin is a smart move for website owners and developers alike. Timely use of an effective backup plugin can save you from huge probable damage.
In this detailed WPvivid review, we’ll explore its potential benefits and drawbacks. We’ll show how you can use this backup plugin to its fullest potential. We’ve also shared our final verdict at the end of this review to help users make an informed decision. Keep reading to explore the ins and outs of WPvivid with us.
Quick Navigation
What is the WPvivid backup and migration plugin?
WPvivid is a WordPress plugin designed to simplify and enhance the process of website backup, migration, and restoration. It is a popular solution for website owners and developers who want to manage their WordPress websites efficiently and securely.
The plugin also provides features like automatic backups, flexible retention rules, multi-email notifications, and WordPress multisite support. It has both free and pro versions of its plugins, with a focus on affordable pricing and 24/7 ticket support.
Key features of WPvivid that help it stand out
The key features of the WPvivid backup plugin for WordPress include:
- Full Website Backup: WPvivid allows you to create complete backups of your entire WordPress website, including all files, databases, themes, plugins, and media.
- Remote Storage: The plugin supports backing up your website to remote storage destinations like Dropbox, Google Drive, Amazon S3, Microsoft OneDrive, and more. This helps to ensure that your backups are stored securely offsite.
- Scheduled Backups: It lets you set up automated and scheduled backups, so your website is regularly backed up without manual intervention.
- Incremental Backup: With incremental backups, you can only back up the changes made since the last backup, reducing backup time and server resource usage.
- One-Click Restore: In case of data loss or website issues, you can quickly restore your website using the previously created backups with just one click.
- Website Migration and Cloning: WPvivid facilitates smooth website migration from one hosting provider or domain to another. It also supports cloning, which allows you to create staging environments for testing purposes.
- Backup Customization: The plugin gives you the flexibility to choose what to include or exclude from your backups, allowing you to fine-tune the backup process.
- Backup Encryption: WPvivid offers the option to encrypt your backups for added security, ensuring that sensitive data remains protected.
- Email Notifications: You can configure email notifications to receive updates and reports about the status of your backups.
- Backup Management: The plugin provides an easy-to-use interface to manage your backups, restore points, and backup settings.
- Affordable Pricing Plans: While the free version provides valuable features, WPvivid offers affordable subscription and lifetime pricing plans for additional functionality and support.
Also read: How to backup a WooCommerce site
How to create a backup and migrate your WordPress website
You can easily create a backup and migrate your WordPress website using the WPvivid plugin. Install and activate WPvivid on your WordPress site, access the WPvivid Backup dashboard, and initiate a full backup by selecting the desired components and settings. WPvivid streamlines the backup and migration process, ensuring your website’s data integrity and smooth transfer. How? Follow the next steps.
Step 1: Install and activate WPvivid on your WordPress website
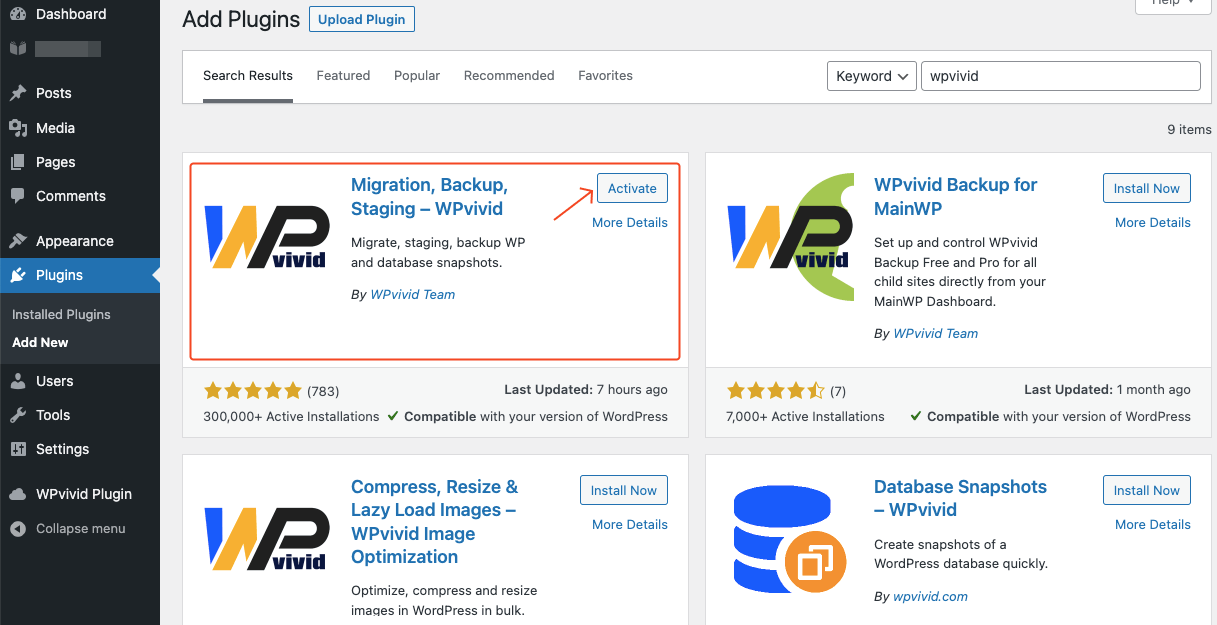
Go to your WordPress admin panel by logging in to the website with your credentials. Navigate to Plugins > Add New. Then type “wpvivid” on the search bar. You’ll see all the relevant results. Choose the one you want to add to your website. Hit the Install Now button and activate the plugin on your website.
This is the general process of installing a free WordPress plugin within the WordPress backend. If you have the Pro version of the plugin, you can download the WPvivid installer from your WPvivid dashboard. Then upload the Zip folder to install WPvivid plugins on your website. Learn how to install a WPvivid Pro plugin on your WordPress site.
Step 2: Explore the dashboard of the WPvivid Backup Plugin
WPvivid keeps the UI minimal and distraction-free in the free version. It comes with a top bar that comprises all the available options you may need. Here’s the UI of the free version’s dashboard:
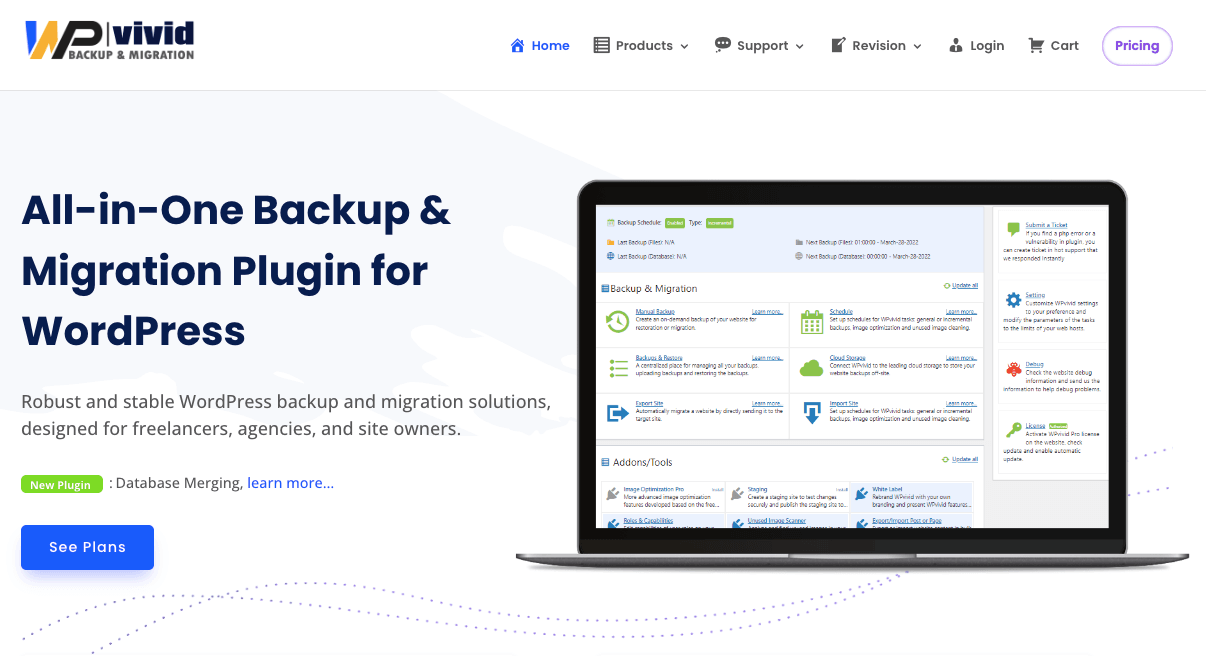
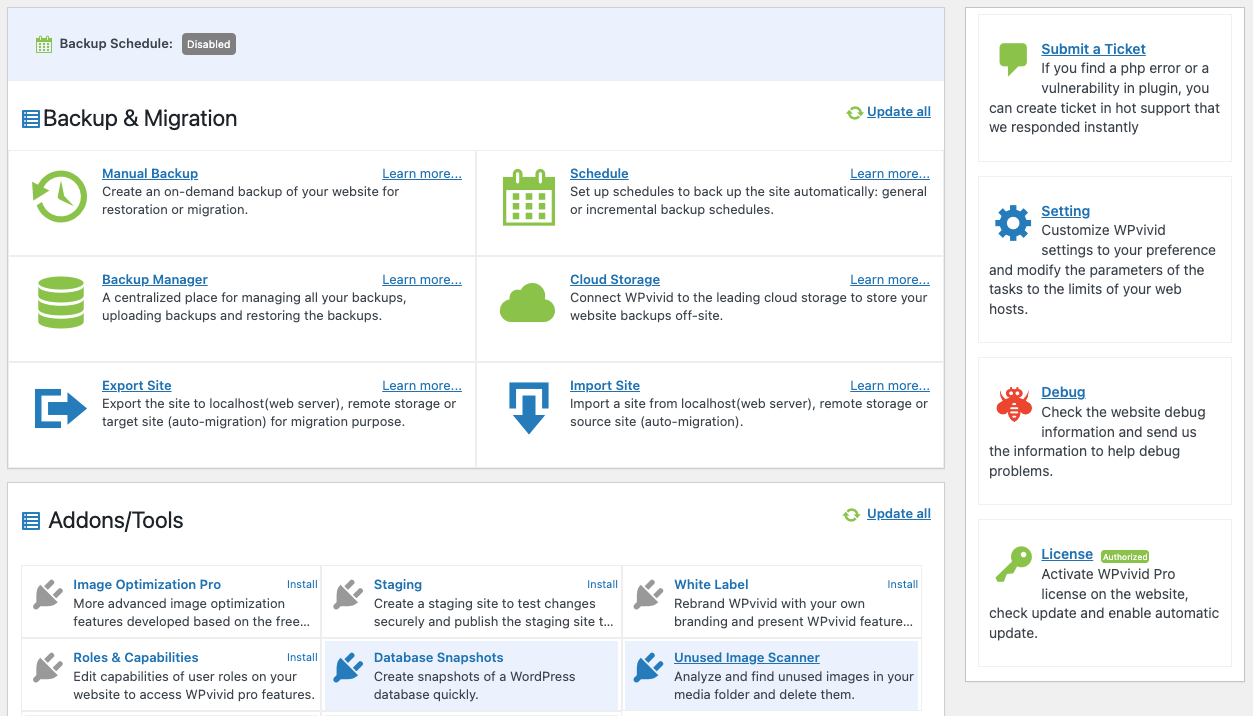
The Pro version of WPvivid offers a more intuitive and user-friendly graphical interface. It has an additional part on the right side consisting of a ticket submission option, setting, debug, and license sections. It also has a dedicated section for available Addons and Tools. The dashboard of the Pro plugin looks like the following:
Step 3: Create a manual backup of the website
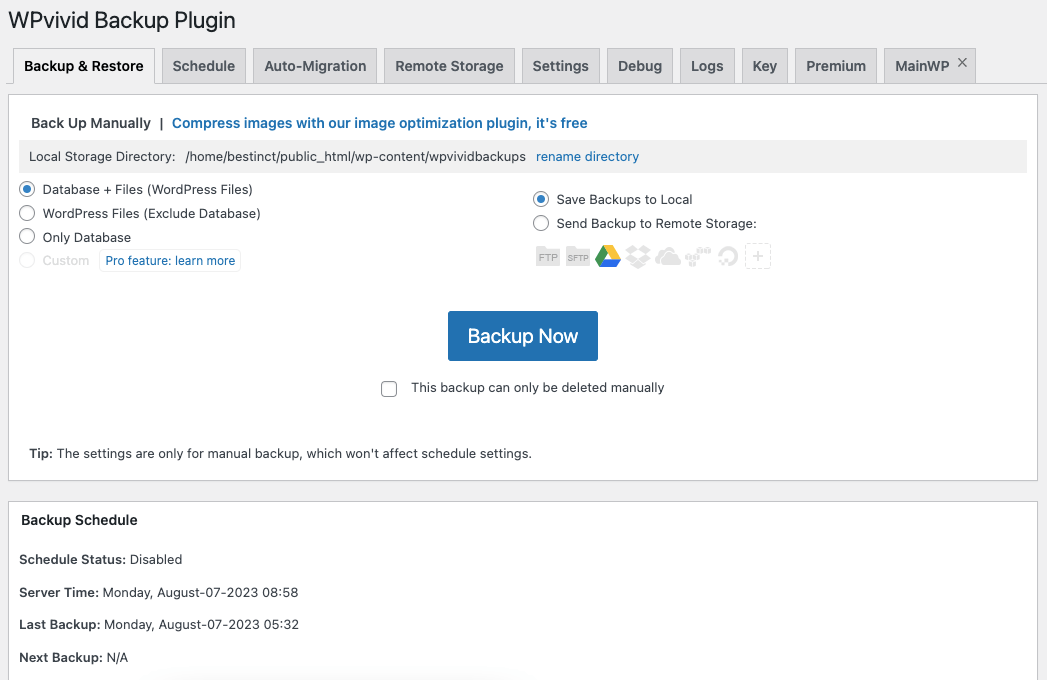
Creating a backup of your website is a straightforward process with WPvivid. You’ll see a menu item called WPvivid Plugin in your WordPress admin sidebar. Click on the Manual Backup submenu under it to access the manual backup functionality.
This includes selecting which site components to back up (files, database, and custom content like themes, plugins, uploads, etc.). You can also choose the backup destination (local or remote storage) and provide additional comments associated with the backup.
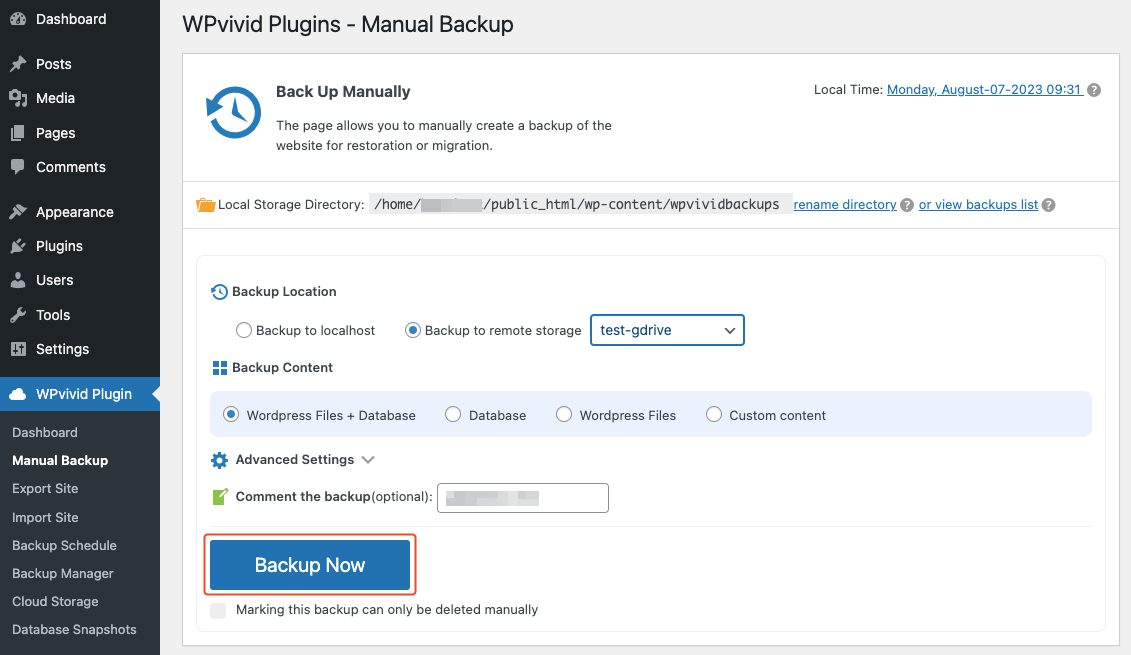
“Hit the Backup Now button, once you check the necessary boxes. You’ll see a congratulatory message- “Congratulations, exporting site succeeded” message if the backup is successful. You can download all parts of the backup now or later on the Backup Manager page.
Step 4: Migrate your website to and from another site
WPvivid offers both export and import functionalities for the users. It allows you to export the site to localhost(webserver), remote storage, or target site (auto-migration) for migration purposes. You can export the site to zip file(s) and download them to your computer. Don’t forget to put a comment for each backup to identify the backup for further use.
Exporting to the localhost and remote stores is easy. Let’s see how you can export your site to a target site using the auto-migration feature. Navigate to Export Site and choose Export to Target Site(auto-migration). You need to simply paste the key here generated by your destination site.
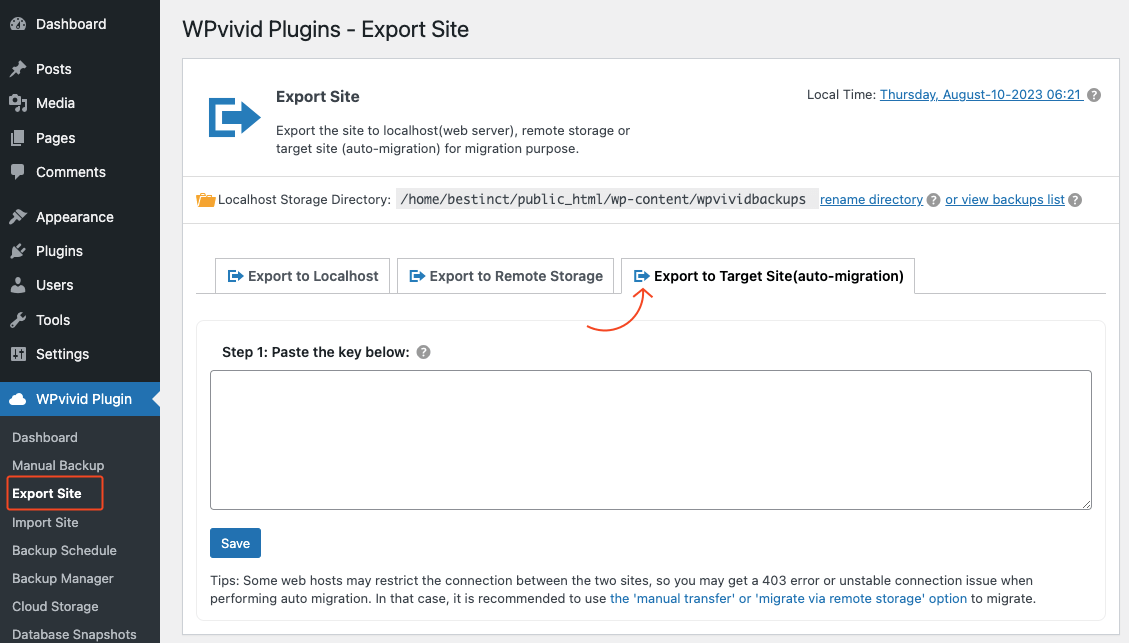
Go to your destination site and navigate to WPvivid Plugin> Import Site> Import from Auto-Migration. Then hit the button Generate A Key. It will provide you with a key. Then come back to your site paste the key in the designated place and click the Save button.
Step 5: Schedule the backups as per your needs
You’ll get the page for managing backups using the WPvivid plugin in WordPress. Navigate to the Backup Schedule menu. This page allows you to schedule backups and manage various backup settings. It primarily focuses on managing backup schedules for both general and incremental backups.
Step 6: Manage your cloud storage options
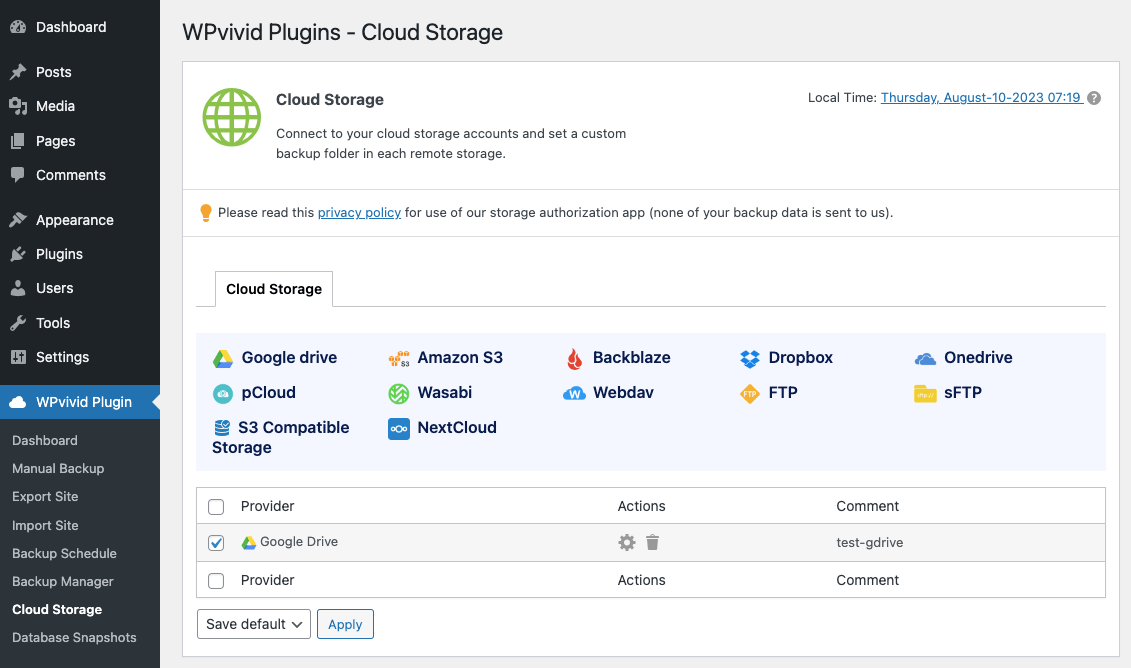
The Cloud Storage settings page allows you to connect your website’s backups to various cloud storage providers. Currently, it supports almost all popular cloud storage providers. The top cloud storage providers are:
- Google Drive
- Amazon S3
- Dropbox
- Onedrive
- FTP
- sFTP
- S3 Compatible Storage
WPvivid has twelve options you can choose from. Simply click on the name of the storage and provide the required information. You can easily connect to your cloud storage accounts and set up a custom backup folder in each remote storage.
Step 7: Create a database snapshot to restore later
Navigate to the Database Snapshots section of the WPvivid plugin in WordPress. It allows you to manage and create snapshots of your website’s database. This page provides tools to manage and create database snapshots, which are backups of your website’s database at specific points in time. You can use these snapshots to restore your database to a previous state if needed.
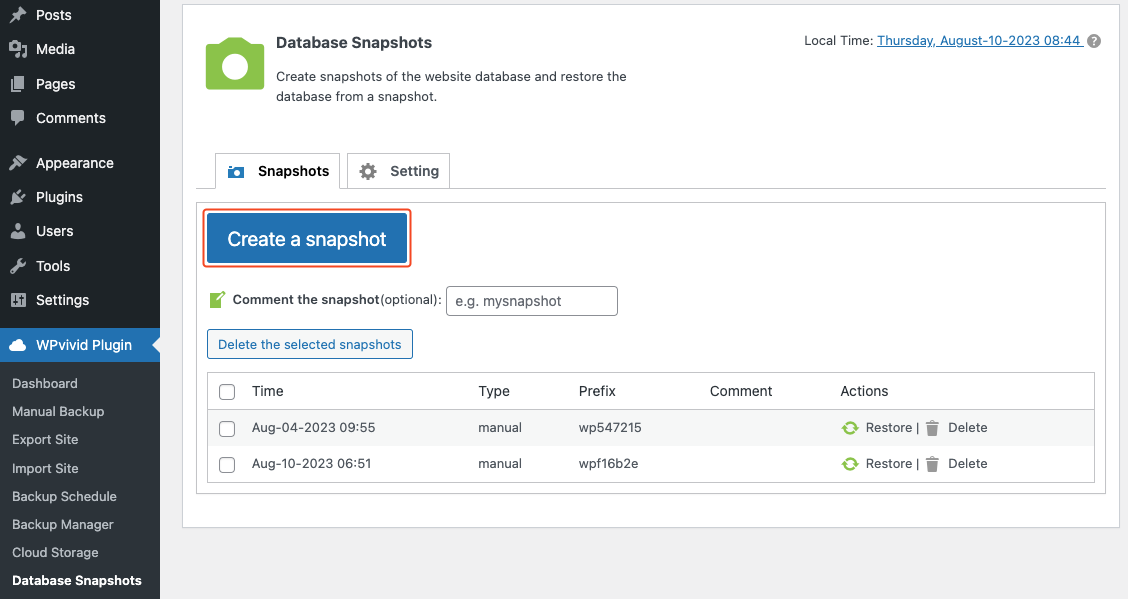
Click on the Restore button placed under the Actions section to restore a snapshot. You need to wait for a while during the restoration process.
Step 8: Manage your backup from a single place
You’ll see all available backups in the same place. The Backup Manager menu will lead you to the “Backup Manager & Restoration” page in the WPvivid plugin. This page provides the following capabilities:
You can view a list of all your backups, each identified by the date and time of creation, the type of content backed up, the storage location, and the size of the backup. Simply select the actions you want to take from the selected section as shown below.
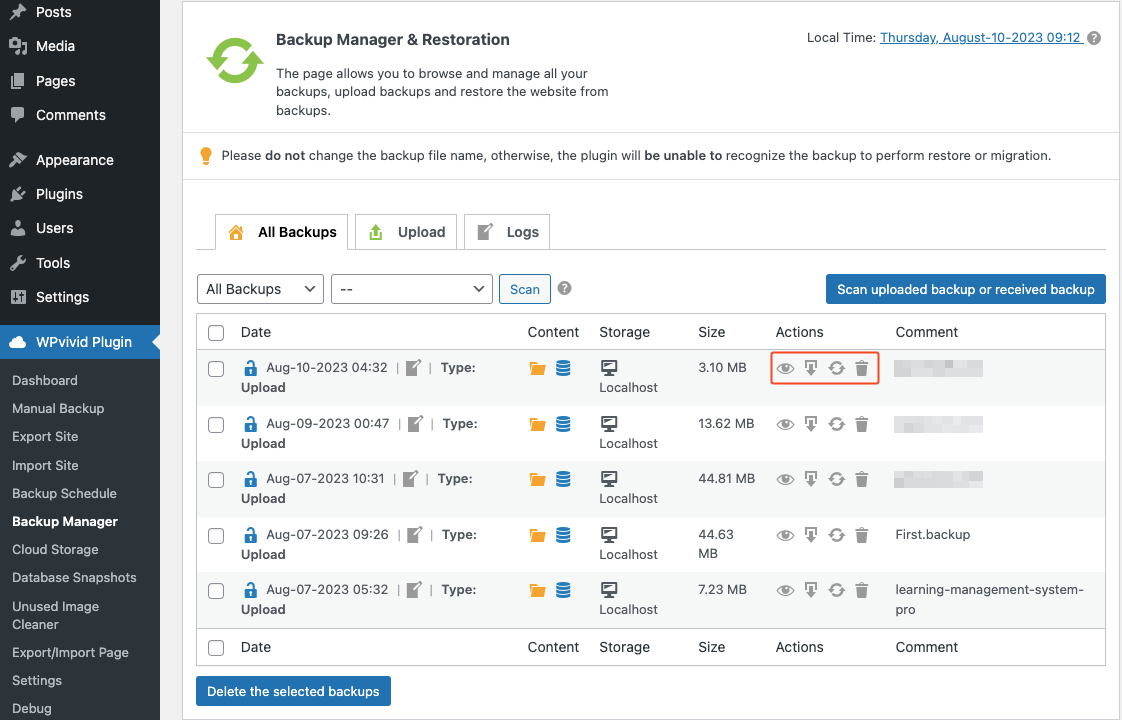
It allows you to view, download, restore, or delete the backup from this page. You can also upload backups to the system, and review logs related to backup activities. This user-friendly interface helps you effectively manage your website backups, making it easier to restore your site if needed.
Step 9: Export/Import posts or pages with images in bulk
Use this page to export and import pages or posts with images. You can export posts/pages based on categories, authors, and published dates. WPvivid also provides a URL replacing tool to help users do a quick domain/URL replacing in the database, with no need to perform a database migration.
Step 10: Clean unused images from your database
The Unused Image Cleaner section in the WPvivid plugin allows you to scan your media folder for unused images and isolate specific or all unused images. This page provides tools to identify and isolate unused images in your media folder. You can clean up your website’s storage by removing unnecessary files.

Note: Currently, WPvivid only scans JPG and PNG images.
Step 11: Optimize the settings for all WPvivid plugins
The WPvivid plugin comes with an all-inclusive Settings menu that enables users to configure Backup, Backup (Advanced), and Unused Image Cleaner settings. You’ll get a comprehensive control panel on this page. These settings allow you to configure various aspects of the WPvivid Backup Pro plugin, including:
- General backup settings
- Backup retention
- Storage locations
- Encryption
- Email notifications
- Export/Import settings
- Auto-backup settings
- Compression method, and more.
Make sure to carefully configure these settings according to your preferences and requirements.
Step 12: Install the additional tools if you need them
Go to the dashboard of the WPvivid plugin. Scroll down to see the “Addons/Tools” section on the web page. It contains information about additional features and tools available in the WPvivid Backup & Migration Plugin.
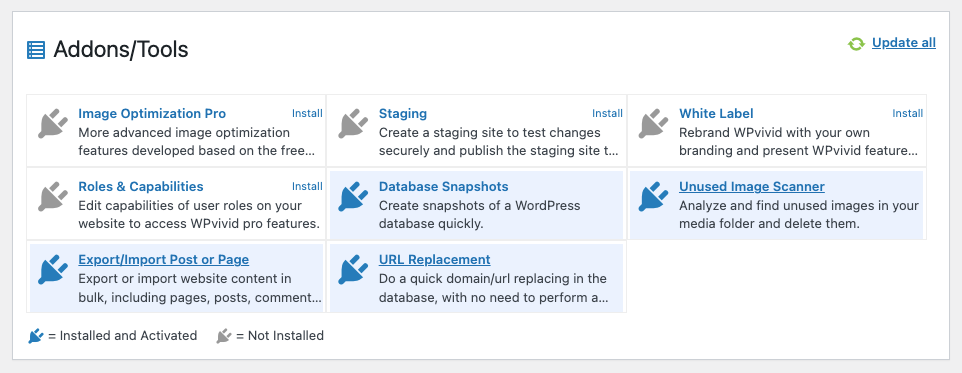
I’m currently using the Freelancer version of the plugin, and it currently has the following eight Addons/Tools. Let’s see how each tool helps WPvivid users.
- Image Optimization Pro: Enhance your website’s performance by optimizing images for faster loading times and better user experience.
- Staging: Develop and test website changes, updates, or new features in a safe environment before applying them to the live site.
- White Label: Customize the plugin’s branding to match your own brand identity and offer backup and migration services under your brand name.
- Roles & Capabilities: Manage user access and permissions to the plugin’s advanced features based on their roles within your WordPress site.
- Database Snapshots: Capture snapshots of your website’s database at specific points in time, which can be useful for restoring or comparing data.
- Unused Image Scanner: Identify and remove images that are no longer being used on your site, helping to free up storage space.
- Export/Import Post or Page: Facilitate the transfer of content between different WordPress installations or websites.
- URL Replacement: Change domain or URL references in the database without the complexity of full database migration, useful when moving a site or changing URLs.
Each of these addons/tools provides additional functionality and customization options to the WPvivid Backup & Migration Plugin. This allows you to manage your website backups, migrations, and optimizations more effectively.
WPvivid review – Pros and cons
Let’s sum it up. We mentioned the most significant advantages and disadvantages of the WPvivid plugin in this section. The key points are as follows.
| Pros of WPvivid | Cons of WPvivid |
| ✓ User-friendly interface ✓ Comprehensive backup options (full, partial, incremental) ✓ Flexible remote storage (Dropbox, Google – Drive, etc.) ✓ Scheduled backups for automation ✓ One-click restore functionality ✓ Simplified website migration and cloning ✓ Enables the creation of staging environments ✓ Extensive documentation to help users | -Some advanced features require a premium version -Shared hosting users may find issues with backup restoration from cloud storage |
The pricing model of WPvivid backup and migration
WPvivid has a free version with basic backup and migration functionalities. It offers a wide range of pricing plans for both regular and advanced users. The price mainly differs in terms of the number of domains you’ll be managing with the plugin. The yearly plans are as follows.
- Blogger
- Price: $49/year
- Domains: 2
- Freelancer
- Price: $69/year
- Domains: Up to 10
- Small Business
- Price: $99/year
- Domains: Up to 50
- Ultimate
- Price: $149/year
- Domains: Unlimited
What’s exciting? WP Hive users get a special 20% additional discount on the prices. Go to checkout to avail of the offer. However, WPvivid also has a few lifetime deals. Follow the below link to see pricing details.
Get a special offer for WPvivid
Our final verdict about WPvivid
It is clear that WPvivid offers a robust and stable solution for WordPress backup and migration needs. Overall, considering its strong feature set, ease of use, and affordable pricing, WPvivid Backup Plugin appears to be a solid choice for anyone seeking reliable backup, migration, and site management tools for their WordPress websites.
So, if you value data security, easy site migration, and a user-friendly experience, WPvivid could be a valuable addition to your toolkit. However, It’s important to note that individual preferences and specific website requirements may vary. We recommend you thoroughly assess your needs and compare them with WPvivid’s capabilities before making a final decision.


Add your first comment to this post