
WordPress is arguably the most popular content management system (CMS) for creating websites. In particular, this open-source software is suitable for building ergonomic and personalized sites.
However, WordPress (WP) can bring some difficulties when it comes to using certain features. In most problematic cases, outgoing emails fall into the spam folders of the recipients. On other occasions, these messages are simply not delivered.
Either way, our guide with a complete overview of plugins, ready-to-install functions, and commands for sending emails in WordPress correctly will come in handy for anyone dealing with it on duty. First, let’s see how WordPress manages email-sending functionalities.
Quick Navigation
How does WordPress manage email sending?

Numerous situations may raise an issue of how exactly you can send email via WordPress:
- when getting messages from the contact form,
- handling notifications about new comments (both to the content author and other commenters),
- newsletters (if sent directly from WordPress),
- even information about various events (updates, user registration, error of some service, e.g. to provide backups).
This is only a small part because WordPress can host an online store (e.g. WooCommerce or Easy Digital Downloads), a system for selling courses and training (e.g. Masteriyo LMS), and a customer service system (CRM). In each of these situations, efficiently sending e-mails using WordPress with attachments or to multiple recipients can be crucial to the operation of the business.
Of course, you can rely on standard e-mail-sending mechanisms operating, for example, on shared hosting. Such messages are usually sent from bulky addresses and cause deliverability problems. Servers often have limits, which are supposed to block SPAMers, but everyone gets hit.
Regardless of whether you ultimately start wondering how to send emails in WordPress using the SMTP function (e-commerce store, course platforms, information services) or via an e-mail account (blog, company website), it is worth setting it by yourself (with a plugin, or a bit of code).
Understanding the challenges in WordPress email delivery
WordPress is a popular platform for creating websites, and it automatically sends emails for a variety of tasks, such as user registrations, password resets, contact form submissions, and more. However, these emails often fail to get delivered and end up in spam or junk folders for several reasons:
- Lack of Authentication: WordPress emails sent via the default PHP mail function aren’t authenticated properly. Without authentication, email servers can’t verify that the email is coming from a legitimate source, which increases the chances of the email being flagged as spam.
- Shared Hosting Environments: Many WordPress sites are hosted on shared servers, where multiple websites share the same IP address. If another website on that server gets flagged for sending spam, all emails from that server, including your legitimate WordPress emails, may be flagged as spam.
- Generic Sender Address: Emails sent from a generic address like
[email protected]or[email protected]can appear suspicious. Spam filters are more likely to flag these as spam, especially if there’s no clear sender identity or the email lacks personalization. - Poor Email Content: Emails with excessive links, unprofessional language, or suspicious attachments are more likely to be flagged as spam. Common words associated with spam (like “free,” “limited offer,” etc.) can trigger spam filters.
- Sender Reputation: If your domain or IP address has been used to send spam in the past, it could be blacklisted, making it harder for your emails to reach inboxes.
Overview of SPF, DKIM, and DMARC records
To improve email deliverability and avoid being flagged as spam, it’s essential to set up proper email authentication methods. The three most important records for email authentication are SPF, DKIM, and DMARC:
SPF (Sender Policy Framework):
SPF is a DNS record that defines which mail servers are authorized to send email on behalf of your domain. It helps prevent spoofing by verifying that the email comes from a trusted server.
When a receiving mail server checks your email, it looks up your SPF record to ensure that the email is coming from a legitimate source. If the server sending the email is not authorized, the email may be flagged as spam or rejected outright.
DKIM (DomainKeys Identified Mail):
DKIM adds a digital signature to your email that verifies it was sent by an authorized sender and that the content of the email hasn’t been tampered with in transit.
This involves adding a public key to your DNS records. When the email is received, the recipient server can validate the signature by checking the public key, ensuring that the email is legitimate.
DMARC (Domain-based Message Authentication, Reporting, and Conformance):
DMARC builds on SPF and DKIM by allowing domain owners to specify how emails that fail authentication should be handled. It also provides reporting to help you monitor your email activity.
DMARC allows domain owners to instruct receiving servers to reject or quarantine emails that fail SPF or DKIM checks, further protecting your domain’s reputation.
Together, SPF, DKIM, and DMARC create a robust system that helps ensure your emails are legitimate and not marked as spam.
The role of SMTP in improving WordPress email delivery challenges
SMTP (Simple Mail Transfer Protocol) is the standard protocol used for sending emails over the internet. In WordPress, emails are typically sent using the PHP mail function by default, which is unreliable and often results in poor deliverability. Here’s why SMTP is a better choice:
- Reliability: SMTP ensures emails are sent through a designated, trusted mail server, which improves their chances of reaching the inbox. It’s more stable and secure than the PHP mail function.
- Authentication: SMTP provides more robust authentication options (e.g., SMTP AUTH), which helps improve email deliverability by confirming that the sender is authorized to send email from that domain.
- Customization: Using SMTP allows you to send emails through third-party services (like Gmail, SendGrid, Mailgun, etc.) that have better deliverability rates compared to the default WordPress setup.
- TLS Encryption: SMTP supports TLS (Transport Layer Security) encryption, which adds an additional layer of security to your emails, helping protect against interception and tampering.
Improving email deliverability in WordPress involves addressing multiple factors, including email authentication, using SMTP for reliable sending, and maintaining a positive sender and domain reputation. By implementing SPF, DKIM, DMARC, and SMTP, you can significantly increase the likelihood that your emails will land in your recipients’ inboxes instead of their spam folders.
Step-by-step manual: send emails from WordPress through wp_mail() function
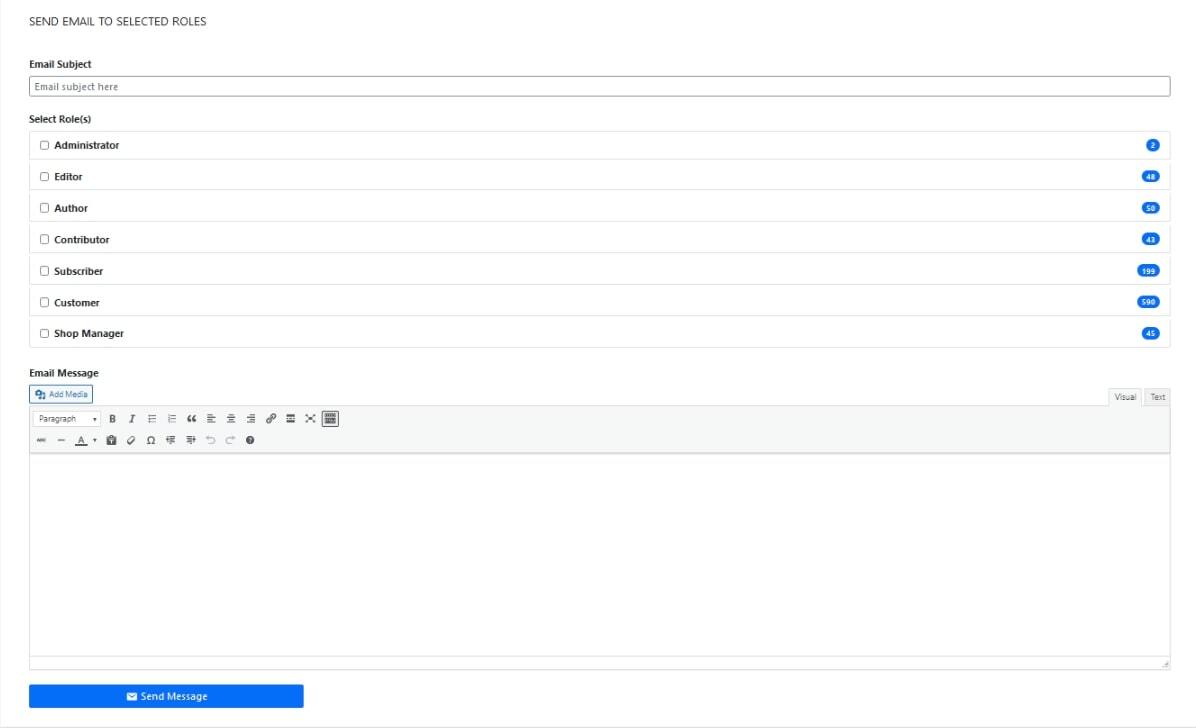
‘Send user email’ is a plugin that allows us to easily send mass emails by selecting individual users or using recipient roles. It has a simple interface and some special features that don’t require detailed configurations. This plugin uses the default wp_mail() function so it is compatible with any other email plugin you can have.
Among other things, it has a wp_mail() function that acts as a wrapper for the PHPMailer class. As a result, it leverages your web host’s server for dispatching emails. Add to this the fact that there are 24 additional reliant WP functions and server-based sending, and you will be hardly shocked that this method doesn’t always deliver as expected.
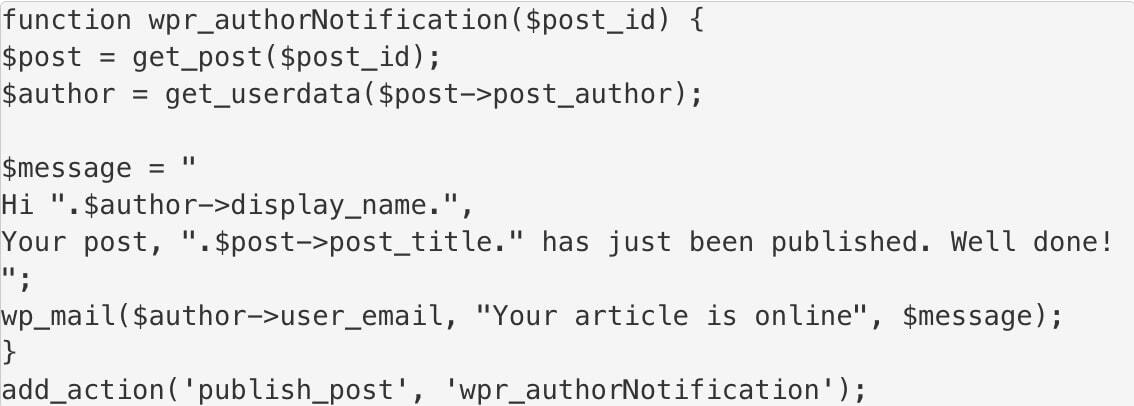
Here’s a stage-by-stage breakdown of the process the wp_mail() function follows when trying to send your emails:
- at the start, use a snippet of code that sets the recipient, subject, message, and other key details to get the email ready;
- then, wp_mail() invokes the PHP mail function nestled within the PHPMailer library, providing server instructions for email dispatch.

- it ignites the hosting servers’ request for the use of PHP mail for sending messages. They generally resort to SendMail or Postfix for directing the emails to their intended destination, where the receiving host either accepts or rejects them.
It’s fairly common for email dispatch attempts to be rejected, meaning your email may not get sent at all. Crafting HTML templates or attaching images with WordPress’s built-in function can be a bit of a hurdle without some additional tweaking.
More crucially, it has issues handling email headers, which partly explains why emails sent via native wp_mail() may wind up in spam. That is why it is worth paying more attention to a more reliable method for sending emails in WordPress based on the simple mail transfer protocol (SMTP) integration with your site.
Learn to send emails with the WordPress SMTP plugin
WordPress has a pre-built feature that makes it easy to send generated emails from your website. It uses the “mail” function integrated into the PHP language.
This feature allows you to send an email anonymously without authenticating with an email-sending service. Consequently, it is not well accepted by email service providers, who fight daily against the sending of abusive or unsolicited emails (SPAM).
To send mass emails with better deliverability, you can subscribe to some online email services such as Mailgun, Sendinblue, or Mailtrap. The latter lets you utilize the WP Mail SMTP plugin. This extension allows sending outgoing emails from your site and is simple to configure. All you need is to perform some actions described below.
Install WP Mail SMTP
Go to your WordPress dashboard and click on the Plugins > Add tab. In the WordPress plugins directory, search for the WP Mail SMTP By WPForms plugin. You can use the search box to find it easily. Now you only have to click ‘Activate’ and be done with installation. Read the following article if you need further guidance.
How to install a WordPress plugin
Enable WP Mail SMTP
After activation, this plugin will appear among your tabs. You need to click on WP Mail SMTP and then on Settings.
Configure WordPress to send outgoing emails using SMTP
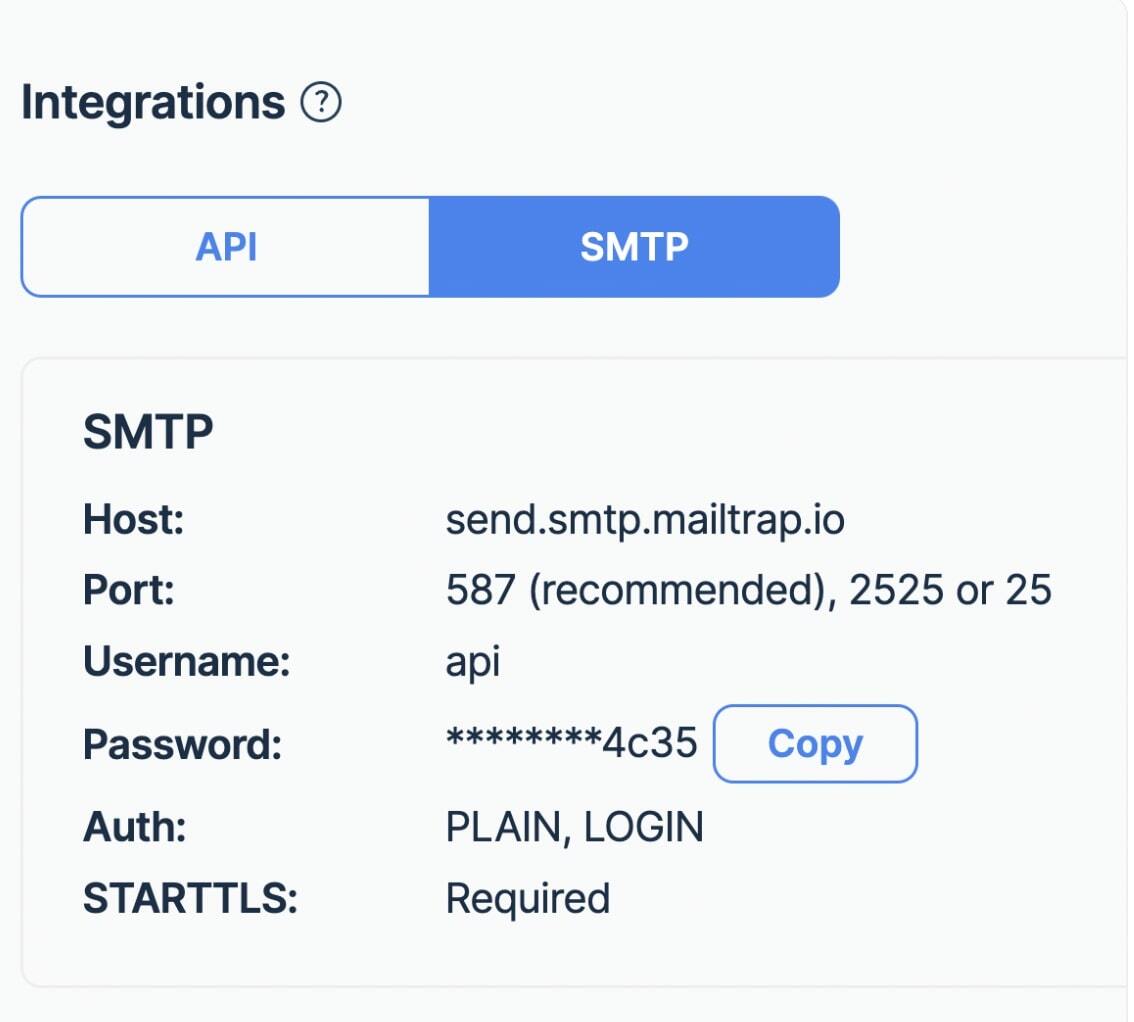
Before starting this process, make sure you have the following contact details with you:
- the SMTP hostname,
- SMTP user name,
- SMTP password.
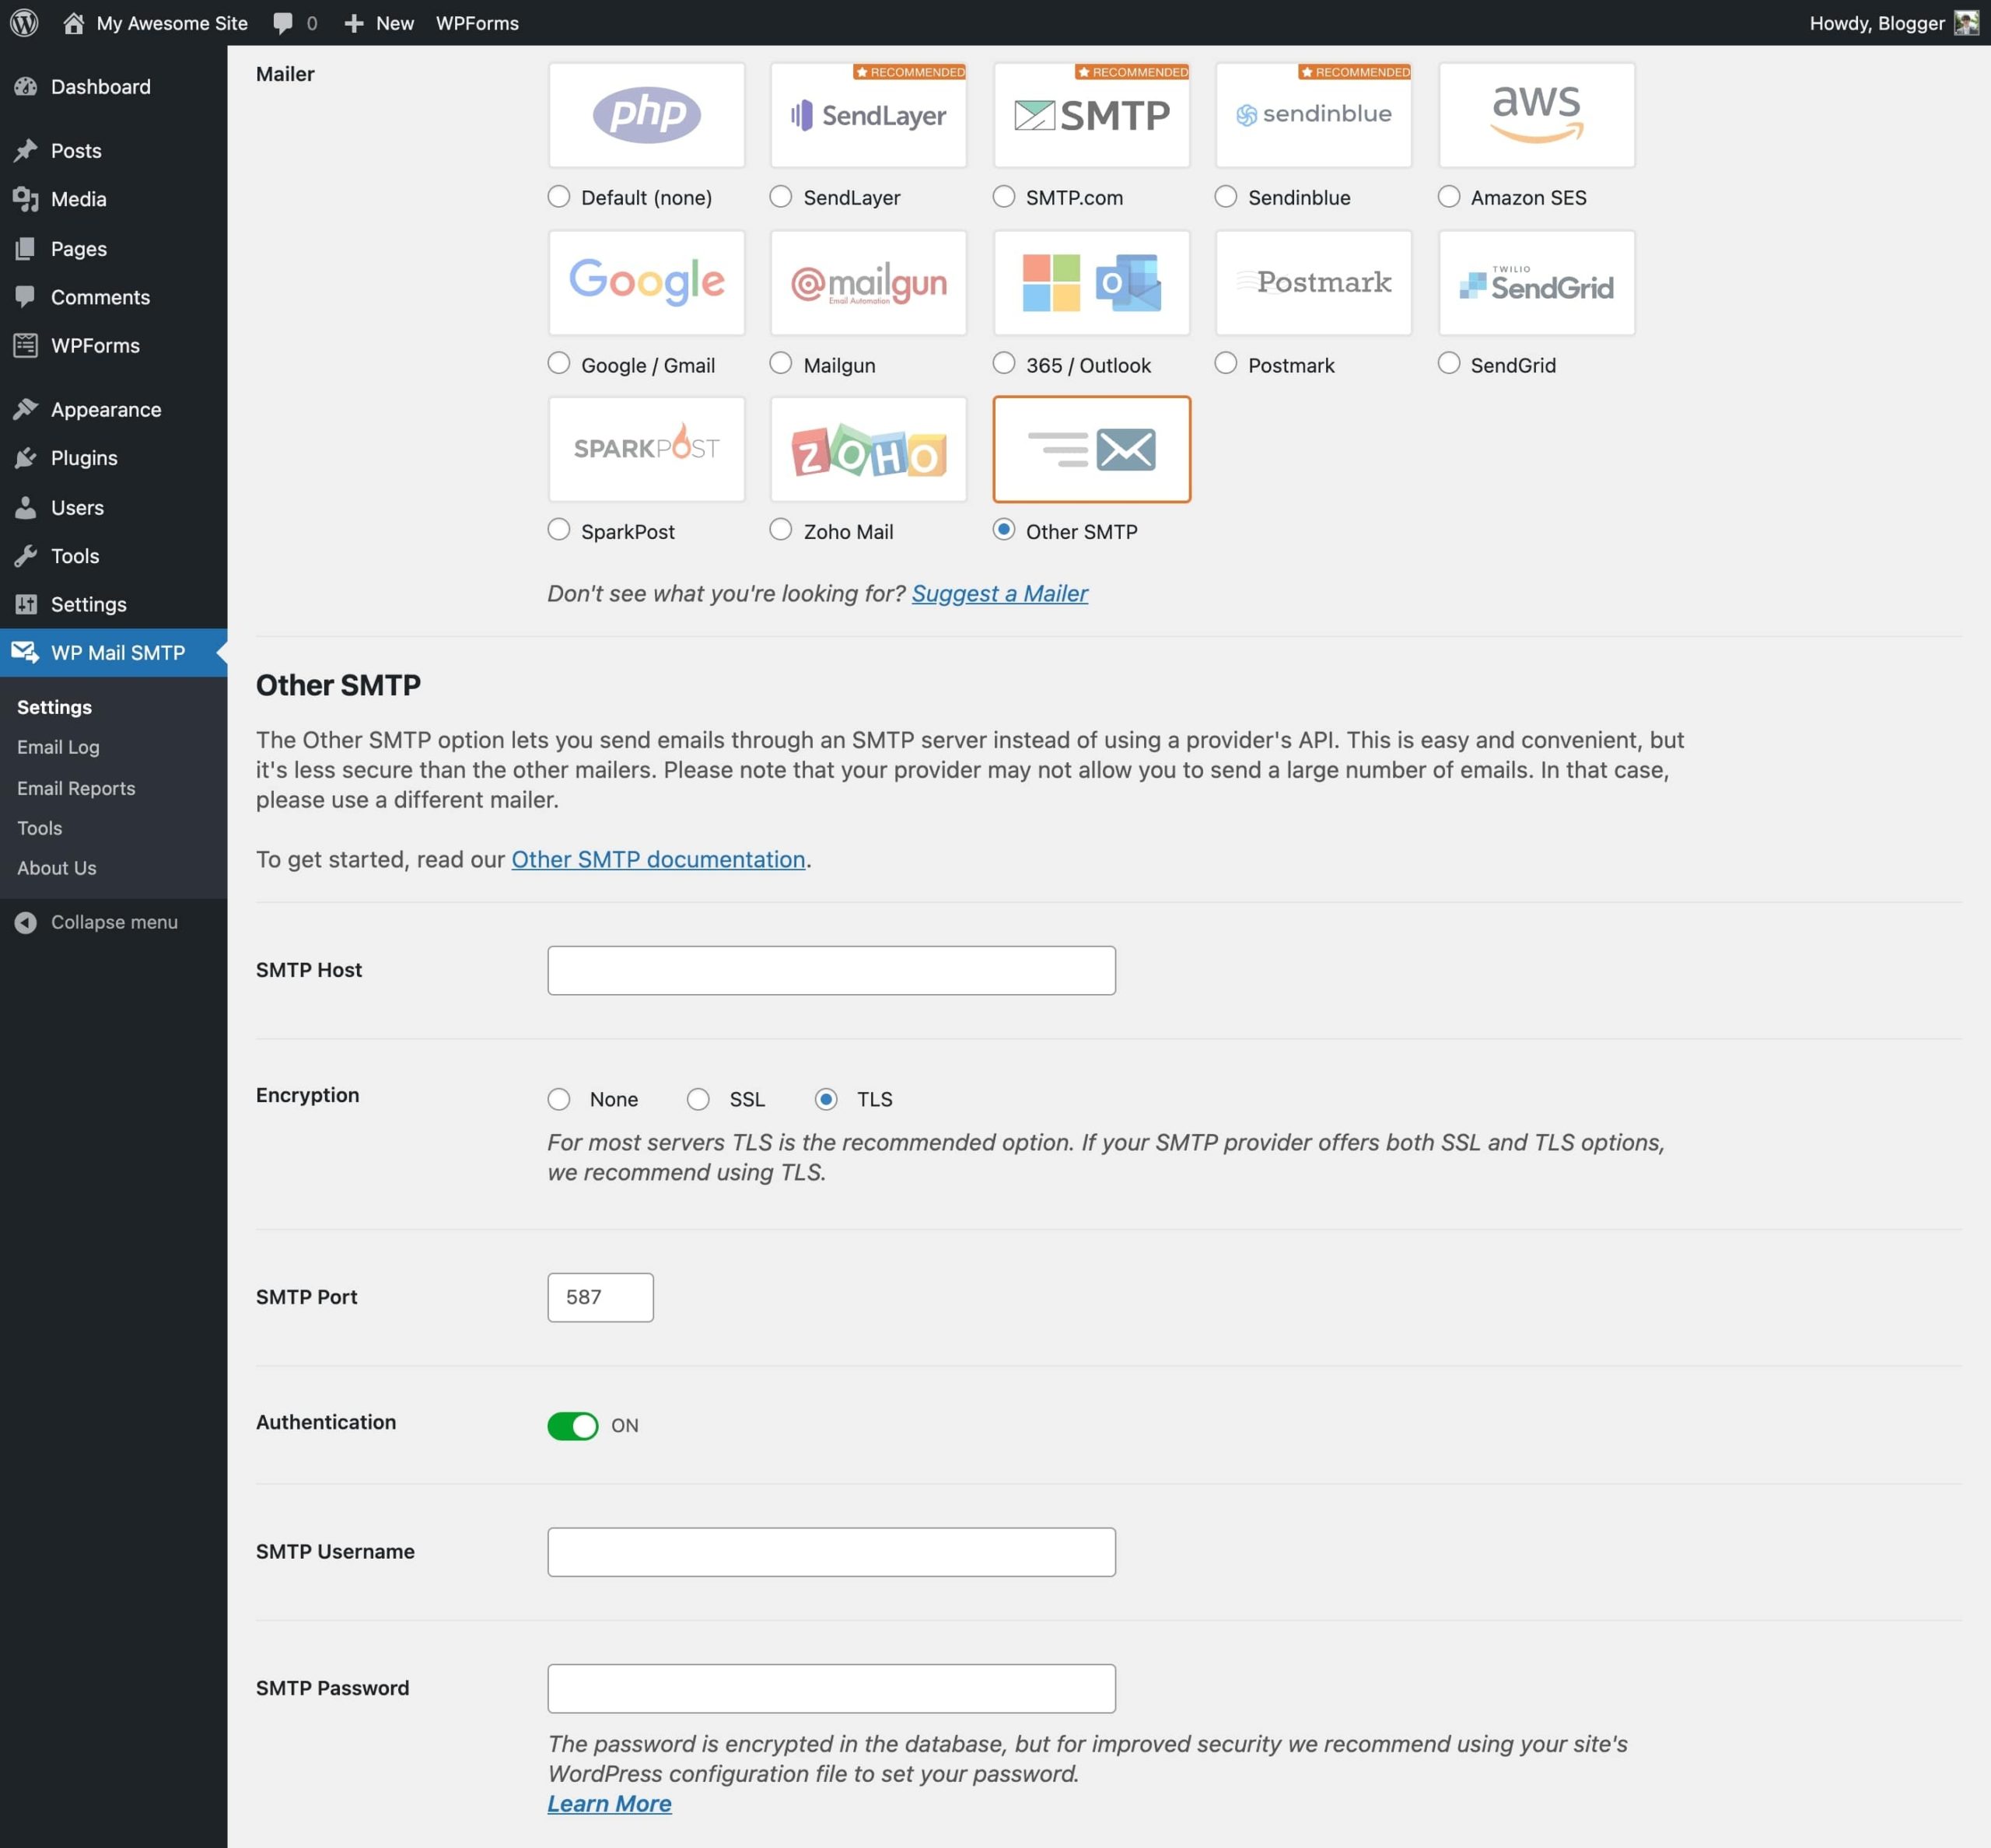
In the new interface, you will go to the configuration of the various parameters. They are:
- Sending email address. Please enter the email address from which all letters will be sent.
- Sender name. You must specify a name that will appear in the “from” box in the recipient’s email inbox. This can be the title of your site, your company, or any other name you want to appear.
- Force sending email and consigner name: If you check these two boxes respectively, you allow all the emails you have generated on your site to automatically carry the same information.
- Return path: It is recommended to activate this option to obtain good results. If this feature is disabled, all emails sent and not delivered will be lost.
- Sending service: Select another SMTP. By choosing it, you will now use the settings you initially retrieved from your mail account. Then go to the next step.
- SMTP host: Mark the name of your host. In most cases, this should have the following connotation. In case you stick to Mailtrap it will look like: send.smtp.mailtrap.io. If this configuration is not correct, you will not be able to use WP Mail SMTP
- Encryption: Here you must select an SSL certificate. If it offers you TLS instead, which is an advanced version of SSL, you must choose the latter. In both cases, the results will still be satisfactory.
- SMTP port: This varies depending on the type of encryption you have chosen. If you selected SSL, the port is 465 otherwise it will be 587.
Authentication: When enabled this option allows your email account to pass through server-side authentication.
SMTP identifier: In practice, this should be the email address that you use for messaging.
SMTP password: You must use the password that allows you to connect to your email address.
After having filled in all this information, you can click on the save settings button. The bottom part of the primary connection page with the above instances may look like this:
Master email dispatch in WordPress without the use of plugins
This procedure is tailored for those with a technical inclination as it demands a manual SMTP setup in WP via wp-config.php and some customizations to your WordPress theme. However, when executed accurately, this method can be the most direct approach that won’t overload your site with extra plugins.
Undoubtedly, an SMTP service is crucial to the process. This walkthrough presumes you’ve already configured Mailtrap and verified your domain.
Locate the wp-config.php in your website’s root directory and modify it through an SSH terminal or FTP server. Embed the following settings into the wp-config.php file. Note: For security reasons, these settings should be placed beneath the specified file and are meant for Mailtrap users. If you’re utilizing Gmail SMTP, for instance, the values would differ.
define( ‘SMTP_username’, ‘api’ ); // Host username
define( ‘SMTP_password’, ‘your-mailtrap-smtp-password’ ); // Mailtrap SMTP password
define( ‘SMTP_server’, ‘send.smtp.mailtrap.io’ ); // SMTP server address
define( ‘SMTP_FROM’, ‘[email protected]’ ); // Your email address
define( ‘SMTP_NAME’, ‘Your Name’ ); // Business from name
define( ‘SMTP_PORT’, ‘587’ ); // Server port number
define( ‘SMTP_SECURE’, ‘tls’ ); // Encryption – SSL or TLS (recommended)
define( ‘SMTP_AUTH’, true ); // Use SMTP authentication (true|false)
define( ‘SMTP_DEBUG’, 0 ); // for debugging purposes only
After the SMTP has been set up manually, proceed to the functions.php by going to the WordPress dashboard, then Appearance, and finally Theme Editor. Next, copy and paste the following snippet for the changes to be effective. As a reminder, it’s preferable to use the child theme. Add the below code snippet to the functions.php file.
add_action( 'phpmailer_init', 'my_phpmailer_smtp' );
function my_phpmailer_smtp( $phpmailer ) {
    $phpmailer->isSMTP();
    $phpmailer->Host = SMTP_server;
    $phpmailer->SMTPAuth = SMTP_AUTH;
    $phpmailer->Port = SMTP_PORT;
    $phpmailer->Username = SMTP_username;
    $phpmailer->Password = SMTP_password;
    $phpmailer->SMTPSecure = SMTP_SECURE;
    $phpmailer->From = SMTP_FROM;
    $phpmailer->FromName = SMTP_NAME;
}
Preserve your updated settings and remember, you can simply copy-paste the code without needing to adjust anything. Finally, to validate your new setup, try sending an email via a “contact us” form.
Unpacking the process of sending HTML emails
The important thing here is to realize that all email sent from WP is by default plain text, with no HTML. The advantage of sending emails in text/plain format is that they look good to all existing email clients.
The format in which an email is sent is specified in a header called Content-Type. By default, its value in WordPress is text/plain, but we can change it to text/html using the wp_mail_content_type filter:
function send_email_on_test_finish( $test ) {
   $email = '[email protected]';
   $title = sprintf(
     __( 'Test "%s" finished', 'nelio' ),
     $test->post_title
   );
   $body = '...';
   $content_type = function() { return 'text/html'; };
   add_filter( 'wp_mail_content_type', $content_type );
   wp_mail( $email, $title, $body );
   remove_filter( 'wp_mail_content_type', $content_type );
}
Once you have it, you are almost ready to send the first email using WordPress HTML. Unfortunately, WP does not offer any standard mechanism for creating and using HTML templates, so it is entirely up to you to create your own sample.
As usual in the WP ecosystem, numerous plugins help you create templates so that all the emails sent are formatted according to the desired style. A couple of examples are:
WordPress Email Template Designer. It allows you to create fully customizable responsive templates without having to touch any code. It has many interesting features (such as real-time preview) and is very actively developed.
Email Templates. It allows you to choose the type of template you want, customize it by adding a logo design, changing colors, etc., changing colors, etc., and, once configured, it ensures that all outgoing emails use that template.
Although these plugins may be different from what you need to send emails from your plugin, they are very useful in helping you generate a new template that you can then extract and package into your plugin.
Emailing 101 continued: how to include attachments
WordPress offers two methods for sending emails with attachments – the native approach using the wp_mail() function, and the alternative of employing a plugin. Here are brief tutorials for both:
Wp_mail() method
Store your attachment files locally on WP, making it possible to append them to the email $attachments. For instance, an email formatted in HTML with attachments might resemble the one below. This method entails configuring custom headers.
$to = '[email protected]';
$subject = 'Email subject';
$body = 'Email body content';
$headers = array('Content-Type: text/html; charset=UTF-8');

wp_mail( $to, $subject, $body, $headers );

// For attachment

$attachments = array( WP_CONTENT_DIR . '/uploads/file_to_attach.zip' );
$headers = 'From: Your business and <[email protected]>' . "\r\n";

wp_mail( '[email protected]', 'subject', 'message', $headers, $attachments );
You don’t need to adjust custom headers to send HTML emails with attachments. You can use $phpmailer–>AltBody to establish an alternate body and add attachments.
This action changes the content type to multipart/alternative instead of multipart/mixed, allowing PHPMailer to handle the rest without having to manually tweak custom headers.
When adding attachments, your content type will become multipart/mixed. However, there’s a multipart/alternative nested within, containing text/html and text/plain parts ahead of the attachments.
The plugin method
Prior to selecting the plugin route, consider the types of attachments you wish to send. Typically, these are PDF invoices dispatched once an eCommerce or SaaS customer completes a purchase. Hence, we’ll guide you succinctly on how to execute this using WooCommerce PDF Invoices & Packing Slips.
Download and activate the plugin, then follow the setup wizard to tailor its operations. This plugin allows you to modify the invoice layout and choose which WordPress transactional emails should incorporate the invoice.
Become an email multitasker: send to multiple recipients
Once more, you have two routes to take when you need to include CC and/or BCC in your WordPress emails.
Approach via wp_mail() function: WordPress welcomes either a comma-separated list or an array of email addresses, and these can be determined under the $to string|string[] variable. The code snippet below illustrates how to define an array for multiple recipients.
It’s also feasible to encapsulate CC and BCC recipients within an array.

The plugin route: In the event you’re employing a forms plugin, such as WPForms, it’s relatively simple to add multiple recipients to your email notifications. Bear in mind, however, that this functionality is exclusive to the premium version of the plugin, and its purpose is to dispatch emails to several recipients post a user’s form submission.
Regardless, your journey begins by navigating to the WPForms Settings and enabling Notifications by clicking the toggle. Proceed to input the email addresses of the intended recipients into the field under Send To Email Address, and make sure to distinguish them with commas.
WordPress email test run: the reason for and the ease in how
Too often we hear about users having issues with WordPress and not sending email. That’s a problem because you rely on email to keep your website running smoothly.
For example, your site sends out emails to welcome new users, reset lost passwords, submit order forms, and notify you when a new user signs up or someone fills out your contact form.
There are a few things you can do to improve the reliability of your WP email. For example, we recommend that you send your email through a trusted SMTP service provider and set up logs of messages sent by your website so that you can track your success.
When you first set up your WordPress website or SMTP service, it’s a good idea to confirm that your site is working properly by sending a test email. With that in mind, let’s take a look at how to send a test email from WordPress.
Send a test email from WordPress

The first thing you need to do is install and activate the WP Email SMTP connection.
After that, you need to configure the plugin to work with your SMTP mail service. The WP Mail SMTP Wizard will walk you through the process step by step.
Configure WP Mail SMTP to work with your SMTP mail service
Go to WP Mail SMTP » Tools in your admin menu, where you will see the ‘Email Test’ page. By default, the test email will be sent to your site administrator’s email, but you can change this by typing a different email address in the “Send To” field.
Go to WP Mail SMTP » Tools
We recommend that you keep the ‘HTML’ setting in the ‘On’ position, but if you want to send a plain text email, you can turn it off.
Once you are happy with the settings, click the ‘Send Email’ button and a test email will be sent to the address you entered.
View email test results
After WP Mail SMTP attempts to send the test email, you will receive immediate feedback on whether the test was successful or not.
If your WordPress email was set up correctly, the test email was sent without any problem. We assume you want to check if the test email actually reached the address it was sent to. You should find a note like the one below in your inbox. If you do, congratulations! Email is working correctly on your WordPress site.
However, if there are problems with your email setup, the test email may not be sent. You’ll see a message that describes the error or problem, along with some steps you can take to resolve it.
After following the troubleshooting steps, you will need to send another test email to confirm that your WordPress email is now working.
Wrestling with WordPress email delivery troubles
The reasons for WordPress fumbling emails – either by not sending them or getting them lost in spam – can range from server hiccups to pesky plugin problems. Here, we’ve prepared a handy toolkit of the most usual culprits and some crafty solutions to get you back on track.
When WordPress may refuse to send emails
The eerie silence when emails simply refuse to fly could be down to non-functioning PHP features or an overly enthusiastic server on a sending spree, blocking subsequent efforts.
Regardless of the cause, switching your settings to ride on an SMTP should clear up this conundrum, giving your infrastructure a break from PHP and hosting servers.
Emails playing hide and seek in spam If your emails are regularly finding refuge in spam, it might be a sign that your IP has fallen out of favor and been blacklisted. Or, it could be that your email construction skills need a little polishing, with unsupported or shaky HTML the culprits.
How to solve this problem?
You’ll need a trusty tool like the Mailtrap Sandbox. This little gem lets you capture emails from staging, analyze spam scores, validate HTML/CSS, and check if your domain is on any naughty lists.
Mailtrap Email Sandbox – Your Spam Detective Server configuration has gone awry. If you’re part of the Mailtrap Email SMTP fan club, you’ll see a cheerful popup confirming your test email is en route.
Mailtrap – Your Setup Confirmation Companion. You can then dive in and see if your email truly made it to the inbox. Remember, even if it takes a detour to the spam or junk folders, it’s a thumbs-up for your server configuration.
The drama evolves in the contact form. Your plugin might be sneakily filling in the ‘From’ field with the email address of the user completing the form. But since the email (or form) isn’t actually making its entrance from the user but your WordPress site, email providers might call out the email as an imposter.
Some notable plugins known for this include Gravity Forms, Ninja Forms, Contact Form 7, WPForms, Happy Forms, and so on.
Plugin showdowns. Sometimes two plugins, similar in nature, might find themselves at odds with each other, effectively blocking any attempts at sending emails. It’s a turf war, really.
Unfortunately, there’s no magic wand to wave this away – you’ll need to deactivate them all and then bring them back one by one, testing as you go, until the email airways are open again.
Improve your WordPress email delivery today
Navigating the tricky terrain of WordPress email delivery doesn’t have to be a daunting task. Through this comprehensive guide, we’ve unveiled the secrets behind managing plugins, harnessing installed functions, and executing precise commands to ensure your emails reach their intended destination.
You can also use InboxWP to handle transactional emails efficiently. This plugin helps users in managing critical emails such as password resets, sign-ups, order confirmations, and more. With InboxWP, you’ll be able to resolve common sending issues and ensure a high delivery rate. It also integrates seamlessly with various WordPress plugins and provides a white-labeled email service.
Now that you’re armed with this knowledge, you’re well-equipped to tackle any email delivery challenge that WordPress might throw at you. It’s time to implement these practical tips and witness first-hand the remarkable improvements in your daily WordPress email operations. Happy emailing!


Add your first comment to this post