There’s a big difference between a regular website and a WooCommerce website. WooCommerce sites are usually eCommerce stores that deal with sensitive customer information. You may lose any piece of important information if your website crashes or the web server fails.
So, it’s really important to know how to back up a WooCommerce site to remain worry-free when dealing with a WooCommerce store.
But, the word backup seems a bit intimidating. It often creates a sense of mundane tasks, requiring excellent technical skills, and of course a great deal of patience. In this blog, we’ll debug this misconception. Creating a backup is not difficult anymore- thanks to the modern WordPress backup plugins!
Keep reading to know how to backup WooCommerce site both manually and using a plugin. We’ve added all possible ways. Eventually, it’s your decision to choose one method that works best for you.
Quick Navigation
Why you should backup WooCommerce sites?

An already established WooCommerce store’s website has very fewer changes in terms of website design and other media elements. But, the database constantly changes since new customers place orders, new people open accounts, the order status gets changed, and so on.
Besides, server failure, brute-force attacks, DDoS attacks, and other malware attacks can cause your website to go down. A backup can then help you get back the website to its original condition. That’s why creating a backup of a WooCommerce website is a must so that you don’t lose any data if anything happens.
Nearly 40% of small businesses experience data loss due to cyberattacks. Alarmingly, 60% of small businesses hit by a cyberattack shut down within six months, and the average cost of such an attack is $200,000.”
If you lose sensitive customer data- that would be almost impossible to get back. You’ll lose track of orders and customers’ billing and shipping addresses. This can largely affect a business’s reputation and trustworthiness.
Creating a timely backup of your WooCommerce website can help you get rid of such hassles. No worries! Learn how to a backup WooCommerce site with and without a plugin from the below section.
Case Study: How Automated Backups Saved a WooCommerce Store
Imagine running a thriving WooCommerce store with thousands of customers and years of data. One day, a ransomware attack encrypts all your site files and database, leaving you unable to access your store. Without a reliable backup, the loss could be devastating, both financially and reputationally.
However, in this hypothetical example, the store owner had implemented UpdraftPlus with automated daily backups stored securely in Google Drive. Within hours of the attack:
- Restoration Process: The owner logged into the WordPress admin dashboard using recovery mode and triggered the restoration process through UpdraftPlus.
- Cloud Backup Access: The backup stored in Google Drive was downloaded and restored directly from the plugin.
- Business Continuity: The website was back online within 3 hours, and no customer data was lost.
This example highlights the importance of real-time or scheduled backups and cloud storage integration. Plugins like UpdraftPlus, BlogVault, and Jetpack Backup can prevent data loss and ensure business continuity.
How to backup your WooCommerce site without losing data
You can backup your WooCommerce site in three methods- using a plugin, using an FTP client, and through your hosting provider. First, let’s learn how to backup a WooCommerce site with a plugin.
There are many quality plugins that can create backups and restore them quickly when needed. We’re using UpdraftPlus here. It has everything you need to automate the backup process for your website. Let’s learn how you can create backups with a WooCommerce backup plugin.
1. Create automated backups with a plugin (the easiest method)
Creating backups with a plugin is easy and safe. It reduces the chance of errors and makes the process hassle-free. We’ve chosen UpdraftPlus for this tutorial since it is a popular WordPress backup plugin that works perfectly.
Here’s an updated comparison table for the backup plugins UpdraftPlus, BackupBuddy, Jetpack Backup, and BlogVault, based on the latest available information:
| Plugin | Features | Price (Free vs Paid) | Ratings (WordPress.org) | Use Cases |
|---|---|---|---|---|
| UpdraftPlus | Scheduled and on-demand backups, multiple cloud storage options, migration tool, incremental backups | Free with paid addons (starting at $70/year) | 4.8/5 | Suitable for general users and small businesses seeking a comprehensive backup solution. |
| BackupBuddy | Full site backups, scheduled backups, site migration, malware scanning, multiple storage destinations | Paid only (starting at $80/year) | 4.3/5 | Ideal for advanced users requiring comprehensive backup and security features. |
| Jetpack Backup | Real-time backups, easy restoration, cloud-first approach, integrates with other Jetpack features | Paid only (starting at $47.88/year) | 4.1/5 | Perfect for users seeking real-time backups and seamless integration with the Jetpack ecosystem. |
| BlogVault | Incremental backups, staging environment, real-time updates, site migration, security scanning | Paid only (starting at $89/year) | 4.7/5 | Best for enterprise-level users and developers needing advanced features like staging and security. |
With UpdraftPlus, you can create backups and store them on Google Drive, Dropbox, Amazon S3, OneDrive, etc. cloud platforms. UpdraftPlus allows users to restore any version of the backup within a few clicks. Let’s see how you can back up your WooCommerce site with it.
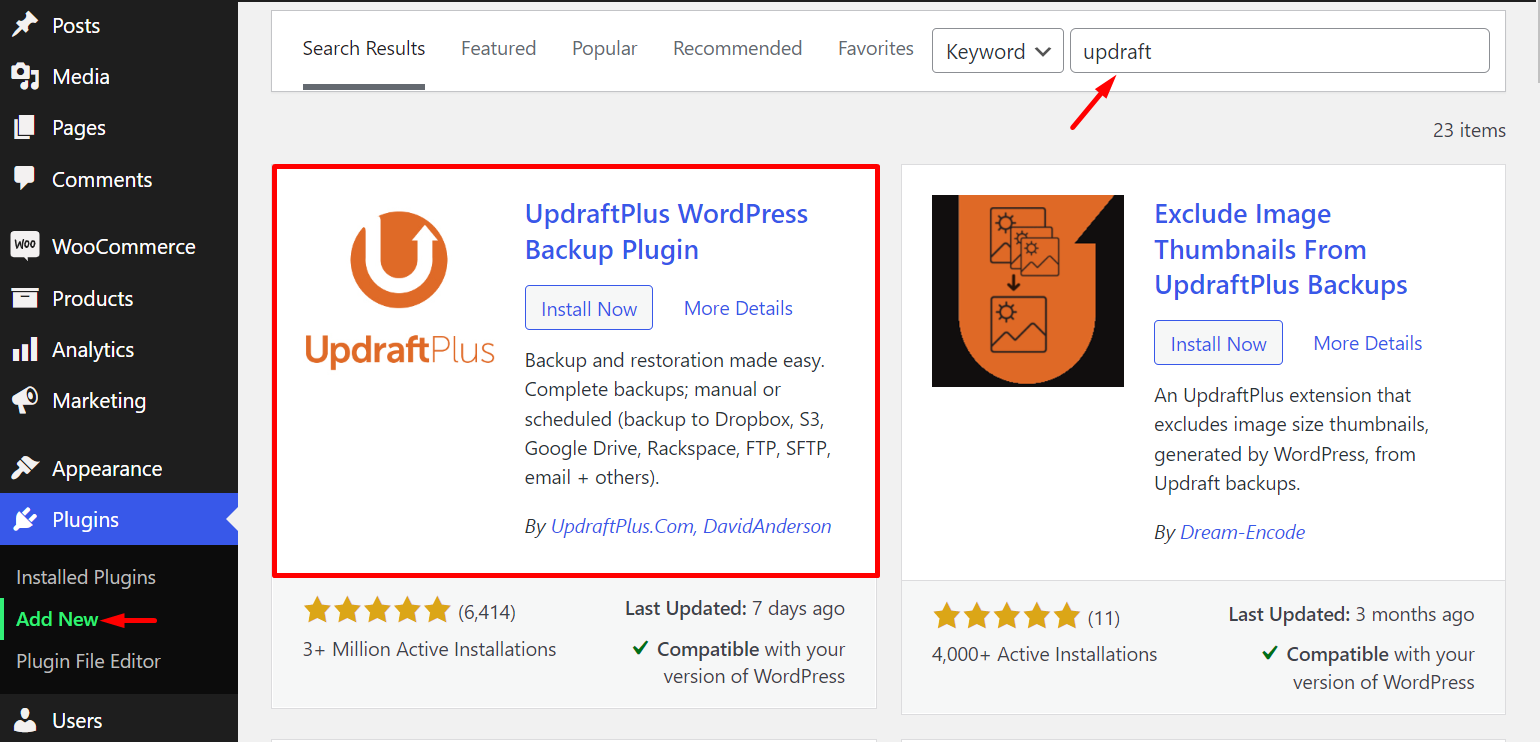
Step 1: Install & activate the UpdraftPlus Plugin
Log in to your website’s dashboard and go to the Plugins menu. Click on Add New to open the plugin search directory. Type ‘updraftplus’ on the search bar. It will bring the relevant results for you.
Choose the first result and hit the Install Now button. Activate the plugin once the installation is complete.
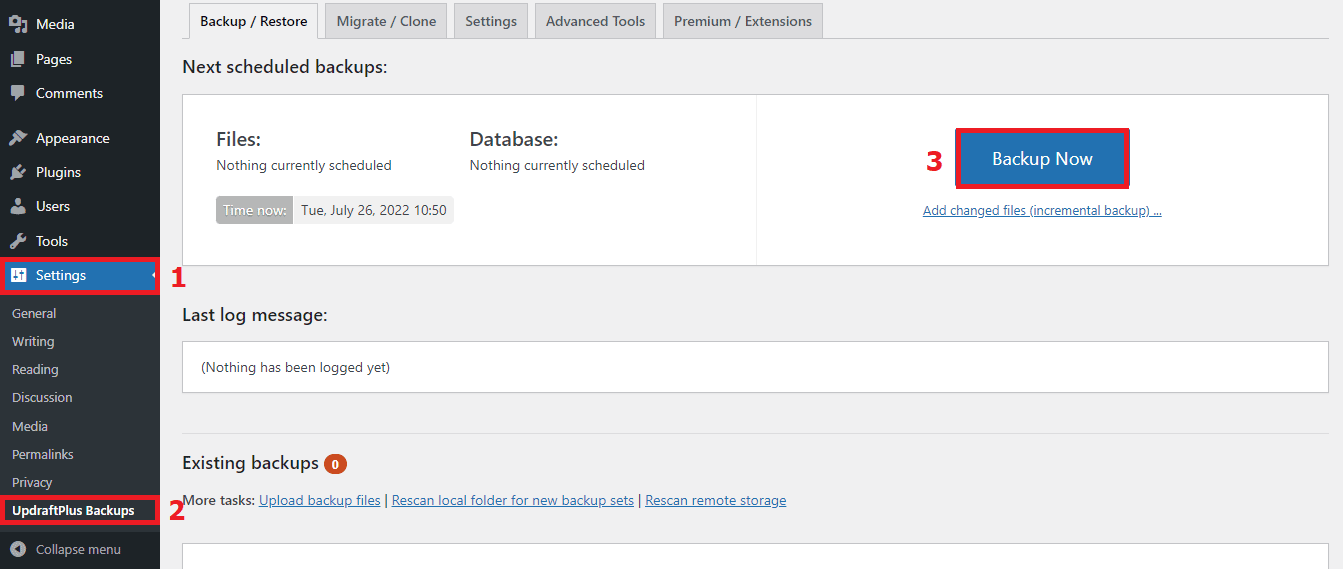
Step 2: Configure the backup options
Go to Settings from your admin panel sidebar. Click on the UpdraftPlus Backups option. It will open a new page with the Backup Now button. Hit this button for the next steps.
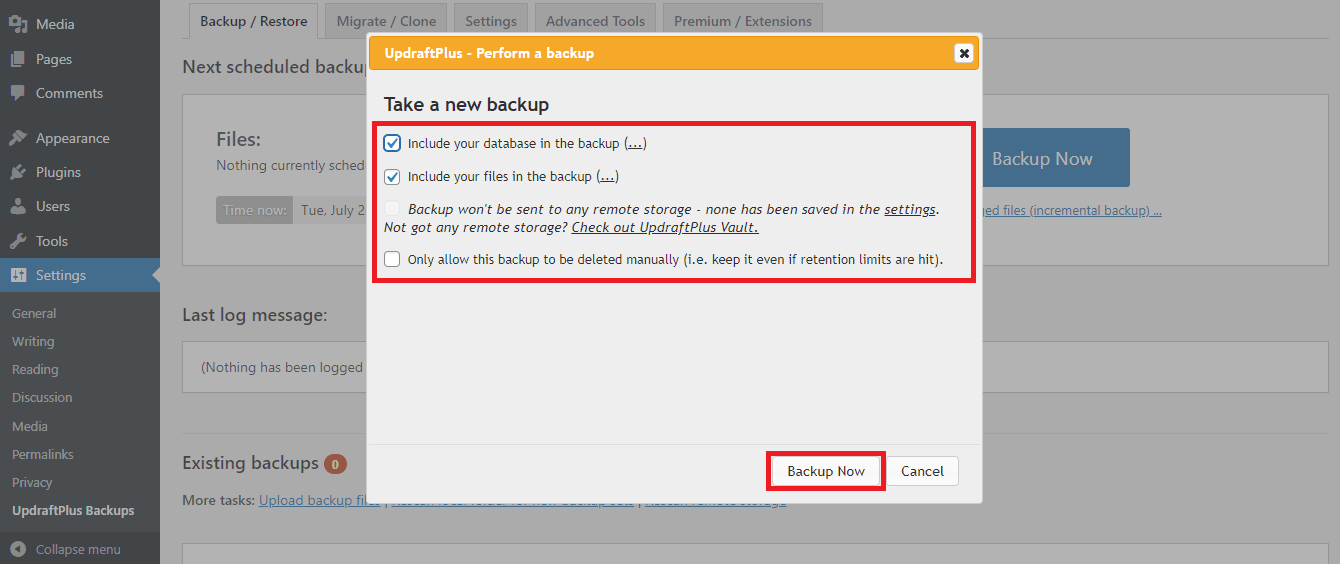
Now you’ll see a popup like the below one. Mark what type of data you need and press the Backup Now button.
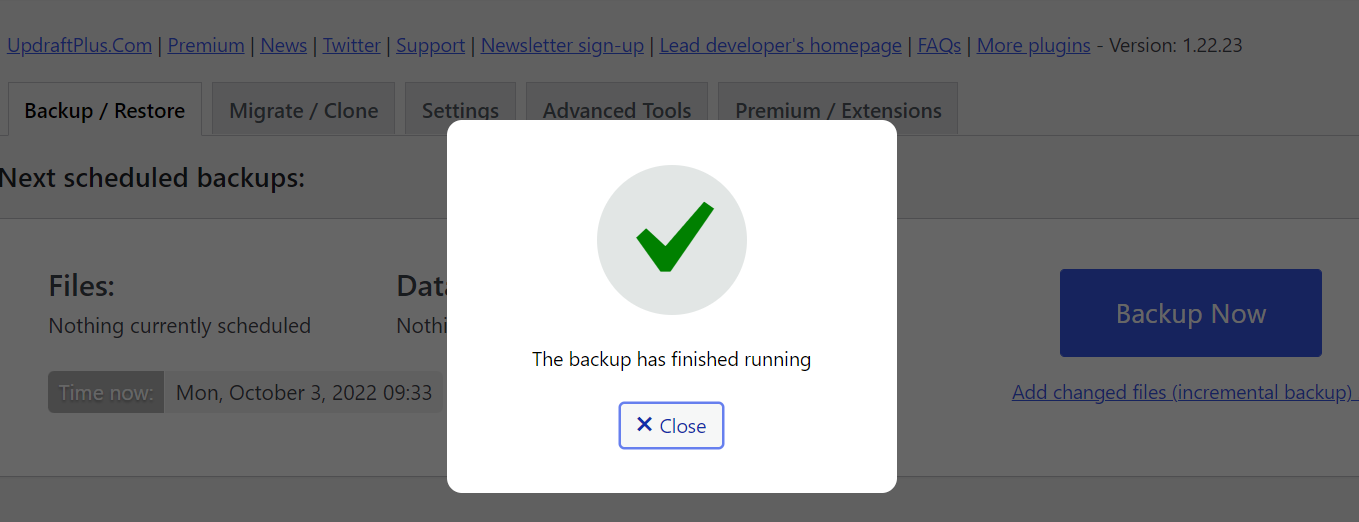
You’ll see a notification like the following image if your backup is successfully created.
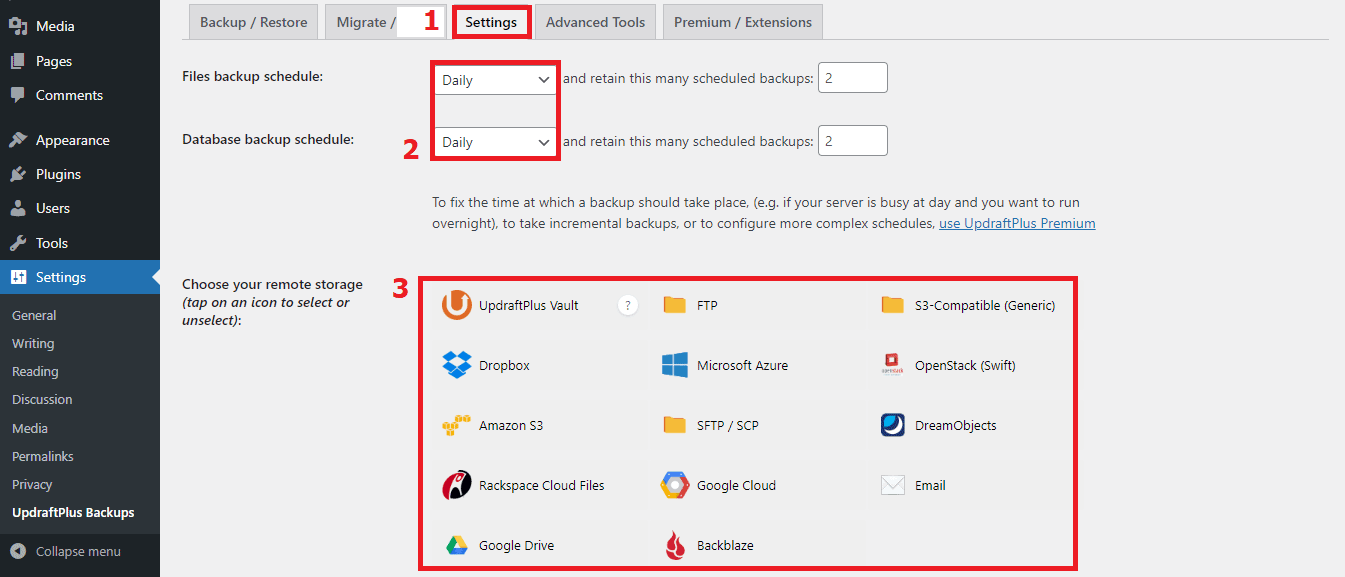
Step 3: Schedule your backup & choose a remote storage
UpdraftPlus allows you to fix a schedule for automated backups. Go to the Settings tab from the top bar. It will open the required configuration fields for you. You can choose the backup schedule as per your needs.
It also has a wide range of remote storage options to help you with cloud-based backups. Choose your preferred remote storage by tapping on the icon you see here.
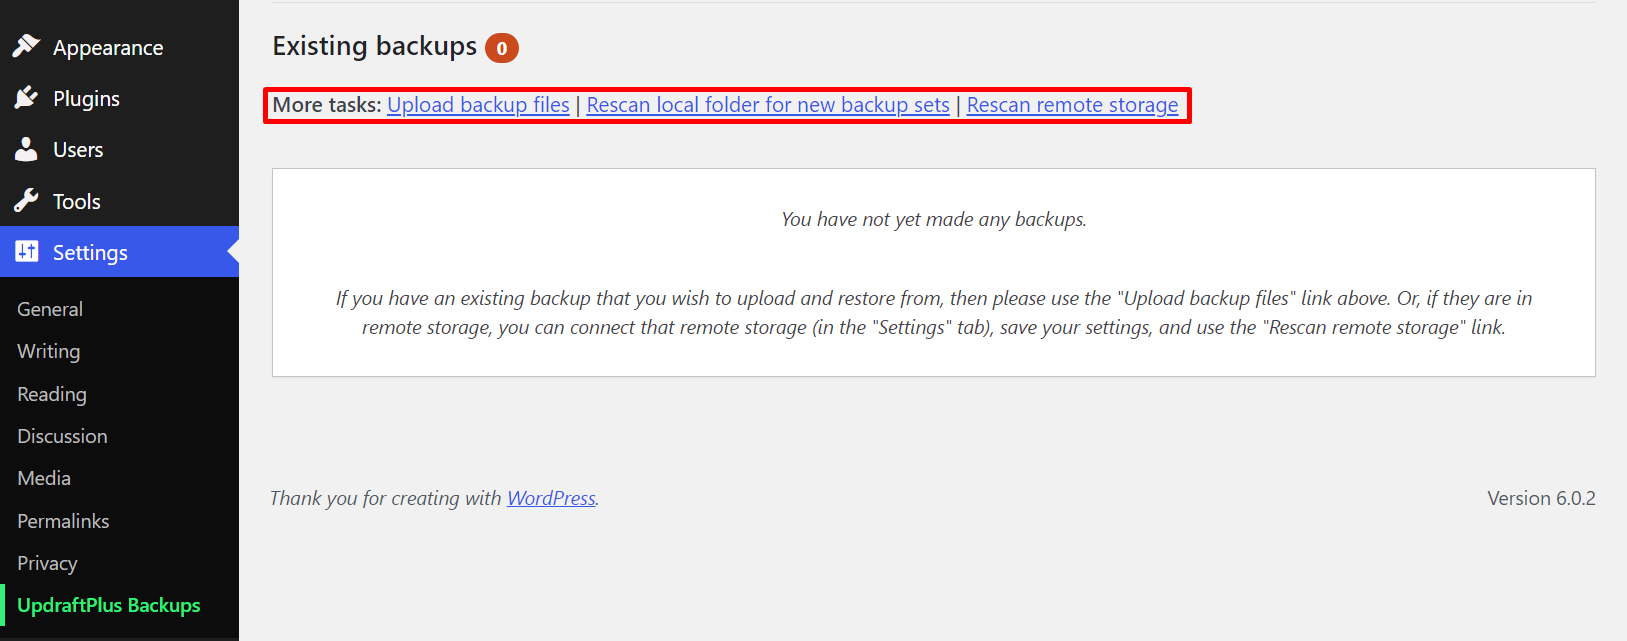
Step 4: Upload backup files or scan remote storage for restoration
You can easily restore your WooCommerce website data by uploading the backup files here. Click on the Upload backup files link if your backup files are stored in a drive or in your computer. Click on the Rescan remote storage to fetch the backup files from remote storage.
Your website is likely to retain its previous state if the restoration process is successful. Other than using a WooCommerce backup plugin, you can backup a site by following two more additional methods as follows.
2. Backup WooCommerce site without a plugin
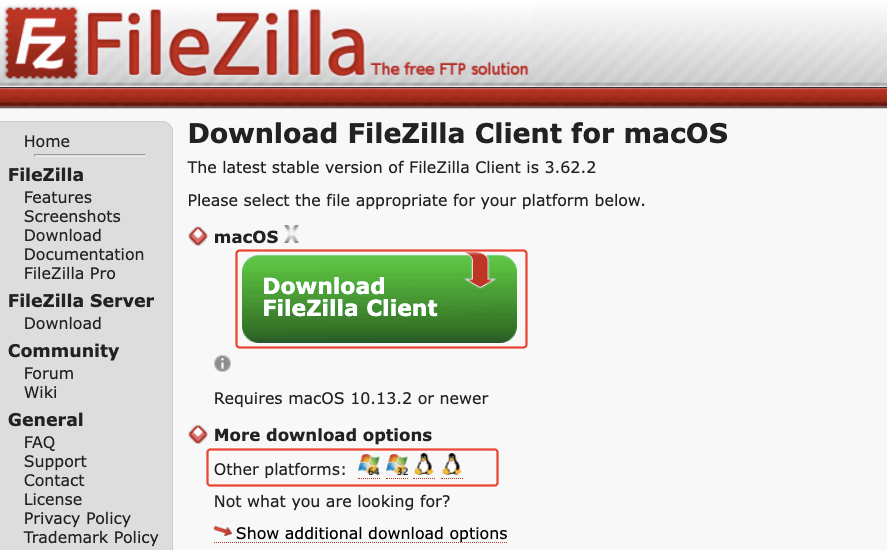
You can manually create your WooCommerce site’s backup though it’s difficult to create and restore a backup without using a plugin. But, here, you’ll need an FTP client to transfer your website’s files to your computer. We used the FileZilla FTP client for this tutorial.
Step 1: Install an FTP Client for your OS
Visit the official website of the FTP client you want to use. Then download the installation file from the website and install the tool on your computer.
Open the FTP client on your computer once the installation is complete.
Step 2: Connect the FTP client with your hosting
Go to your FTP client and choose a directory of your computer where you want to keep the transferred files. Here, we used Users/WPHive/WooCommerce Backup.
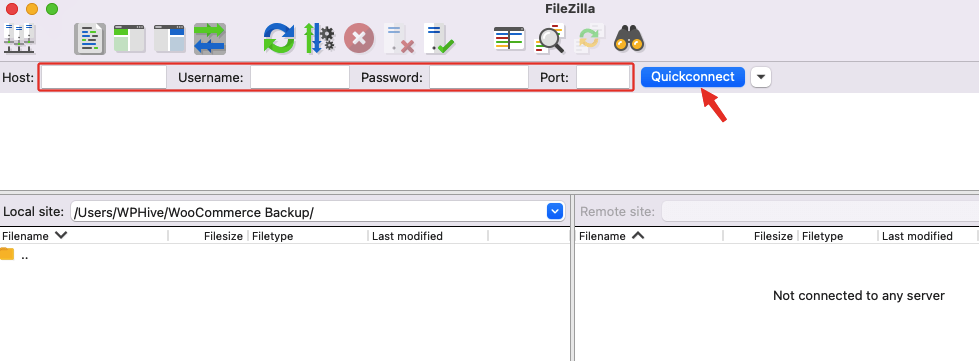
You need a few pieces of correct information to connect the FTP client to your hosting account and cPanel. Host, username, password, and port- all this information was provided to you by your hosting provider when you subscribed to their services.
These are the username and passwords associated with your cPanel. You can write your domain name in the host field. And, put 21 in the port field. Then click Quickconnect to connect the FTP client to the cPanel.
You’ll see all your website’s files on the right side of the server get connected without any error.
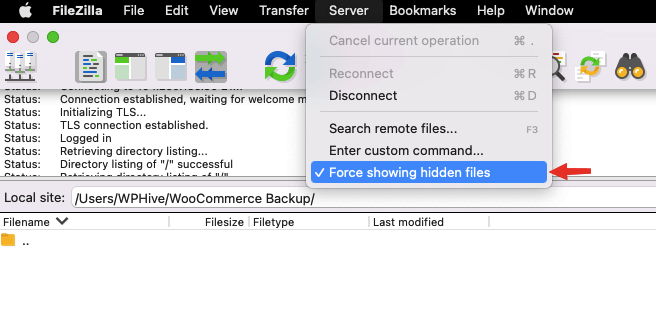
Step 3: Enable the ‘Force showing hidden files’ option
Make sure you turn on showing hidden files. Go to the Server menu from the top bar and click on ‘Force showing hidden files this will show all files including the hidden ones. It is important to ensure that no files will get missing when you transfer them to your local storage.
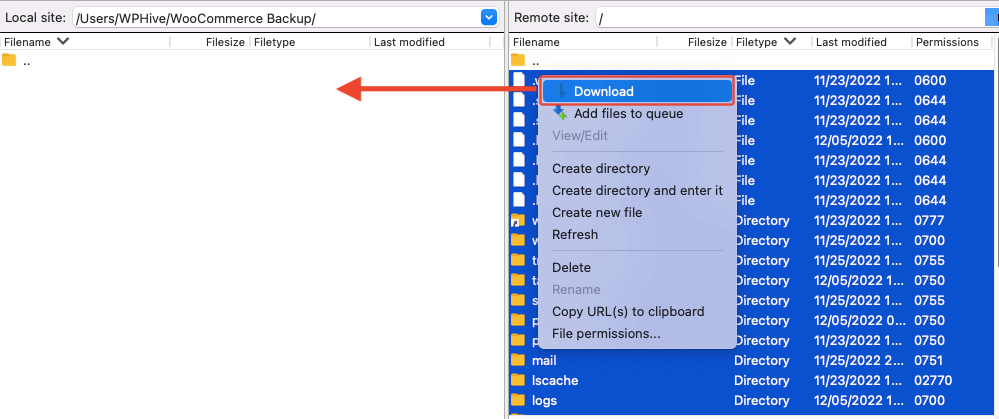
Step 4: Transfer your files to the local site
You’ll see all your WooCommerce website’s files, including the hidden ones, under the Remote site window of the FTP client. Mark all of them and right-click on the mouse. Select Download from the options. It will transfer the files to the left side of the FTP interface under the Local site window.
The transfer process may take time to complete. Keep patience during this period.
Step 5: Create a backup of your database
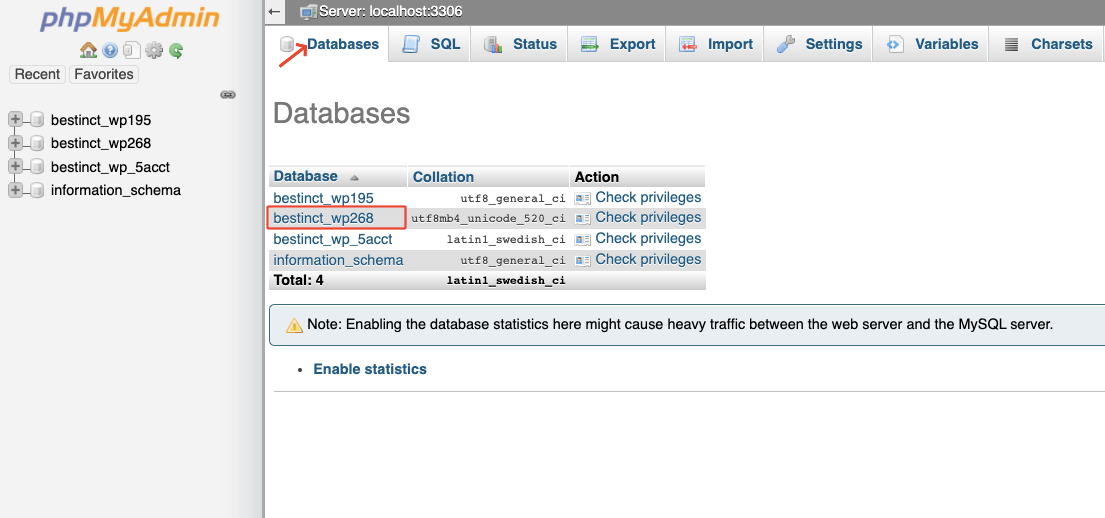
Now, it’s time to create a backup of the database associated with your website. You may have multiple backups. Make sure to select the right one to avoid future hassles. You can know the name of your WooCommerce website’s database by examining the wp-config.php file.
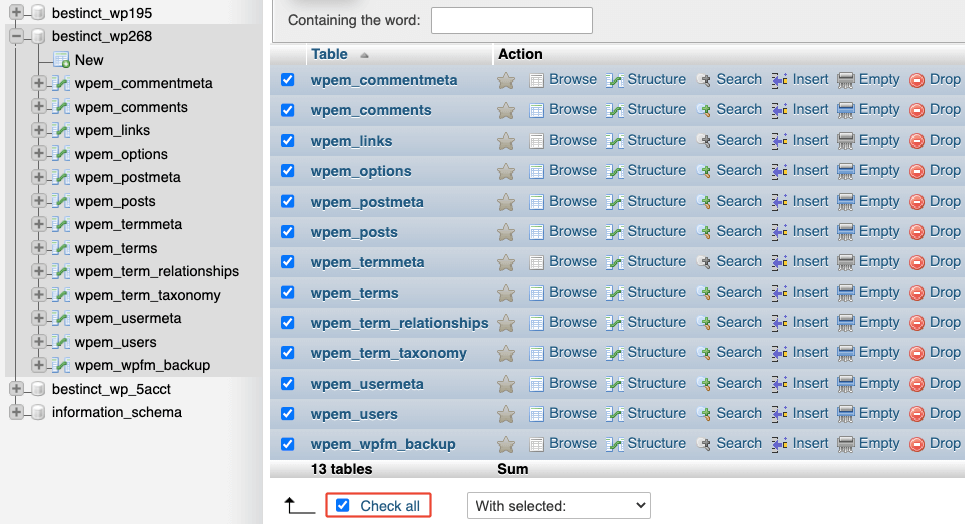
Go to phpMyAdmin from your cPanel and choose databases from the top bar menu. Click on your preferred database. It will open tables for your use.
Select all available tables by clicking on the checkbox ‘Check all‘.
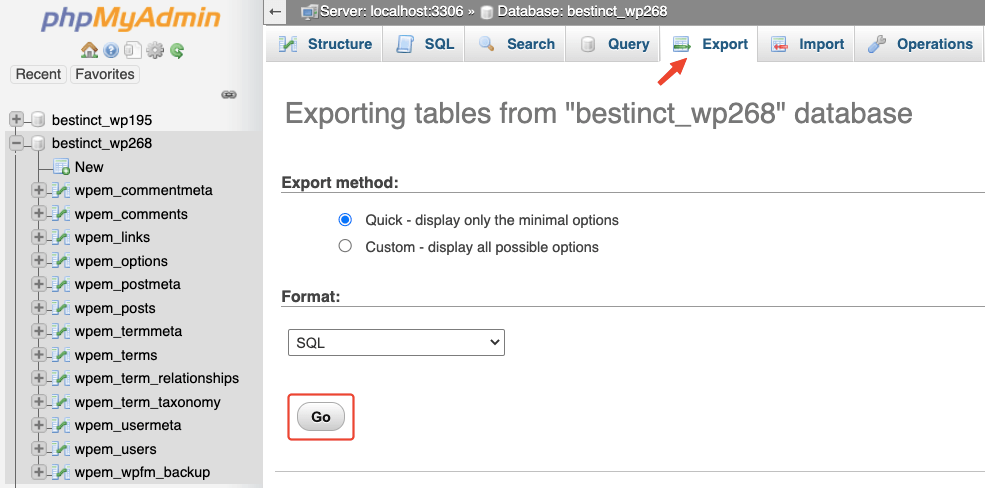
Then navigate to the Export menu from the top bar. And, click on the Go button to initiate the backup creation process. You can save this version of the backup for further use during the restoration process.
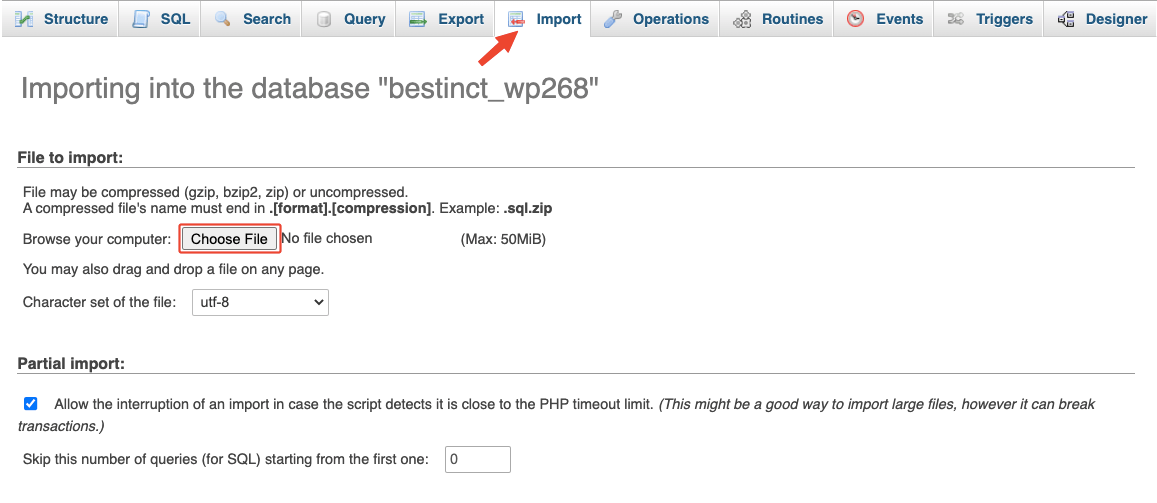
The restoration process is simple through the cPanel. Simply navigate to the Import menu from the top bar. Choose the backup file from your computer.
You’re done! Now, wait with patience to finish the backup process.
3. Bonus method: Contact your web hosting
Cloudways, Kinsta, Bluehost, DigitalOcean, A2 Hosting, etc. are the big names in the hosting industry. You’re most likely to get a backup service from these hosting providers. check your hosting account dashboard, and see if you have any backup options. You can create your own backup from the dashboard.
Or, you can reach out to your web hosting company through their support team. They’ll inform you whether they offer backup services or not.
Request them to create a backup of your website on your behalf. They’ll surely do this if they offer that service with your hosting package. Sit back and relax! Let them run the extra mile for you.
Note: We suggest using a web host for backup only if there’s no other way. Because, when you create a backup on the hosting server, both the live site and backup files are stored on the same server. If the web server fails, you’ll lose both- backups and the live websites. So, you can’t rely fully on backups made by web hosting providers.
Pro tips for managing your store’s backups
Now you know how to backup WooCommerce site. Here is a list of proven tips that can help you manage your store’s backup efficiently.
- Keep the backup files stored on local storage so that cloud-based server failure doesn’t affect the backup files
- Restore to your website during quiet periods (when there’s almost no traffic)
- Use a staging site to run a trial restoration process to be sure how it works
- Try to choose a WooCommerce backup plugin that offers excellent support
- Use a plugin to automatically create backup files as per a schedule
Keep in mind, a website reaches a stable condition after years of hard work. It’s crucial to maintain the website in the right shape at any cost. Keeping backup files is the easiest way to ensure you’re not losing your website forever.
Disaster recovery strategies for your WordPress site
Data loss, malware attacks, or server failures can severely impact your website, but a robust disaster recovery strategy can help minimize downtime and restore operations. This guide outlines effective recovery practices, including crucial actions to take after restoring your site.
1. Identifying the cause and restoring backups
When disaster strikes, the first step is identifying the cause, whether it’s a cyberattack, plugin conflict, server crash, or human error. Once identified, you can proceed with restoring your site using a recent, clean backup. Selecting the right backup file is crucial to avoid reintroducing vulnerabilities.
2. Next steps after restoring your site
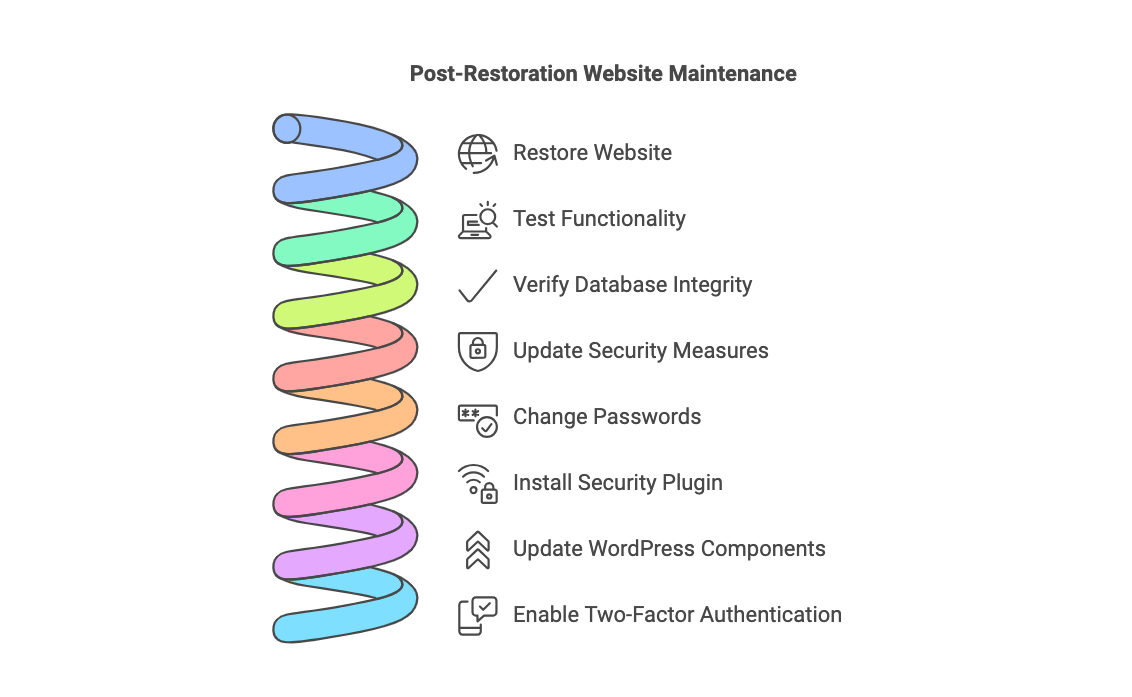
Restoring your website is only the first step. Several follow-up actions are essential to ensure your site is fully operational and secure.
Testing the functionality of the site ensures all critical features are working correctly. Navigate through key areas like pages, forms, and checkout processes to confirm everything operates as intended. Dynamic features such as logins, search bars, and contact forms should also be validated.
Database integrity must be verified post-restoration. It is essential to check for any corruption or missing data, particularly in customer records, product listings, or blog content. For e-commerce websites, conducting test transactions and reviewing order data ensures that payment and order systems are functioning seamlessly.
Updating security measures is an integral part of recovery. This includes changing all passwords for admin accounts, databases, and hosting services. Installing a security plugin like Wordfence or Sucuri can help identify and address vulnerabilities.
Additionally, updating the WordPress core, themes, and plugins ensures that your site is protected against known exploits. Enabling two-factor authentication adds an extra layer of security to sensitive accounts. Hardening your website by implementing best practices such as disabling unnecessary XML-RPC access and setting appropriate file permissions is equally important.
3. Monitoring your website
Monitoring your site after recovery is critical. Using tools like UptimeRobot or Jetpack, you can keep track of site availability and quickly identify any issues. Reviewing error logs regularly can also help spot potential problems early, allowing for timely intervention. Ensuring the site’s performance remains stable post-restoration prevents any lingering effects from impacting user experience.
4. Planning for future incidents
Planning for future incidents strengthens your overall resilience. Regular disaster recovery drills prepare your team to respond effectively to emergencies. Reviewing your backup frequency ensures it matches the criticality of your website’s data. Periodic evaluations of your disaster recovery strategy will help keep it aligned with evolving risks and business requirements.
FAQ- How to backup WooCommerce site with & without a plugin

1. How often should you back up your WooCommerce site?
The frequency of backup depends on the number of orders your WooCommrece store gets each day. If you get very few orders, it’s okay to create a backup once a day.
But, if you get a lot of orders on a single day, it’s better to keep backup once an hour. Even, losing one hour’s data could impact your business on a large scale.
2. How to choose a good WooCommerce backup solution?
Keep the following points in mind when choosing a WooCommerce backup plugin.
◼ Automatic and real-time backups without the need for human intervention
◼ Off-site storage to keep the files safe from online mishaps
◼ Easy and quick restoration process
◼ Well-defined activity log to detect the changes made by anyone
◼ Option to choose from remote storage like Google Drive, Dropbox, and more.
Choose a plugin that has prompt support services and good reviews on the WordPress repository. The pricing depends on your needs. A free version is good enough for basic backup facilities.
3. Which FTP client is the best to create a backup?
As per my experience FileZilla, Cyberduck, and Core FTP are the best three FTP clients for WordPress websites. There are many other options as well. But, FileZilla is a free solution that’s good enough to backup your WooCommerce website.
4. What happens if I restore an incomplete backup?
Restoring an incomplete backup can result in missing data or broken functionality on your site. Critical files, database entries, or plugin configurations may be absent, leading to issues like missing pages, unresponsive features, or errors in your admin dashboard. If you suspect a backup is incomplete, avoid restoring it unless absolutely necessary.
5. How much cloud storage do I need for my backup files?
The amount of cloud storage you need depends on the size of your website and the number of backup versions you want to retain. A typical WordPress site ranges from 500MB to 2GB, including the database, media files, and themes.
6. Are free plugins safe for eCommerce backups?
Free plugins can be safe for backups if they come from reputable developers and are well-maintained. However, eCommerce sites often require advanced features like real-time backups, incremental backups, or integration with cloud storage services, which are typically available in premium versions.
Additionally, free plugins may lack support, security monitoring, or updates, making them less reliable for high-stakes applications like eCommerce.
For businesses handling sensitive customer data, investing in a premium backup plugin ensures better security, compliance, and peace of mind.
7. What should do if my backup restoration fails?
If your restoration fails, verify that the backup file is complete and compatible with your current hosting environment. Check for errors in the restoration process, such as file corruption or server timeouts.
Many plugins like BlogVault and Jetpack Backup offer fail-safe options, including partial restorations or support from their technical teams. If issues persist, contact your hosting provider or use a backup file from an earlier date.
8. Can I restore a backup to a different hosting provider?
Yes, most backup plugins support migrating a website to a different hosting provider. During the restoration process, ensure that your new hosting environment meets the technical requirements of your WordPress site (e.g., PHP version, database compatibility).
My verdict: Which method you should follow?
You should use a plugin to avoid all hassles and complexities. WordPress is made a better place by these plugin developers. Using their product will encourage them to create more products and improve the ecosystem for all users.
You can consider UpdraftPlus for its too many features, excellent customer service, and user experience (particularly free of cost) that very few other plugins do.
So what’s your decision? Feel free to let us know in the comment section. And don’t hesitate to ask any questions about WordPress. If you like any other backup plugins, you can also let us know.


Add your first comment to this post