When most people think of WordPress, they think blogs, business websites, and eCommerce stores.
But did you know that WordPress is also an excellent project management platform?
Thanks to a growing ecosystem of smart, flexible plugins, you can turn your WordPress site into a serious platform for managing tasks, teams, and workflows. In this post, we’ll walk you through:
- Why managing projects in WordPress makes sense (especially if you already use it)
- The four critical steps in planning a project
- How plugins like GravityBoard help you create customized Kanban-style workflows on your WordPress site
- The issues with traditional SaaS tools when it comes to project and task management, and why WordPress offers a better solution
Let’s get started.
Quick Navigation
How to effectively plan a project, step by step
The key to running a successful project is good planning. And we’re going to walk you through the process! Having managed several projects myself and completed formal courses on project management, we’ve condensed what I know into four simple steps.
1. Setting up for success: Managing key stakeholders
If you’ve ever managed a project, big or small, you know how crucial people are to the process. And not just the people doing the work. We’re talking about everyone who’s invested in the outcome: your stakeholders.
One of the first and most important steps in any project is figuring out who your stakeholders are and how to keep them involved. But here’s the thing: not all stakeholders are created equal. Some just want to stay informed, while others require detailed reporting and progress updates.
These are the ones holding the keys to approval, budget, and decision-making. These “key stakeholders” can make or break your project, so naturally, they deserve your full attention.
To identify these key stakeholders, start by brainstorming a list of all the people and organizations that will be affected by the project (positively or negatively!). Next, you’ll need to identify what level of management each stakeholder requires.
To gauge this, you can use a helpful visualization called a Power/Interest grid, where you separate stakeholders into quadrants based on their power and influence over the project.
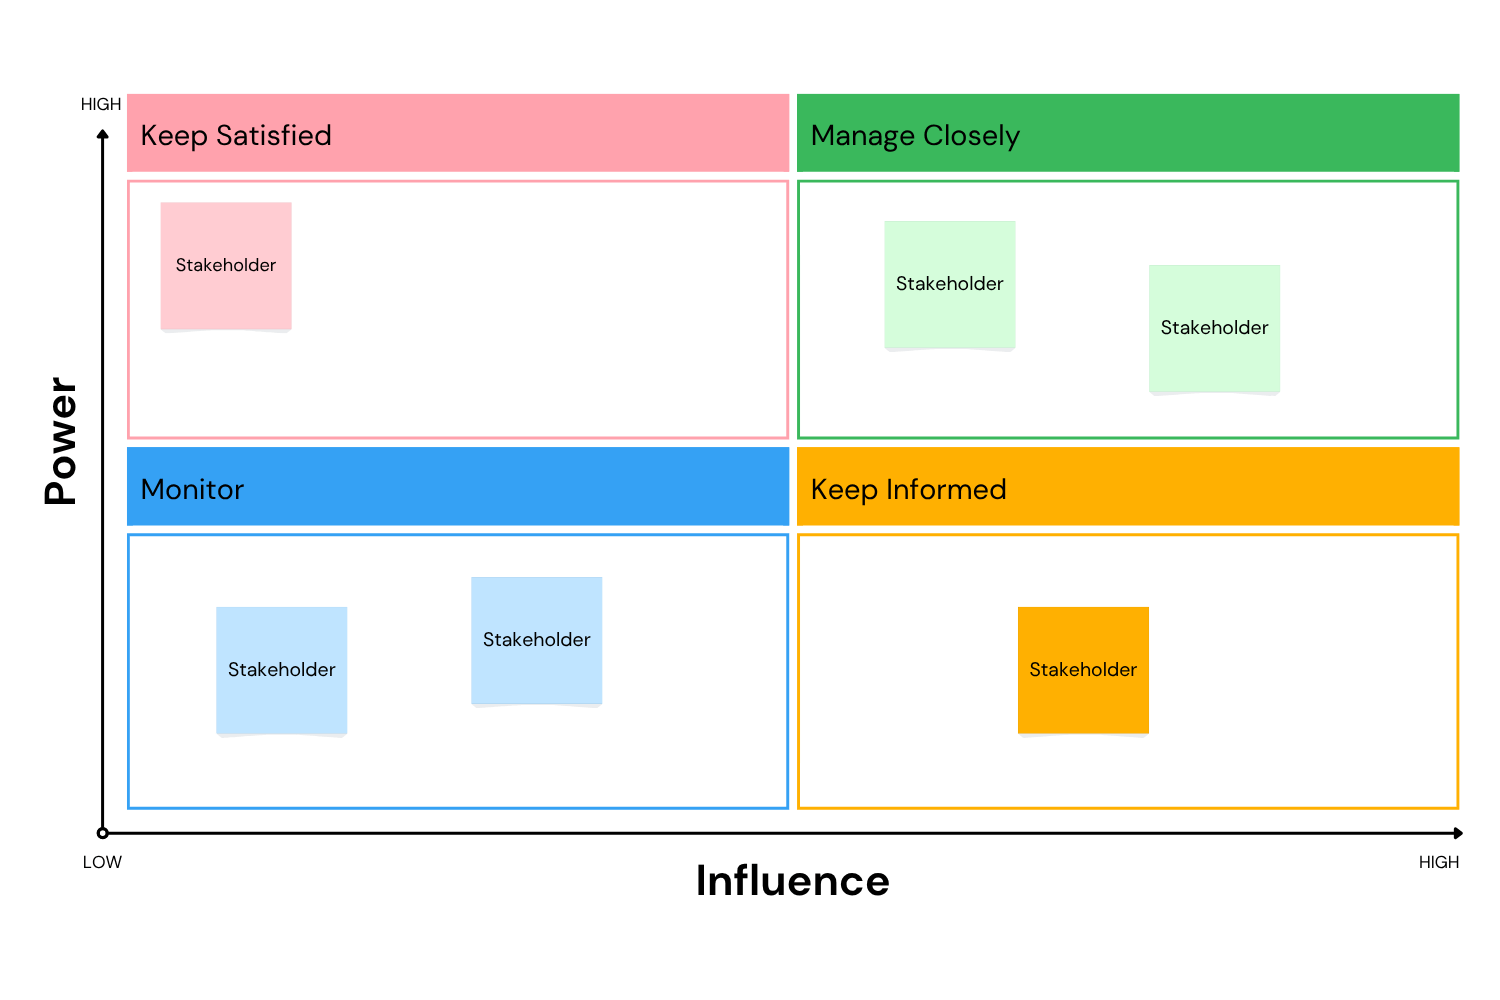
You can then draft a communication plan, outlining how you’ll keep everyone in the loop. That might mean crafting tailored progress updates or sharing specific KPIs that matter to them. Done right, this process helps keep your project aligned, your priorities clear, and your stakeholders happy.
2. Breaking it down: How to actually plan a project that works
Planning a project isn’t just about setting deadlines and crossing your fingers. It’s about building a clear, visual map of what needs to be done, how it’ll get done, and who’s doing it.
That’s where breakdown structures come in.
Breakdown structures provide a visual overview of project deliverables, the tasks to be completed, and the people involved. They help you map out exactly what needs to be done to complete the project, who is doing what, and what the expected outcomes are.
- Product Breakdown Structure (PBS) – A big-picture checklist of all the final outputs.
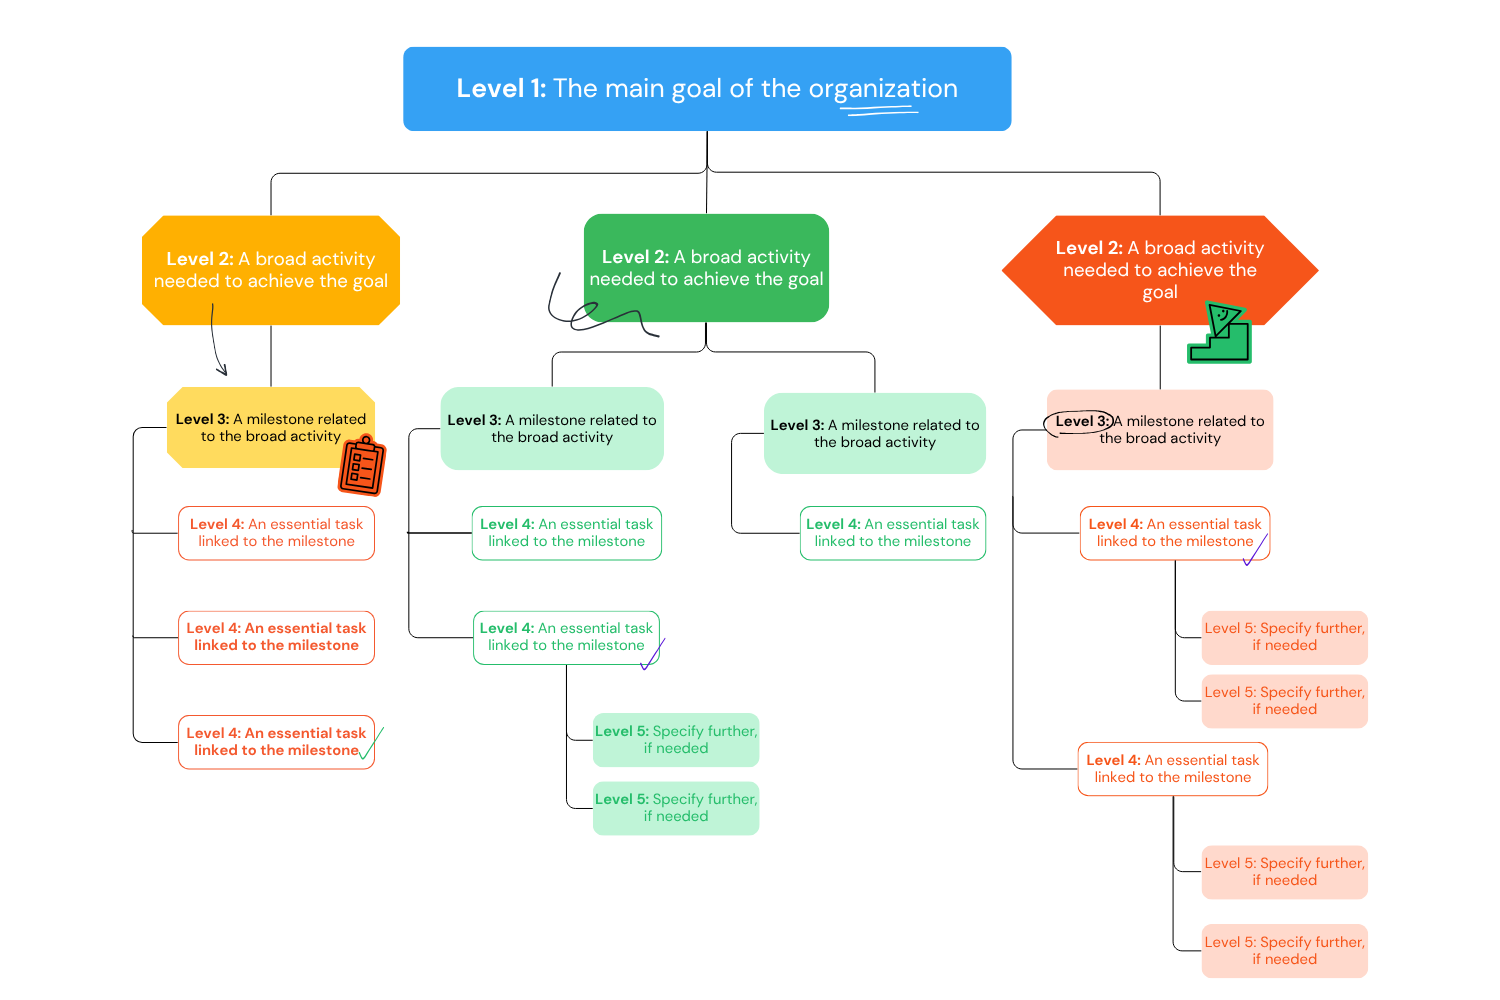
- Work Breakdown Structure (WBS) – Breaks deliverables down into bite-sized, actionable tasks. This is the blueprint for how the work actually gets done.
- Organizational Breakdown Structure (OBS) – This shows the people or teams responsible for each piece of the project puzzle.
The WBS breaks the project down into activities, which are then broken down into milestones, and finally into tasks, the individual units of work that need to be completed. The WBS doesn’t just help you define scope; it forms the backbone of your project! Get that part right, and everything else flows a whole lot smoother.
3. Visualizing the timeline: Why Gantt charts still rule
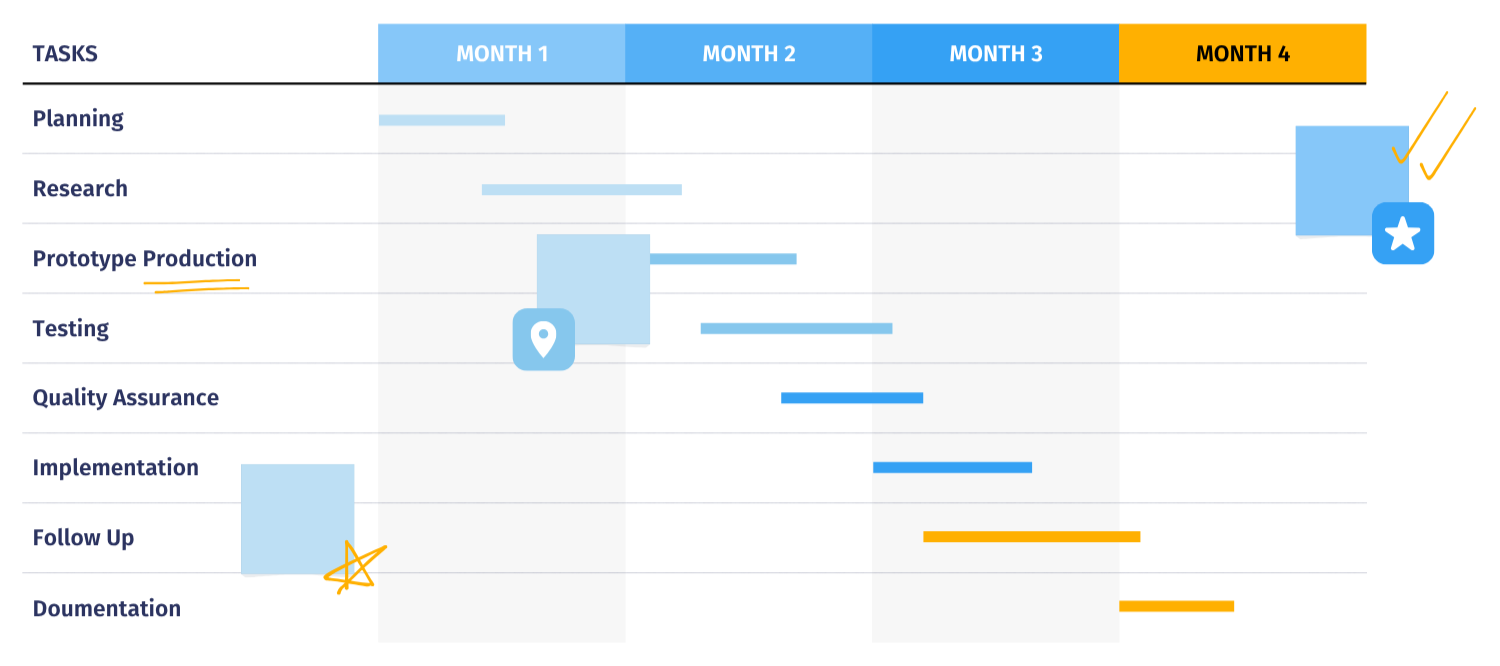
Once you know what needs doing, you’ll need to figure out when it’s going to happen and how long it will take. That’s where Gantt charts come in.
A Gantt chart is like a project roadmap with timestamps. It lays out your tasks along a timeline so you can see exactly how long each one should take. You’ll also see how tasks are connected: what needs to be finished before something else can start, and where the critical milestones are.
Bottom line: Gantt charts take a sea of moving parts and turn them into a clear, visual story. You’ll know what’s happening, when it’s happening, and where you’re likely to experience blockers.
4. Risk management: Planning for the bumps in the road
No project goes exactly as planned! That’s why it’s important to start your project with a bullet-proof risk-management plan.
Devising a risk management plan typically involves the following three steps:
- Spot the potential risks – What could go wrong? What unexpected opportunities might arise?
- Size them up – How big of a deal is each risk, really?
- Have a game plan – What will you do if this happens?
Identifying risks isn’t just guesswork. It takes a mix of analysis, expert input, and conversations with your team and stakeholders. From reviewing project docs to hosting brainstorming sessions, it’s all about surfacing the things that might trip you up.
Getting started: Assemble your toolkit
Before you dive into deadlines and deliverables, you need the right tools to run your project smoothly. Here’s what a low-cost, high-impact setup might look like:
- WordPress as your HQ
Whether you’re building something for clients or managing an internal initiative, WordPress is your operational hub. It’s flexible, powerful, and there are plenty of plugins that can help you manage tasks, stay productive, and build streamlined workflows.
- Task tracking with GravityBoard
Need a clear visual of who’s doing what and when? The GravityBoard plugin enables you to create Kanban boards so you can move tasks through each stage of your workflow. It’s built on top of Gravity Forms, so it’s familiar and customizable.
- Team comms: Slack and Zoom
If you’re working with a distributed team, you’ll need a way to communicate async or over video chat. Slack keeps quick convos and check-ins flowing, while Zoom is perfect for more in-depth collaboration and decision-making sessions.
- Code and version control: GitHub
For dev teams, GitHub is the standard. It’s where code lives and changes get tracked.
- Budgets and costs: Google Sheets
When it’s time to track expenses or estimate costs, Google Sheets offers the flexibility and accessibility you need. Easy to share, quick to update, and great for keeping your finances transparent.
Set these tools up early, get your team familiar with them, and you’ll save yourself countless headaches later on.
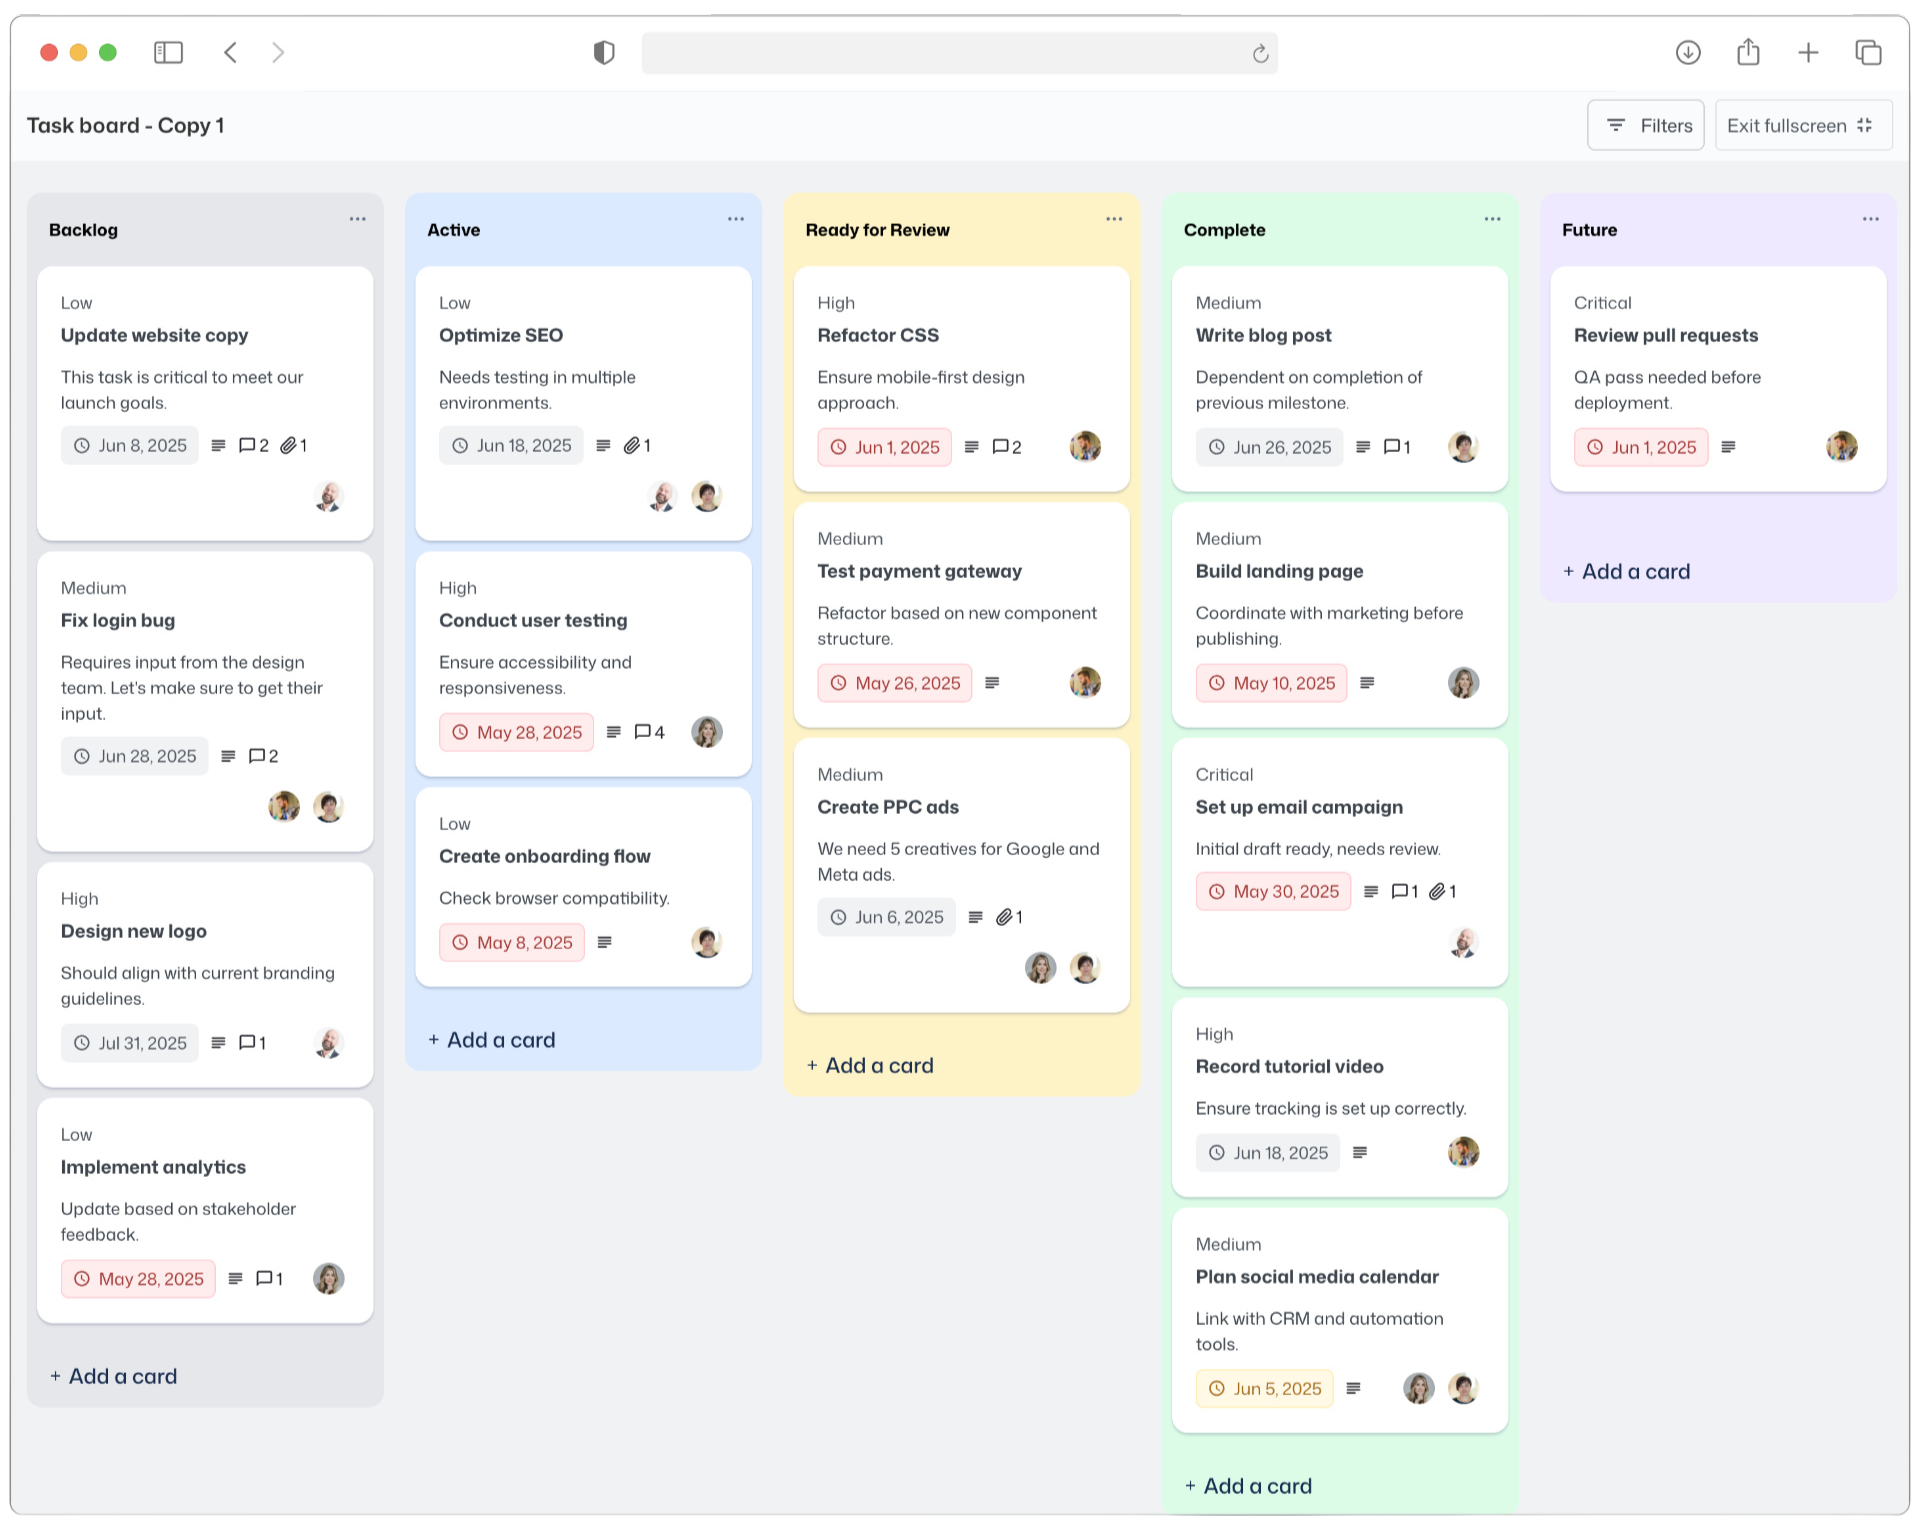
Setting up a project management Kanban board on WordPress with GravityBoard
GravityBoard is an add-on for Gravity Forms that enables you to turn form entries into visual, Kanban-style boards, making it easier than ever to track tasks, stay organized, and collaborate with your team.
Built by the team over at GravityKit, GravityBoard is perfect for teams who want to build visual project management workflows directly on WordPress. The plugin supports drag-and-drop editing, team collaboration via comments and @mentions, file attachments, automated notifications, and more.
Here’s how to set it up…
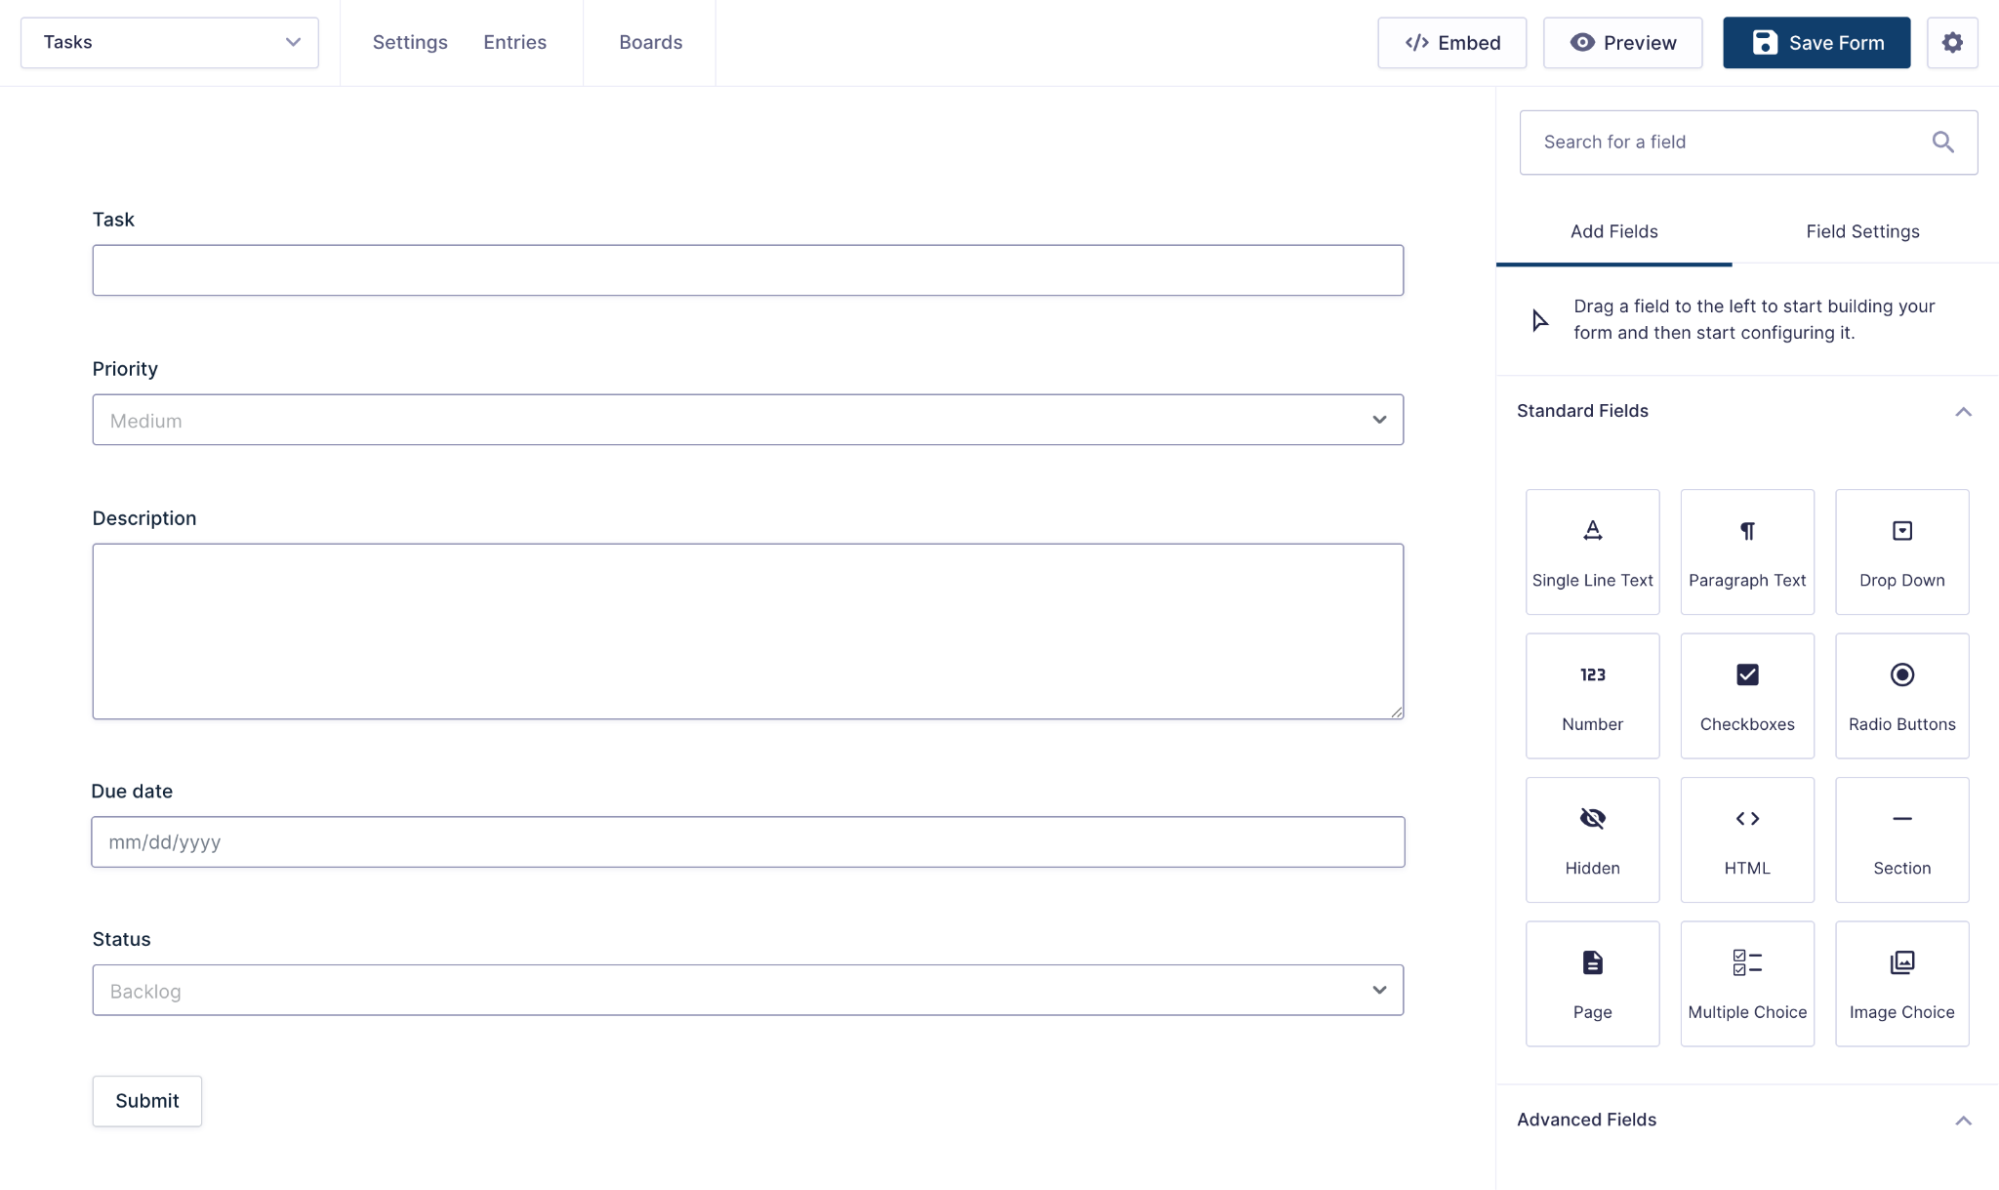
1. Create a form for adding tasks
You’ll begin by creating a form in Gravity Forms that fits your workflow.
At the most basic level, you’ll need a Drop Down or Radio Buttons field to categorize your entries. GravityBoard makes this super easy by offering predefined choice sets tailored for common workflows.
From there, you can expand your form with fields that capture the key details you care about. For a simple project management system, that might include:
- Task name
- Priority level
- Description
- Due date
You decide what information matters most, and GravityBoard takes care of the rest.
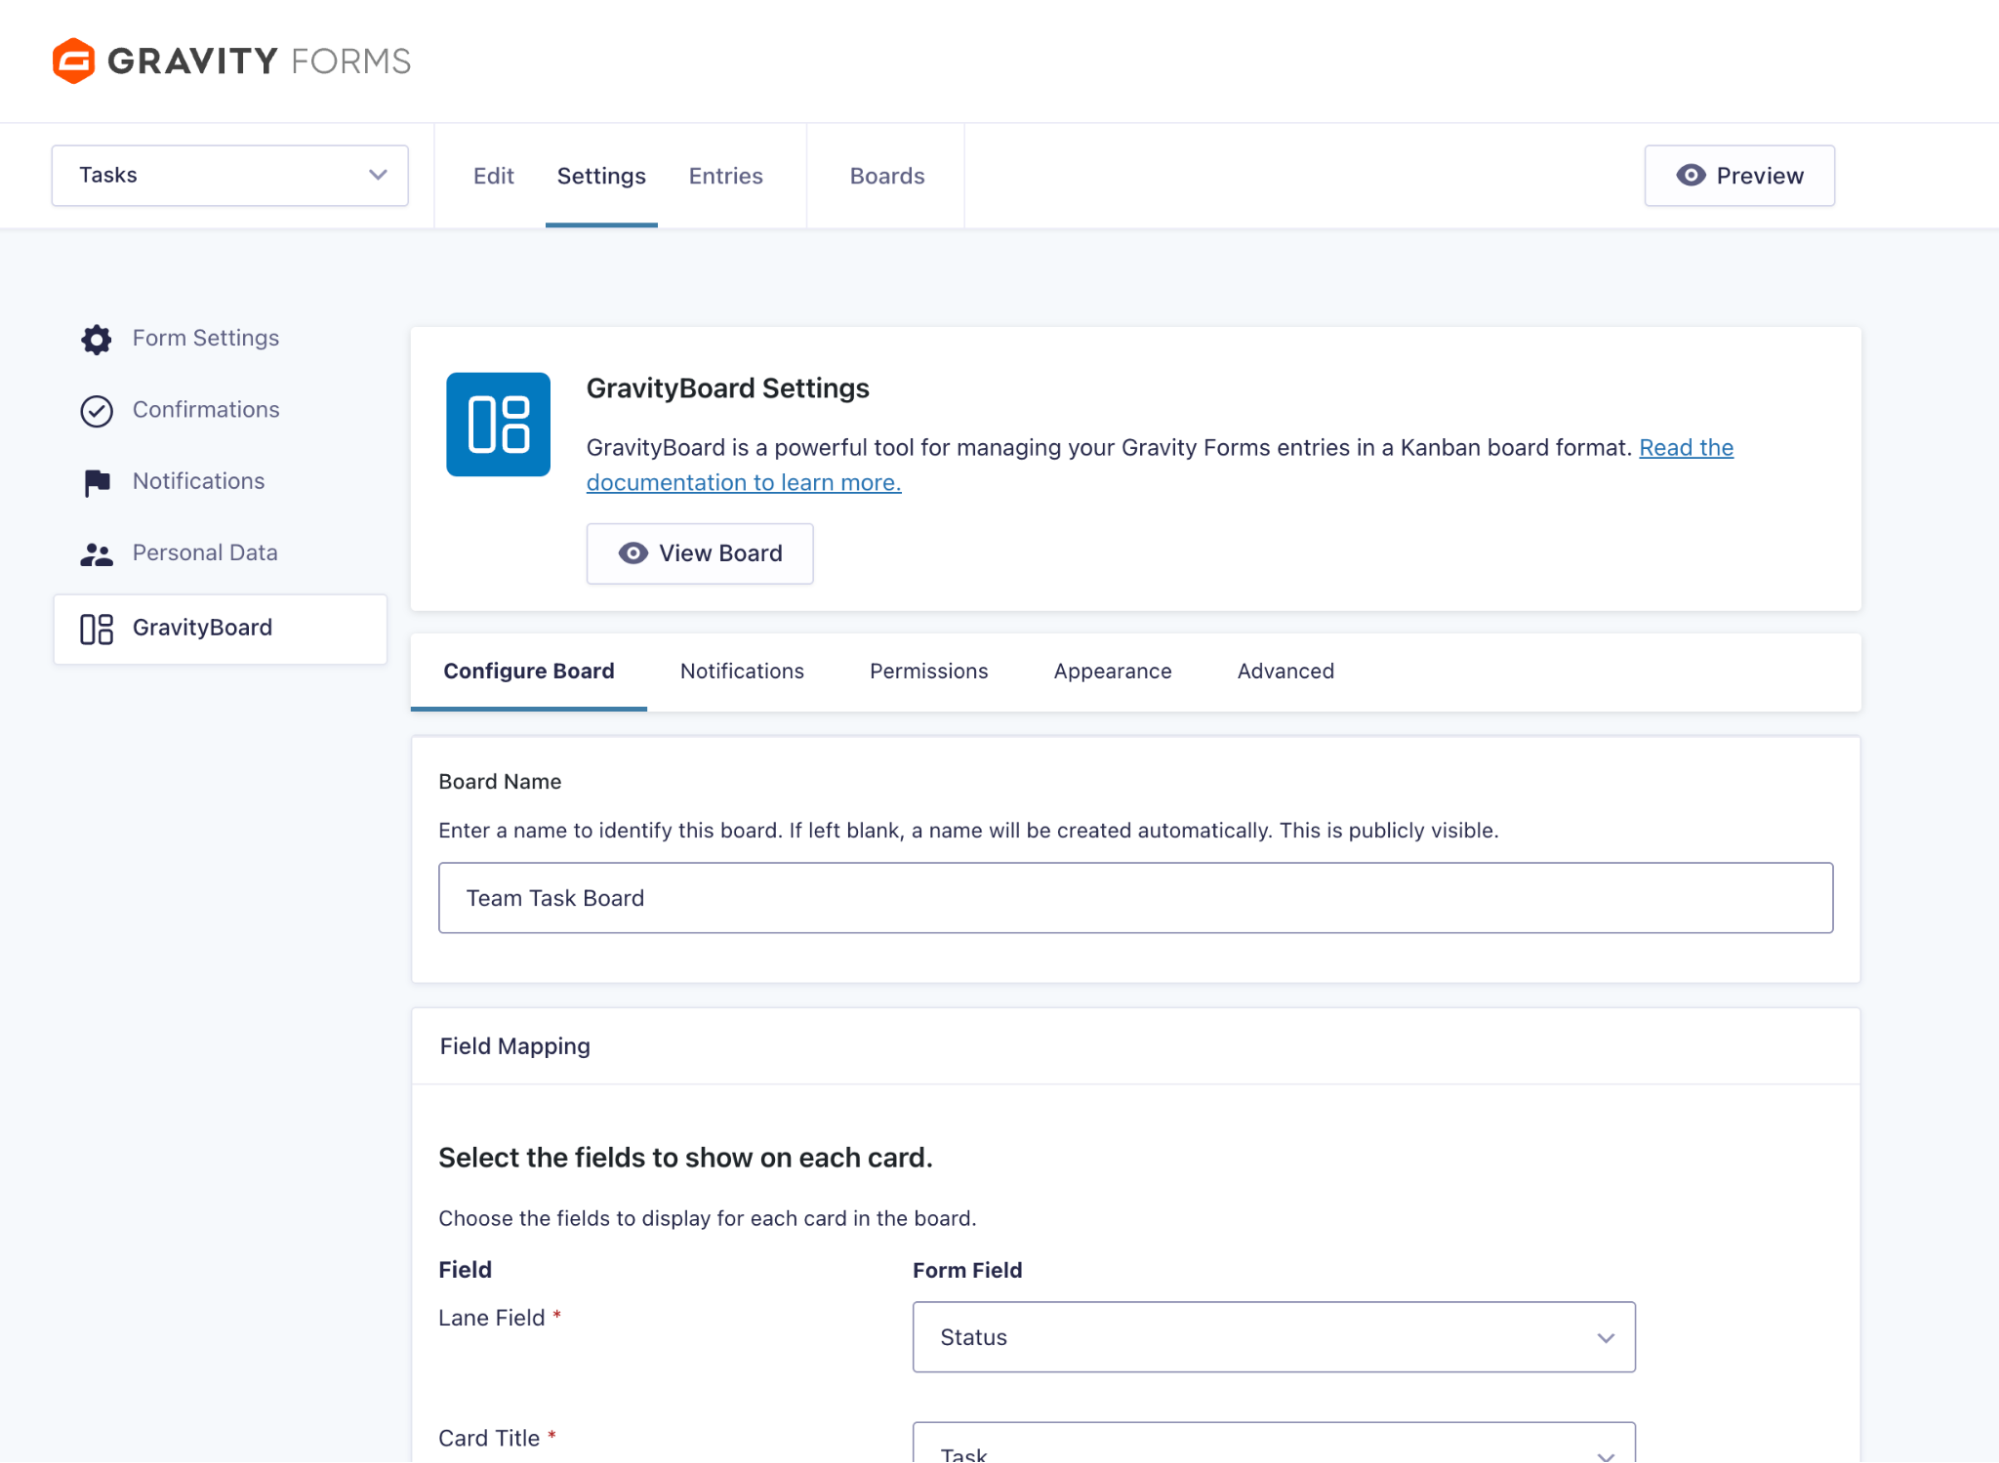
2. Create a GravityBoard feed
Next, head into your form’s Settings, click on GravityBoard, and hit Add New.
Start by giving your board a name and a short description so your team knows what it’s for. Next, choose your lane field. This is the form field that represents the stages of your workflow (like “To Do”, “In Progress”, “Done”). Think of it as the backbone of your board, defining how tasks flow from one step to the next.
Then, map out the rest of your card details:
- Title – the main task name.
- Description – more context or instructions.
- Label – useful for things like priority or tags.
- Due Date – to keep things on schedule.
Once that’s done, your board is ready to go! Your board automatically syncs with your form, so new entries become cards on the board that you can interact with from the frontend.
3. Configure board options
After creating a new board, you can fine-tune it to match the way you work. GravityBoard comes packed with settings that let you customize everything from who can see the board to how it looks and behaves. Here’s what you can do:
- Turn on useful features like entry notes, user assignments, and file attachments
- Control access by setting permissions based on user roles, login status, or specific capabilities
- Make it yours with customizable lane colors and background styles
- Automate notifications to keep your team in the loop. Trigger them when a task changes lanes, gets reassigned, or hits a deadline, for example
- Use conditional logic to show or hide fields based on specific rules, keeping your board clean and focused
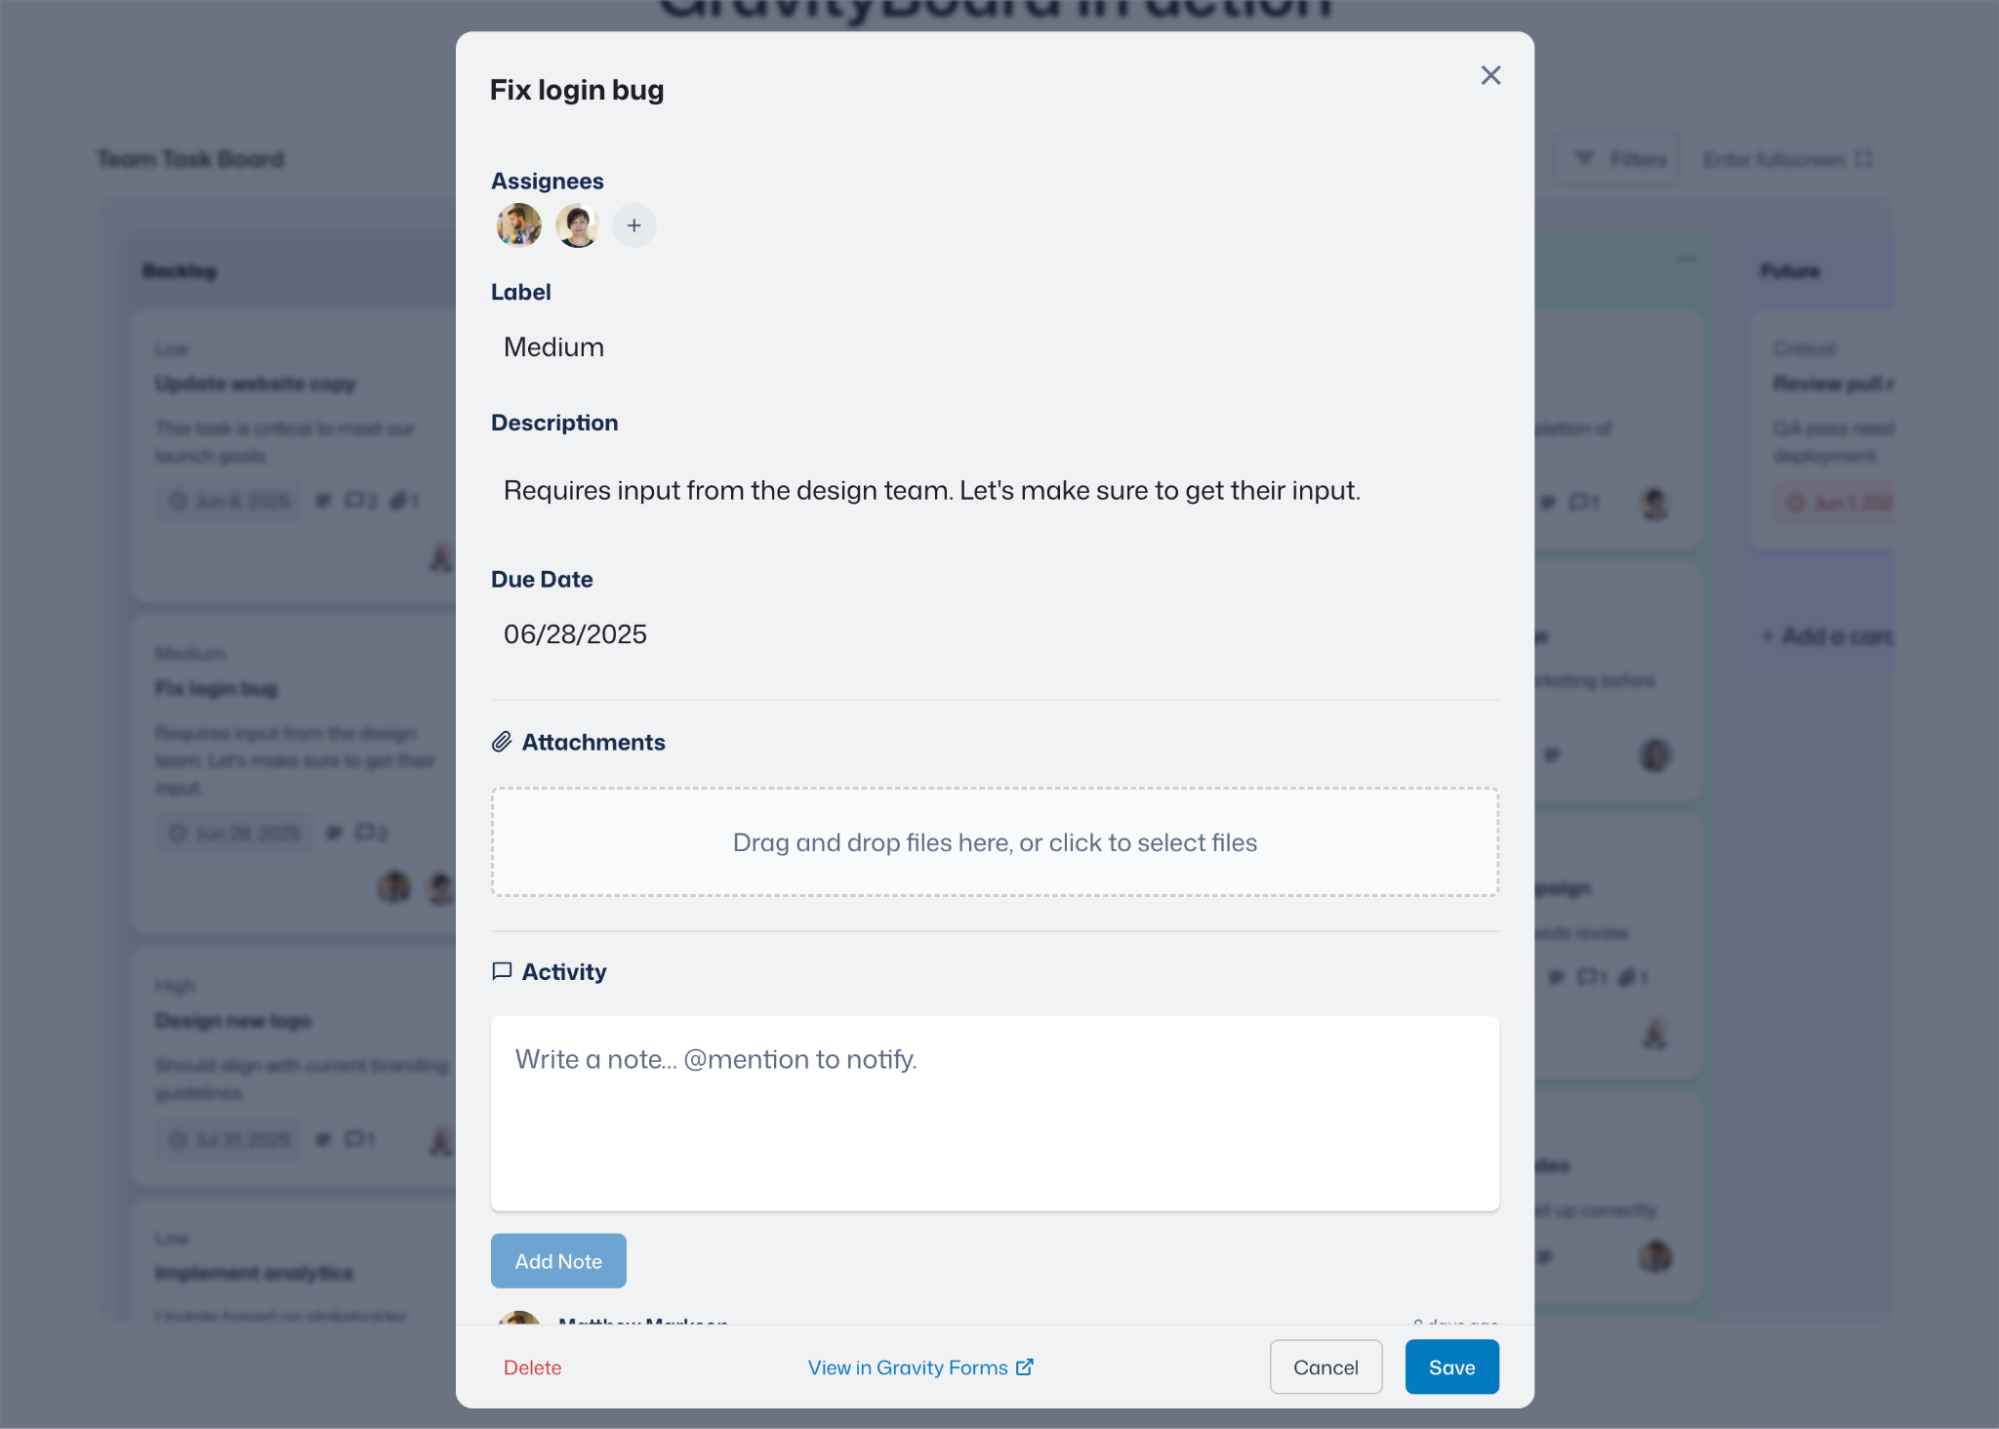
4. Embed your board on the frontend
After customizing your board, you can embed it into any page or post on your WordPress website.
Boards are fully interactive, so users with the right permissions can:
- Add new cards
- Move tasks through different stages
- Assign team members
- Attach files
- Leave notes and comments
It’s a seamless experience that brings powerful task management to your site’s frontend, keeping everything organized, accessible, and right where your team needs it!
Project management on WordPress vs SaaS solutions
Popular project management tools like Trello, ClickUp, and Jira get the job done, but they come with trade-offs. They’re hosted on third-party platforms (that you have no control over), and often require yet another account (or subscription) just to get started.
WordPress is different.
When you build your project management system on WordPress, you’re in full control. You own the infrastructure. Your data stays on your site. No forced syncs. No third-party accounts. No limits on customization. It’s your platform, your rules.
And thanks to WordPress’s massive plugin ecosystem, you’re never locked into one way of working. Want to customize fields, automate emails, integrate payments, or build dashboards? There’s a plugin for that.
GravityBoard is a perfect example; it brings Kanban-style task management into your WordPress environment, built directly on top of Gravity Forms.
When you manage projects and workflows within WordPress, you’re building something that’s deeply integrated, fully customizable, and entirely yours. If your business already runs on WordPress, adding workflow management to the mix just makes sense.
Bringing project management to WordPress
Project management doesn’t have to live in someone else’s app. With WordPress and the right tools, you can build customized project management tools and workflows directly on your own website.
For example, with GravityBoard, you can create flexible Kanban boards powered by Gravity Forms. More importantly, you get control of your data, your process, and your platform.
So if you’ve been bouncing between tools that almost fit, maybe it’s time to build something that actually does.


Add your first comment to this post