WordPress is a go-to choice for numerous people looking forward to building websites and making their mark online. It’s an ideal platform to create almost any type of website, from simple blogs and portfolios to eCommerce sites. But one common problem that WordPress users often face is running out of disk space.
It means the hosting storage allocated to the site is nearly full or has reached its limit. It can severely affect the performance of a website. You may have seen many times that a large part of the storage is filled with unnecessary files which can be cleaned easily.
Fortunately, there’re many ways you can do it. In this article, we’ll explain to you several effective methods on how to free up space on WordPress. Get started!
How to Check Disk Space Usage on WordPress
It’s not that you must check your current WordPress disk space allocation only after receiving the notification – your disk space is running out. You must do it regularly after every few days. It can help you identify any abnormal usage patterns.
Any unexpected or sudden spike in hosting storage usage may indicate malware attacks, security breaches, and other issues. Regular checkups can help you detect such issues and solve them in a short time.
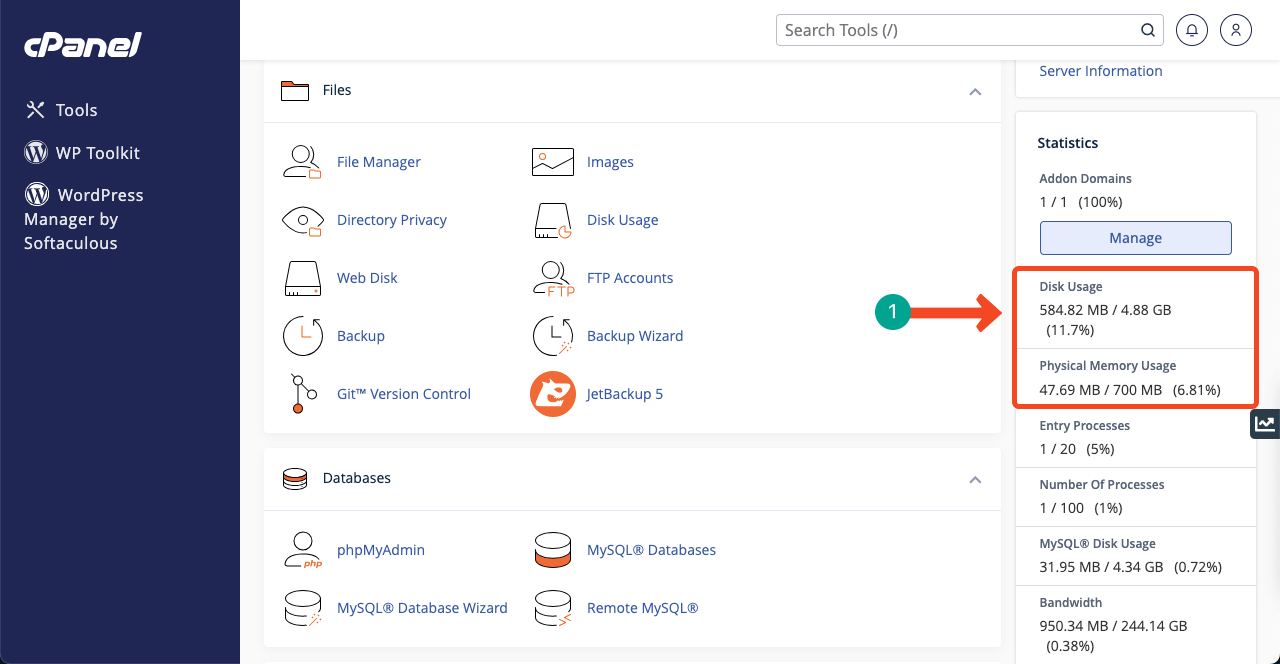
There are many ways to check the current disk space usage on WordPress. They are through Media Library, cPanel, SSH, and plugins. From our experience, cPanel is the easiest way to check the current disk space status.
Log in to your cPanel. Keep scrolling down, keeping an eye on the right sidebar. You will find two sections called Disk Usage and Physical Memory Usage. From there, you can know your WordPress site’s current disk space status.
How to Free Up Space on WordPress: Step-by-Step Guide
Your WordPress hosting storage space may get unnecessarily filled up for various reasons. So, you need to follow multiple steps one by one to clean them up. Here, we’ll cover the most common methods applied in WordPress hosting.
Step 01: Back Up Your Site in Third Party Storages
Regular website backups are important because they can help you instantly recover your site if its database crashes. Many people often keep backups on their hosting account, which unnecessarily consumes valuable hosting space.
Better if you remove the old backups stored in your hosting account and save them on your personal drives or somewhere like Dropbox and Google Drive. There’re tons of good plugins to do that, like BlogVault, UpdraftPlus, VaultPress, etc. Learn how to back up a WordPress website in different methods.
Step 02: Use External Hosting Spaces for Large Files
When the length and quality of video and audio files increases, their size naturally goes up. Uploading such files directly to the website can take up hosting space and increase the page loading time alongside.
The best solution is if you use third-party hosting solutions. For example, YouTube, Vimeo, Soundcloud, etc. After uploading files to these platforms, systematically link them to WordPress so visitors can view them without any disruption.
Step 03: Compress Images Before Uploading to WordPress

Whatever image you have, there’re many tools online by which you can compress them to reduce their sizes without compromising the quality. This will help save storage space as well as increase the page loading speed.
Some such tools are TinyPNG, TinyJPG, and Egif. But as this process takes a bit more time, some people tend to follow an ordinary approach. They upload all the images on their website first. Then, install an optimization plugin to compress all the images within the WordPress eco-system.
But this approach has a fatal weakness. The extra sizes remain within the hosting space since the original images are saved in the media files section. Optimization plugins can only improve the page loading speed.
So, we suggest compressing all the images before uploading them to your WordPress site. Although it will cost a little more time, you will enjoy long-term benefits.
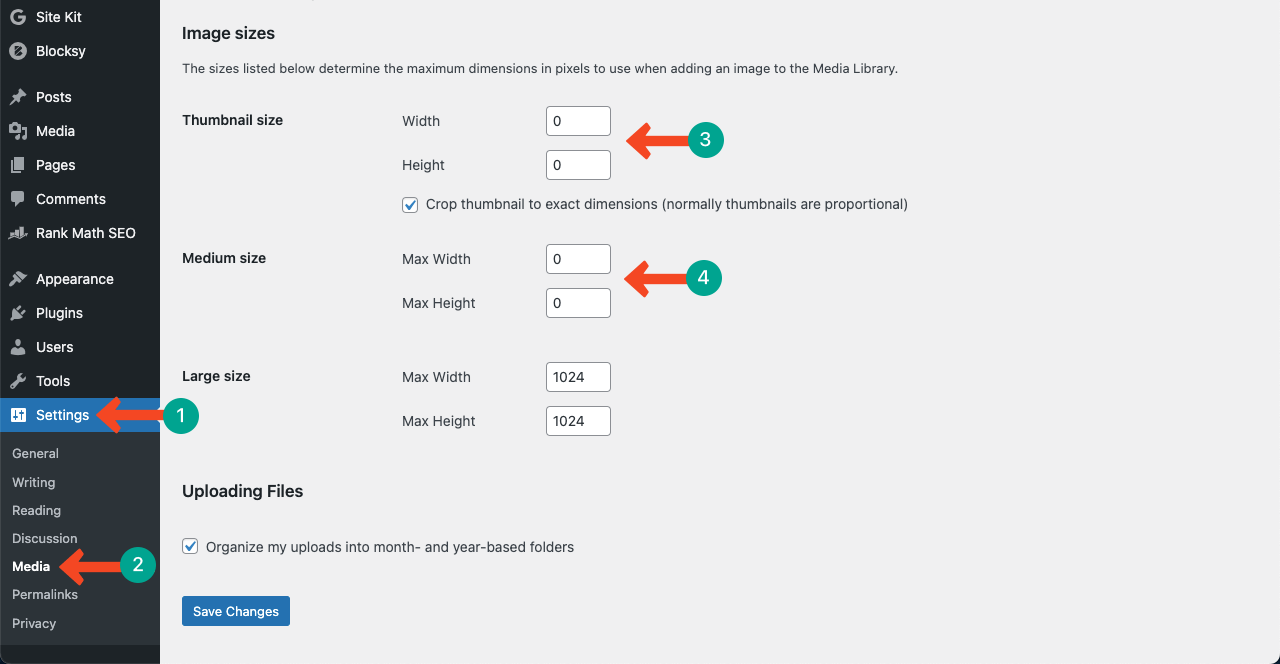
Step 04: Prevent WordPress from Generating Image Sizes
Whenever you upload an image to WordPress, it automatically creates several versions of the image with different sizes. They are Thumbnail, Medium, and Large. WordPress stores the original file as well. Plus, some themes and plugins create several additional copies depending on their needs.
And all these together can have an effect on your hosting space. To prevent WordPress from automatically generating image sizes, go to Settings > Media. Make the Width and Height values zero ‘0’ for the image sizes you want. Press the Save Changes button at the end.
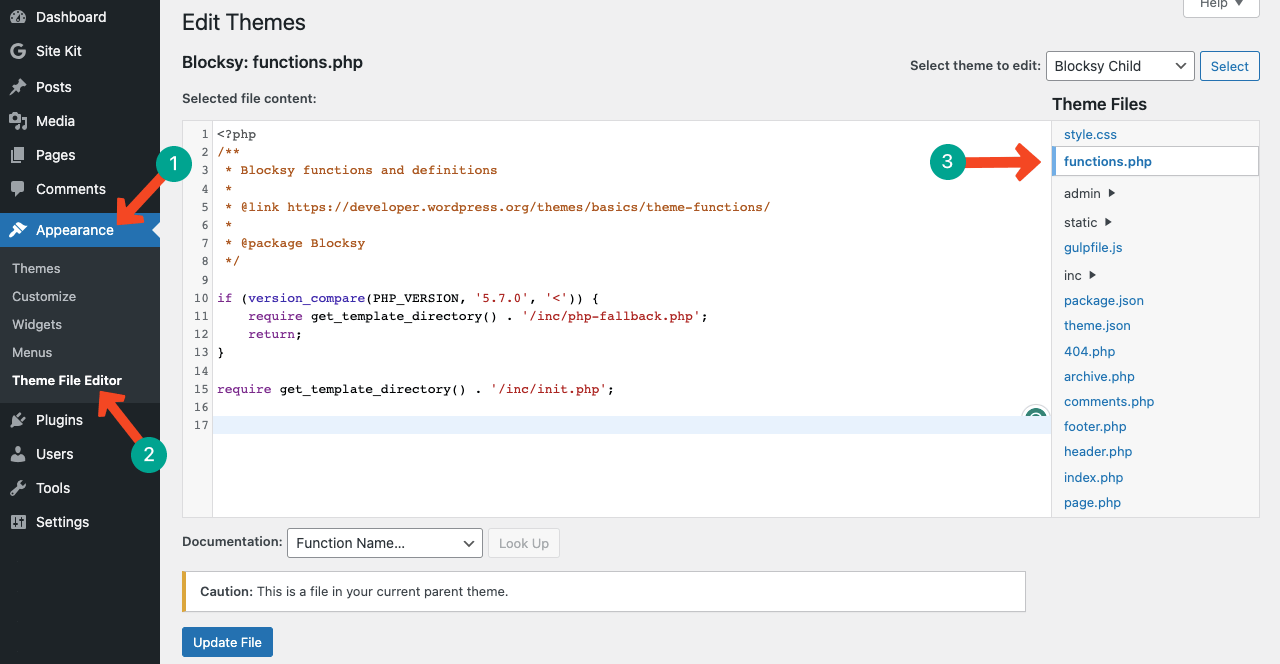
Some themes also create different image sizes, as we said before. Go to Appearance > Theme File Editor to prevent themes from generating images. Find the function.php file.
Search for the code add_image_size and set_post_thumbnail_size. If you find any of these codes there, it means the theme generates images. Just delete the codes and update the file. If these codes aren’t there, you are lucky.
Step 05: Remove All the Unused Media Files
We don’t need to discuss how unused media files can take your valuable hosting storage space. Let’s talk about how to detect unused media files. You can do it manually or using a plugin. We’ll show you both methods.
- How to Detect and Delete Unused Media Files Manually
Go to WordPress Dashboard > Media > Library. Press the dropdown option All media items. Select the option Unattached.
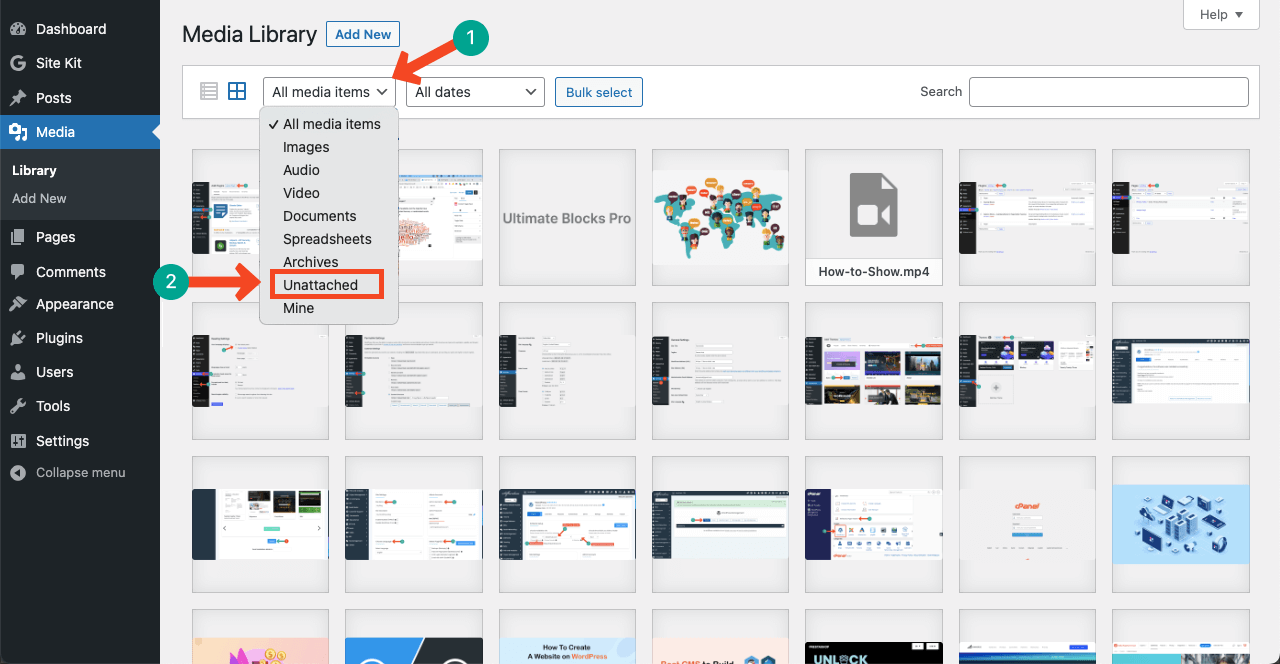
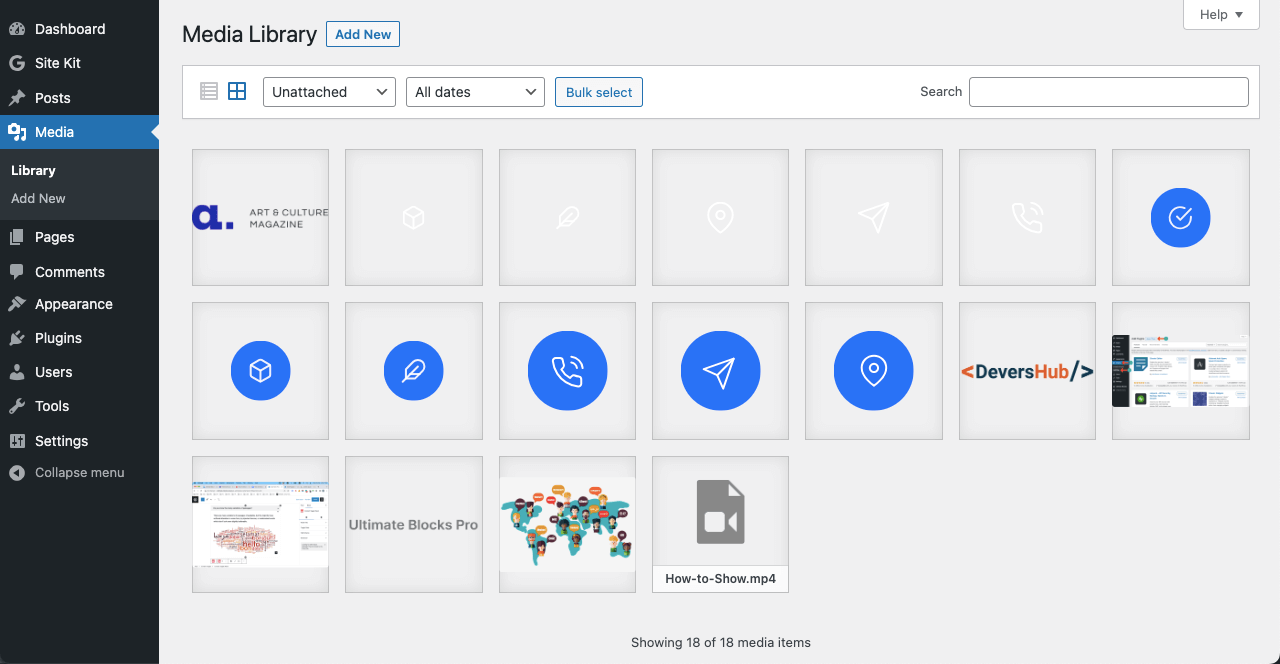
You’ll see all the unattached media files, meaning they aren’t currently used on the site. You may
Important Notice: Due to some technical difficulties, WordPress may often show you some used files as unused. Deleting them can cause great havoc to your website. So, we recommend you double-check them using a plugin.
- How to Detect and Delete Unused Media Files Manually
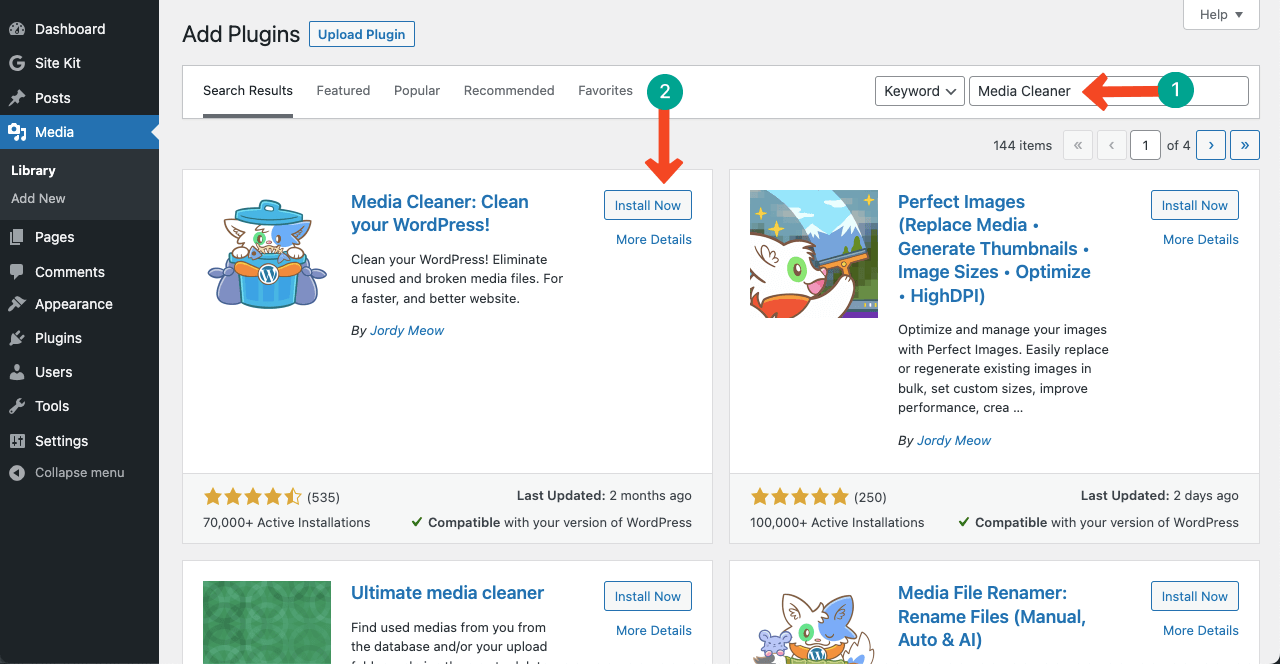
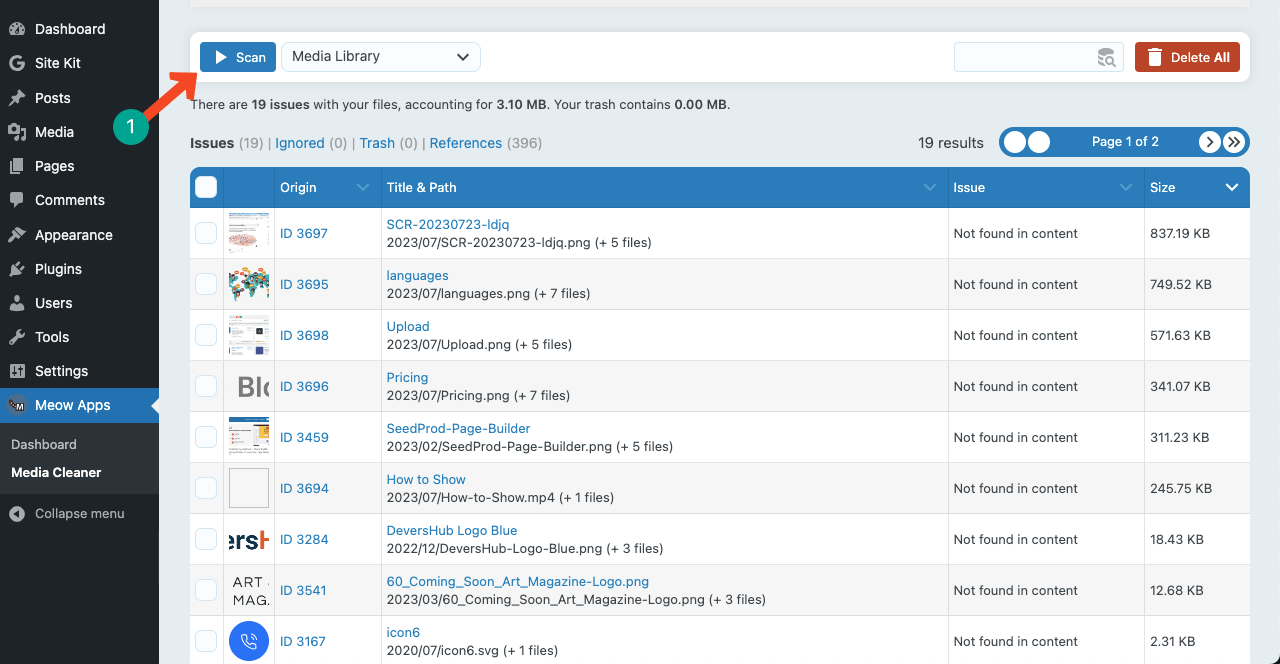
Media Cleaner is one of the best plugins you can use to detect unused media files. Go to Plugins > Add New. Install and Activate the plugin.
Navigate to Meow Apps > Media Center. Land on the tab Filesystem Scan. You’ll have limited access to it as a free user. Select the Check option next to Content. Then, press the Access Media Cleaner Dashboard button.
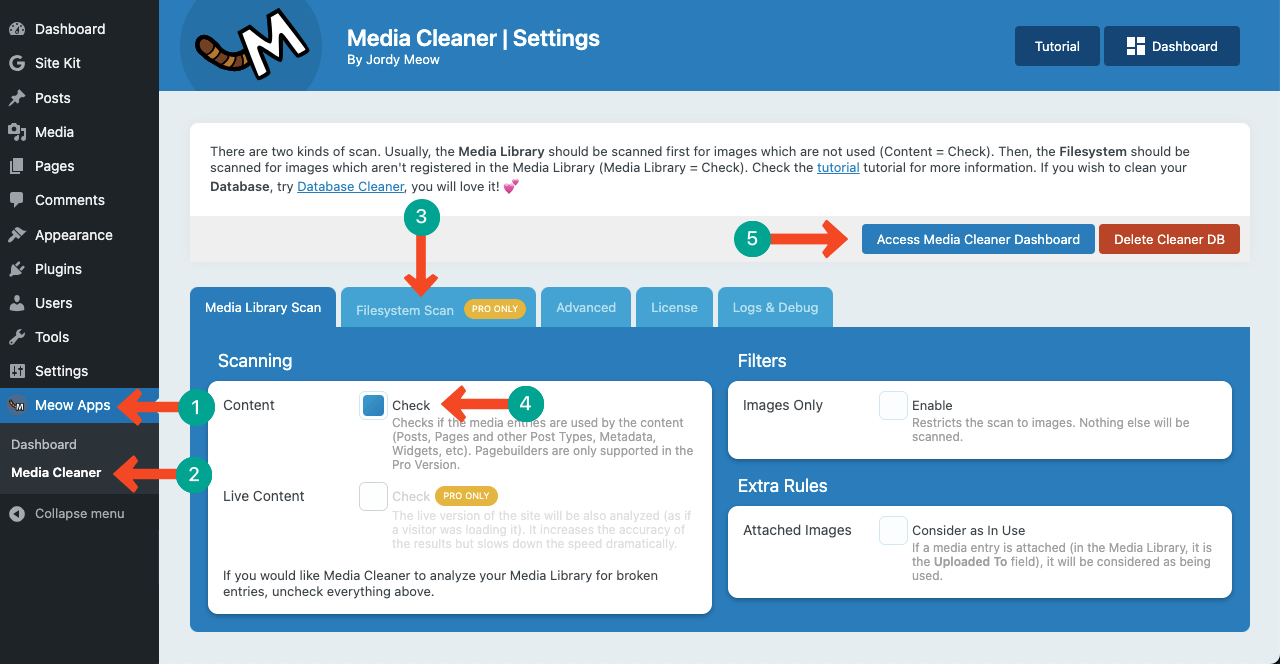
You’ll be taken to a new page. Hit the Scan button. Within a few minutes, you’ll get a list of all the unused media files below. Delete them one by one.
Step 06: Delete Unnecessarily Drafted Posts and Pages
Every post and page you create is stored in the WordPress database, whether you publish or draft them. But it’s not a bad practice always. Due to reviewing, editing, gradual build-up, and content scheduling, you may draft some posts and pages.
But there’re many people who draft some posts and pages for unconditional time, which is never a good practice for any website’s health. This can gradually bloat your database slowing down the site’s speed.
So, we recommend you check and delete the unnecessary drafted posts and pages in WordPress as soon as possible.
Step 07: Delete Spammy and Unwanted Comments
Spammy comments refer to irrelevant, disruptive, and harmful comments containing malicious links content. These comments can take up your valuable database space in two ways.
Firstly, each comment is stored in the WordPress database with the comment text, author information, timestamp, and metadata. As spammy and unwanted comments increase, it starts consuming valuable storage space on your hosting server.
Secondly, some spammy comments include malicious links and content that may trigger additional server requests. The server has to put extra strain on its resources to process this harmful data.
As a result, you must delete spammy and unwanted comments regularly to freshen up your database. Better if you use an anti-spam plugin. Because manually filtering out spammy and wanted comments can be time-consuming.
Step 08: Clean Up Your Mailbox and Unused Email Accounts

Like spammy comments, you may receive tons of unnecessary emails that can swallow your entire inbox overnight. This will make it very challenging to quickly find the right emails from the inbox, reducing productivity.
When your email inboxes are filled with unnecessary emails, it can consume your valuable server resources, impacting email response and delivery time. Besides, unused email accounts can pose security threats to your site.
Hackers and cybercriminals usually target inactive email accounts as they provide leverage for unauthorized access. Regularly cleaning up mailboxes and unused email accounts can save your server space and prevent security threats.
Step 09: Remove Inactive Themes and Plugins
Inactive themes and plugins consume your server space and pose security threats like spammy comments and unused email accounts. A key reason is inactive themes and plugins don’t receive update notifications.
Hackers can use this unpatched vulnerability to get unauthorized access to your websites. They may inject malicious codes, and you cannot catch them until and unless you activate the themes and plugins.
Plus, inactive and un-updated themes and plugins may lose compatibility with the latest WordPress version, leading to errors and conflicts. So based on these factors, you should activate all inactive themes and plugins.
And if there are any unnecessary plugins in the list, delete them. This will protect your server space and website from many security threats.
FAQ on How to Free Up Space on WordPress

Freeing up space on WordPress is a continuous process. You can fix a specific day every month to audit your website with all the steps mentioned above. In this section, we’ll answer some notable queries we usually find online related to this topic.
How to check the size of my WordPress website?
Log in to WordPress. Navigate to Tools > Site Health. Land on the tab Info. Expand the section Directories and Size. You’ll know the total installation size of your WordPress site.
Can WordPress handle large websites?
Yes, WordPress can handle large websites today. But for that, you must have robust planning, scaling up, and optimization strategies right from the beginning. Plus, you should choose a hosting plan that offers top-notch security, high bandwidth, and utilizes powerful content delivery networks.
How to change the maximum file upload size in WordPress?
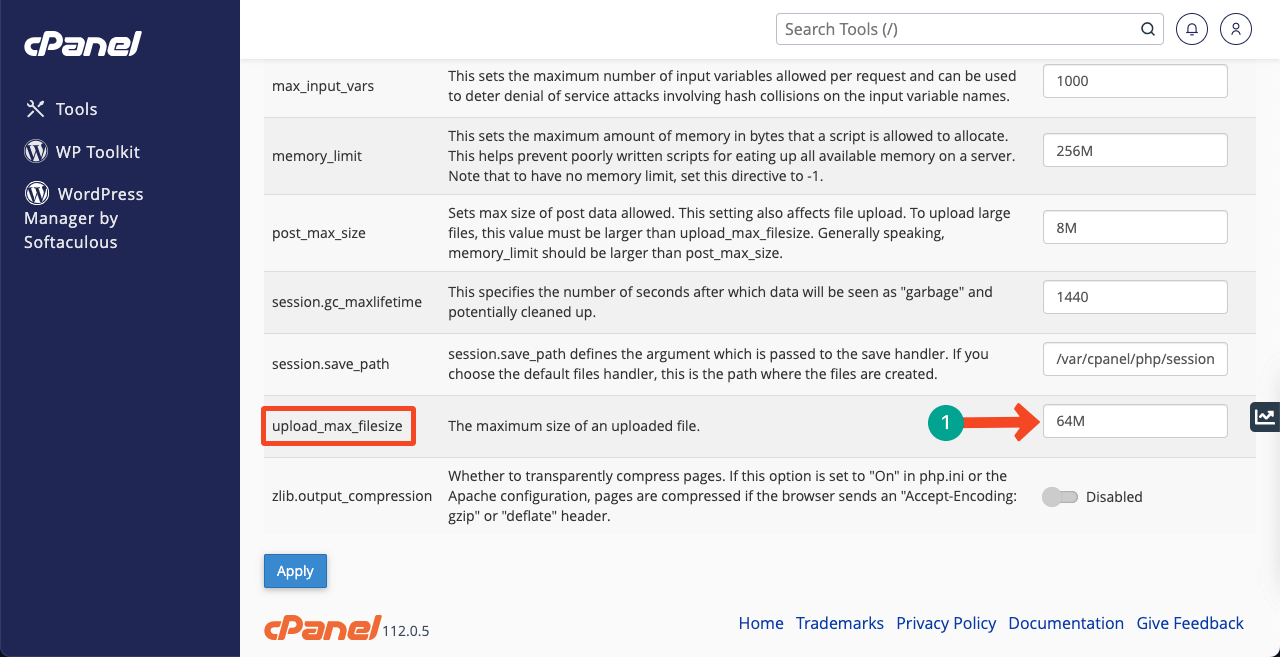
You can set the maximum file upload size limit for your WordPress site from the cPanel. Log in to your cPanel. Navigate to Software > MultiPHP INI Editor. Scroll the page down to the option upload_max_filesize. Here, you can set the maximum file upload size value.
Note: If you have multiple domains connected to the cPanel, you have to select the domain first on the MultiPHP INI Editor page.
Does WordPress use a lot of RAM?
By default, WordPress requires at least 512 MB of RAM. If the hosting server offers more RAM, WordPress can more efficiently process the database queries, PHP coding, web page caching, etc.
Do unused tags, categories, and metadata also consume the hosting storage space?
Unused tags, categories, and metadata consume the hosting storage space. You must also clean them so they never get a chance to bloat your content management system.
Final Takeaway on Freeing Space on WordPress!
Maintaining a website is an ongoing process. For example, no matter how beautifully you build a house, you’ll need to sweep it regularly to keep it clean and repair some furniture every year. And the same applies to websites.
Unless you optimize your website and clean up unnecessary files regularly, maybe after a few months and or a year, it will become so heavy that users and visitors won’t get a friendly experience from it. So our cordial suggestion is if you really expect good results from your website, you should never be lazy in your website maintenance.
Hope we have been able to cater to your quest ‘how to free up space on WordPress’ in this article. WPhive is relentlessly covering quality how-to posts to make WordPress easy for you. Please, explore our other posts and let us know your feedback.


Add your first comment to this post