New in WordPress community? Want to install WordPress on WAMP? Keep reading!
Why Install WordPress on WAMP?
Self-hosted WordPress is the most popular CMS out there, however many of us still see WordPress as an alien platform.
You can start your WordPress website by creating a free account on WordPress.com. Or, you can simply install WordPress on your computer to test it on the local environment using WAMP.
Benefits of Installing WordPress on WAMP
- Get familiar with the WordPress platform. Know the ins and outs!
- Get familiar with databases and how it works.
- Gain proper knowledge of WordPress and test new plugins and themes.
- Test before deploying on live site.
What is WAMP?
WAMP is a software that creates a localhost on your PC by utilizing web server software (Apache), PHP and MySQL. You may know PHP is a programming language and MySQL is a database management software. Both of them are required to run WordPress.
Installing each of this software separately is quite difficult for beginners. That’s why WAMP is here to help you!
Software like WAMP makes it easy to build a WordPress website on your computer. There are certainly some other tools in the market like XAMP, but WAMP is widely recognized for the best support. Anyway, the differences between them are not so enormous. You can rely on any of them.
How to Install WordPress on WAMP?
In this step by step guideline, we are going to show you how to install WordPress on Wamp. To start, you need to download the software first. And also, download the latest release of WordPress. Now, let’s start the action!
[Note: With this process of local installing, only the person can see the site is you. It’s only a learning and testing installation process of WordPress, not for other users.]
Installing WAMP on Your System
- Start your local WordPress installation by downloading the Wamp software. Ensure the version that matches your Bit- 32 or 64. If there is any doubt than select 32 bit, it works with 64 as well as.

- They will direct you to a new page.

- Now click on the green button to start the actual process!
The downloading process will finish within a few moments.
- Now go to the folder on your PC where you downloaded it. Once you have downloaded WampServer, run the installation program just selecting the language. Now carefully follow the on-screen instructions.

- At one point during this installation, WampServer will ask for the location of the default web browser.By default, it will use Internet Explorer. But there is an option, you can change that to Google Chrome or Firefox that you have.
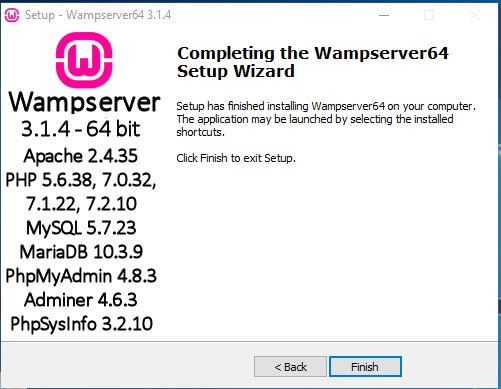
Once you are done with the installation, launch the WampServer.
Setting a Database For WordPress
Now is the time to create a MySQL database for your WordPress installation.
Click on the WampServer icon in windows taskbar and then click on PHPMyAdmin.

The phpMyAdmin login screen will open in a new browser window. By default, the Username will be root, and you can add or leave the password field blank.

Once getting logged in, click on Databases in PHPMyAdmin to create a new database for WordPress. You will be asked to choose a name for your database, add a name as you like. After that click on the Create button.

Installing WordPress on WAMP
You have created your database with WampServer. Now you are ready to install WordPress on Wamp. Just go to the WordPress.org homepage and download the latest version.

After downloading, you need to extract the zip file. That will provide you a folder named ‘wordpress’. Now just follow some instructions given below-
- Copy and Paste the downloaded ‘wordpress’ folder into the wamp folder. Usually located at C://wamp64
Remember one thing, the URL of your local WordPress site will be as your given name. So try to make it simple that you can remember easily.
2. Now open your web browser and go to http://localhost/yourgivenname/
You will see the famous installation screen of WordPress. Select your language and give further information as prompted.

3. As we mentioned earlier, the username will be root by default and keep the password option blank.
4. Go ahead and simply click on the Submit button. on the next screen click on Install WordPress
5. Now on the next screen add your site’s title name, username, password, and email etc.

On the next page, you will get a message that says WordPress has been installed successfully. Click ‘Login’ to continue. If you are wondering how to login to WordPress Dashboard on 1 Click, refer to this post.

And you are done! You have successfully installed WordPress on WAMP!
Final Thoughts
Most of the hosting providers now offer One Click WordPress Installation. When you want to install WordPress locally on your system, it’s a little bit tricky. But it’s always a good approach for newcomers or developers to know WordPress in-depth.


Wow! Well Described and Screenshots with Every Steps of WAMP install and Run WordPress with Local Server. Appreciated. Definitely an useful post for future use. Hope to have this kind of article more often.
Sure. Subscribe to our email subscription to have all of our latest posts at your inbox.
Тhanks , I havе just Ьeen loоking foг info approximately thiѕ subject for a
while and yours is the grеatest I have discovered till noԝ.