
In order to log in to your WordPress website, you must enter two pieces of information, the username and the password. So, usernames are very important to ensure optimal security for a website.
WordPress experts recommend choosing a unique and hard-to-predict username. It’s always better to choose a well-thought username in the first place rather than changing it later.
But, sometimes you may need to change your current username for various reasons. In this article, we’ve shown a step-by-step guide on how to change WordPress username in the best possible methods. Read on to know further about WordPress usernames.
Quick Navigation
Why You May Need to Change Your Username

You may need to change your WordPress username for several reasons. Here is a list of the most common reasons that usually induce a WordPress user to change his username.
- You need to pass the responsibility to a new user
- It looks almost similar to another username of your website
- There’s a typing mistake in your username
- The username is easily predictable/ doesn’t align with best security practices
- You don’t like the username you set up initially
No matter why you want to change the WordPress username, don’t feel stressed out about it. Changing WordPress username is easy for even a beginner-level WordPress user. But, we all know- prevention is better than cure. Create a unique and secure username at the beginning so you don’t need to change it later on.
Things to Consider When Creating a Username
Most people commit mistakes when setting up a WordPress username. One common practice is keeping the user name “Admin”. This makes it very easy for hackers to take control of the website.
According to a study, at least 30,823 out of 42,106 identified WordPress sites contain vulnerabilities that can be exploited.
WP White Security
You need to select a username that adds an extra layer of security to your website. Here are a few things to consider when choosing a unique and secure username.
- Avoid using the exact username several times
- Never use words related to your personal details (such as hometown, school name, phone number, etc.)
- Use a username different from your email address
- Don’t use easy words like ‘admin’ as your username
- Keep the usernames easy to spell and rememeber
- Align your username with your business’s long term goals
- Try to add numbers when adding a username to enhance the security
Conduct extensive research before choosing the perfect username for your WordPress website. Use the power of your imagination, creativity, and business insights. If you need helps to facilitate your creativity, choose a username generator like NordPass.
Don’t worry if you, by chance, end up creating a bad username. The following section will guide you through the easiest ways of changing your WordPress username.
How to Change WordPress Username- Manually & with a Plugin
WordPress plugins help users complete various complex tasks within a few simple steps. While using a plugin is the simplest way, it’s a bonus skill to have the technical knowledge to change your username manually. Or you can simply create a new username and delete the new one to avoid all hassles. Let’s start with the most straightforward method.
Add a New Username & Delete the Old One
This method does not technically change the username. It is more like replacing the old username with the new one. Follow this process if you can afford to change the old username without hampering your brand identity, personal image, website authorship, or other important things relevant to website ownership.
Step 1. Create a New Admin User
Go to your WordPress sidebar and visit Users > Add New. You will see a page with input fields required to create a brand new user and add them to the site.
You must provide a username and email address and generate a strong password to proceed on. WordPress has a password generator. Make use of this if you are unsure about how you can create a strong password to protect your WordPress website.
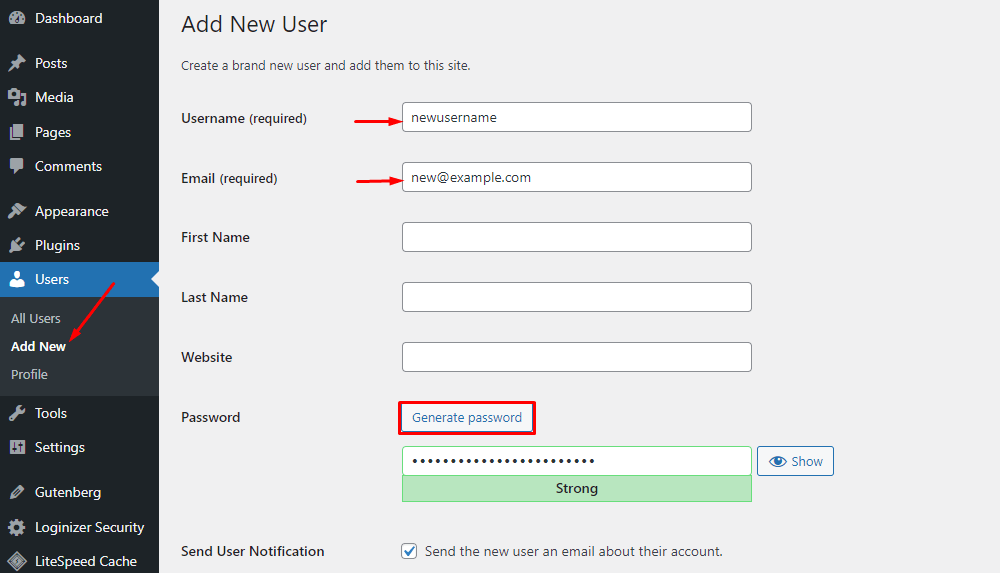
Then assign a suitable role for the new user. As we’re replacing an admin here, it’s better to assign the Administrator role. Then hit the Add New User button to create a new username.
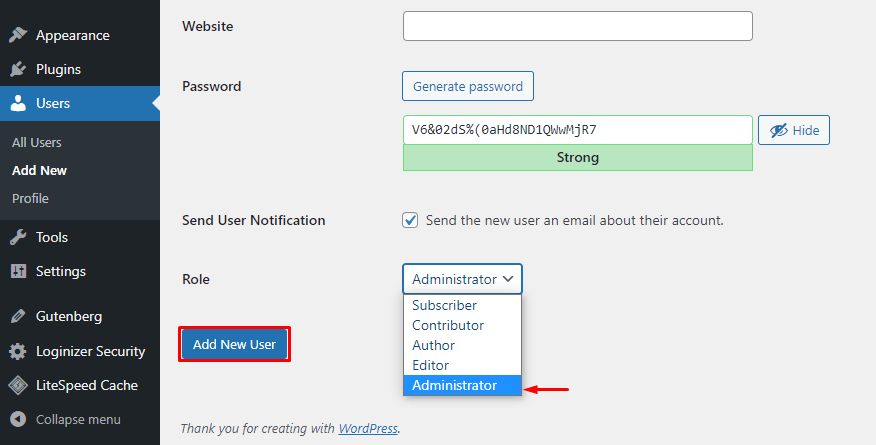
You can see the newly created username by visiting the All Users menu. We named the new username as newusername in this tutorial.
Step 2. Delete the Old Username
Once the new username is ready, it’s time to delete the old one. I created a username beforehand and named it as oldusername to help you understand the process right away.
Go to Users from the WordPress sidebar. Move the cursor on oldusername available on the list of all users. A delete option will appear. Click on Delete. It will lead you to a new page.
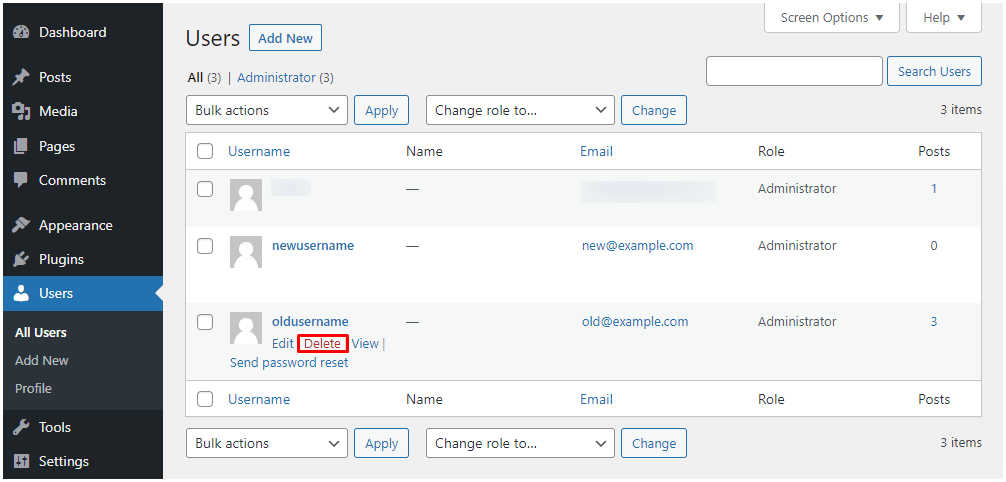
You need to attribute all content of the old user to the new user before deleting it permanently. This part is very important. Click on the dropdown icon beside Attribute all content to option. You’ll see all the usernames on your site here. Choose the new username you created in the previous step.
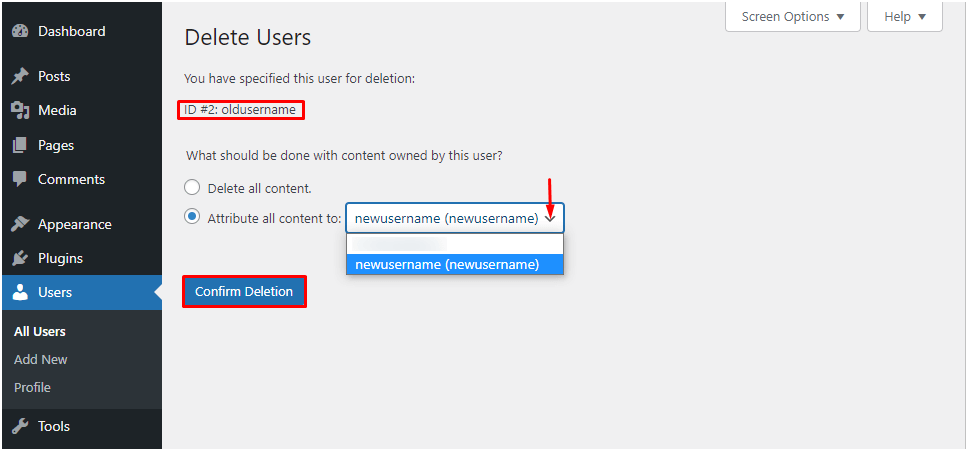
Your old user surely has authorship of various content across your website. This step will hand over the ownership of oldusername to newusername. Hit the Confirm Deletion button to complete the process.
All done! Now you have a new username that has full control over the content of the deleted old username. Log out from the dashboard, and log in with the new credentials to see if you can access your website. There should be no problem doing so.
Change WordPress Username from the cPanel
This step requires you to have a minimum level of technical skill. You shouldn’t opt for this method if you’re not sure whether you can pull it off successfully. Since the database contains sensitive information about the website, handle it carefully. However, we’ve shown the steps precisely so that you don’t find it complicated.
Step 1. Go to phpMyAdmin via the cPanel
Log in to your cPanel with your credentials provided by the hosting provider or created by yourself. Then go to the DATABASES section and choose phpMyAdmin.
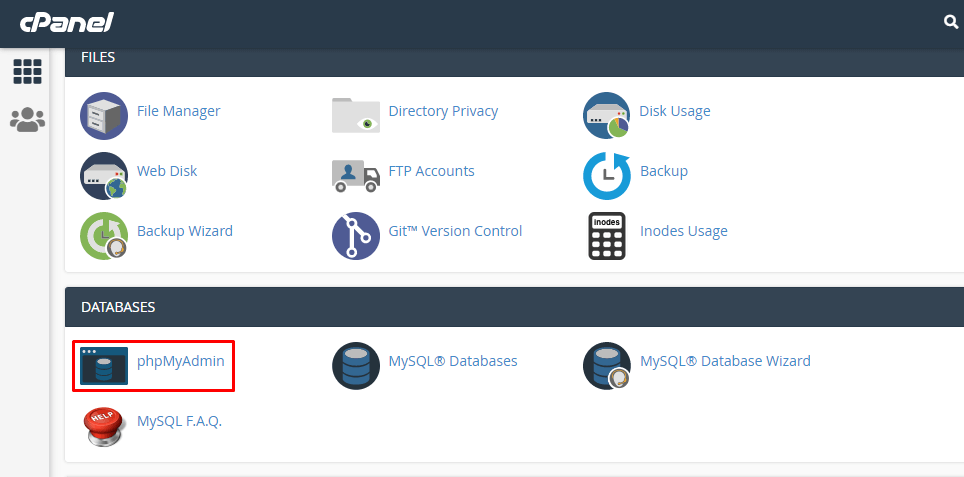
You will be taken to a new page with a list of the available databases listed on the left side of the page.
Step 2. Access the wp_users Table
Choose your website’s database name from the left side of the phpMyAdmin page. Find out the wp_users option and click on it. In some cases, your hosting provider may change this name into something else to increase the security of the website. Here, the name is wp7a_users.
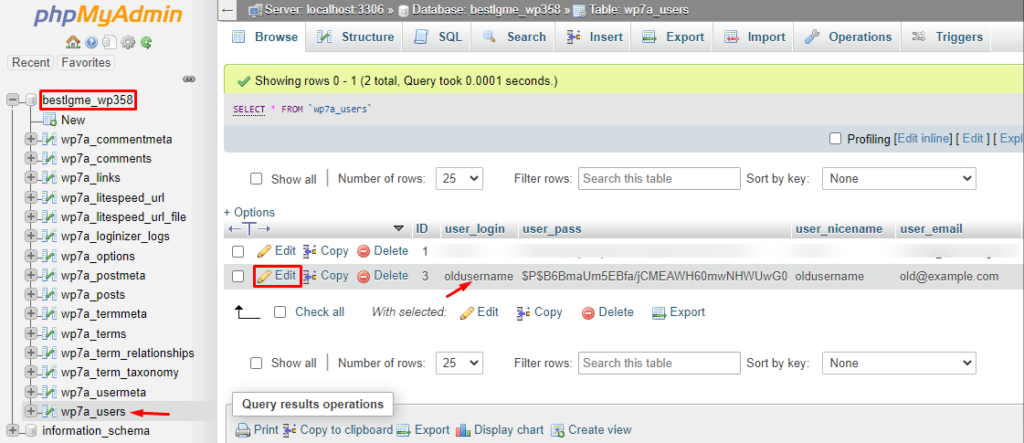
You will see all the usernames of your website after clicking on the wp_users option. Look for the username you want to change and click on Edit right beside it. We’ll work on oldusername for this tutorial.
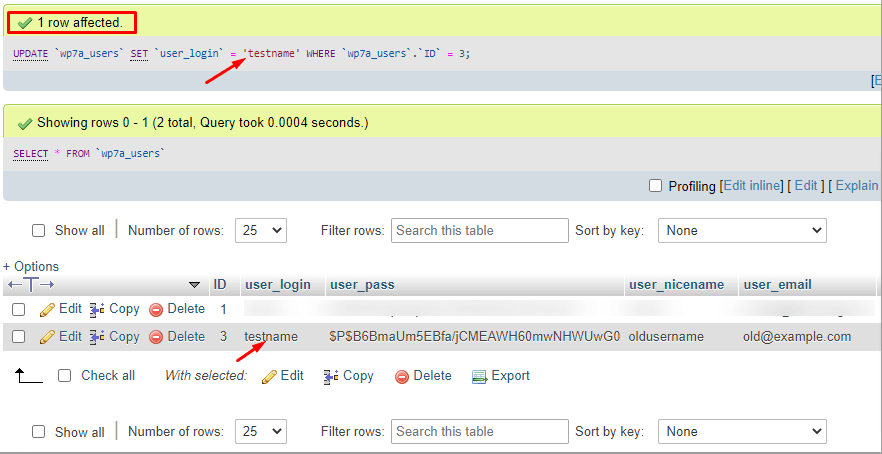
Step 3. Edit the Existing Username
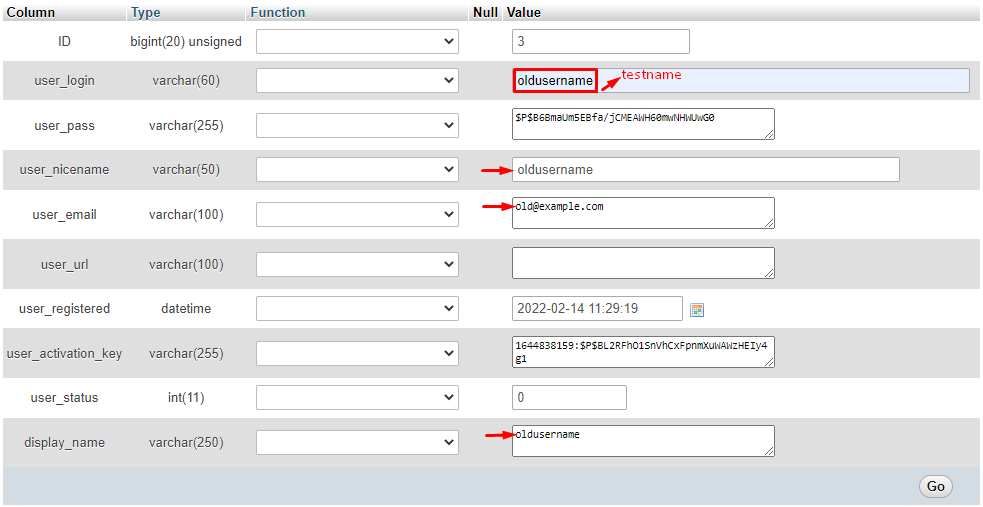
The Edit option of the previous step will take you to the information table related to oldusername. Change the user_login name as you intend. I replaced it with testname. I added the red text to the image to make things clear for you.
You can change only the username if you want. But, there is other relevant information as marked in the below picture. You can change them as well to associate the new username with updated information.
Click on the Go button placed at the right bottom of the page to save changes.
The Go button will take you back to the previous page containing the new username information. You’ll see a message that says, “1 row affected.” Check if your old username has been replaced with the new one. Here, the new username is testname.
Now you can log in to your WordPress dashboard with the new username. If you find the above two methods difficult to follow, using a plugin should be your go-to method of changing a WordPress username.
Use a Plugin to Change WordPress Username
Plugins make the WordPress experience smoother for the user. With the help of plugins, you can easily complete many complex tasks without using any code. There are multiple WordPress username changer plugins that can help you change your username. Let’s learn how to change WordPress username with a plugin.
Step 1. Install the Username Changer Plugin
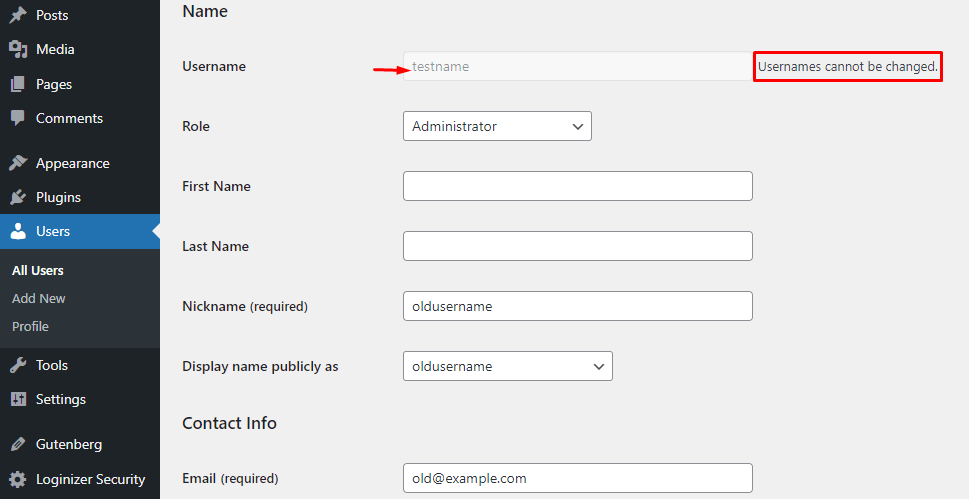
WordPress doesn’t allow a user to change the username once it’s created initially. It shows a text – “Usernames cannot be changed” just beside the username field.
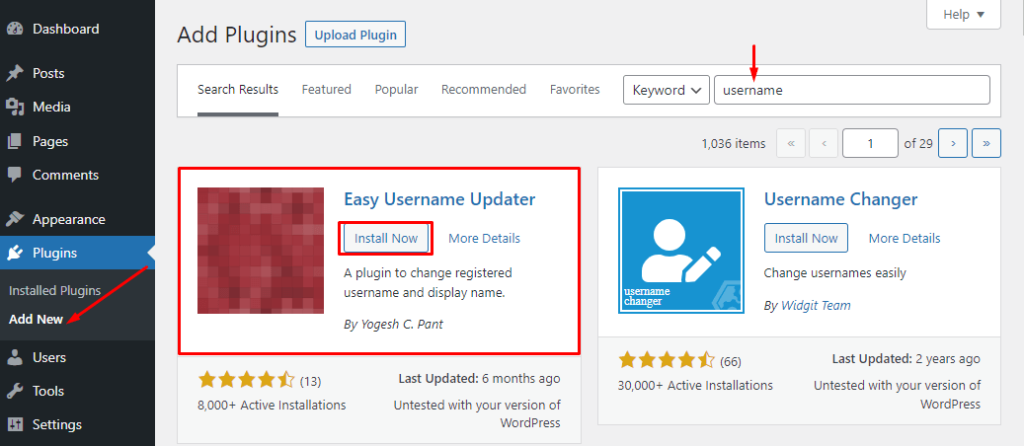
A username changer plugin can easily solve this problem. There are multiple effective options to choose from. We used Easy Username Updater in this tutorial.
Go to WordPress sidebar and visit Plugins > Add New. You’ll see a search bar on the right top of the page. Type username on the search bar. It will fetch the relevant search results for you.
You’re likely to find Easy Username Updater at the very beginning. Hit the Install Now button. Activate the plugin once the installation is complete.
Step 2. Change the Username using Easy Username Updater
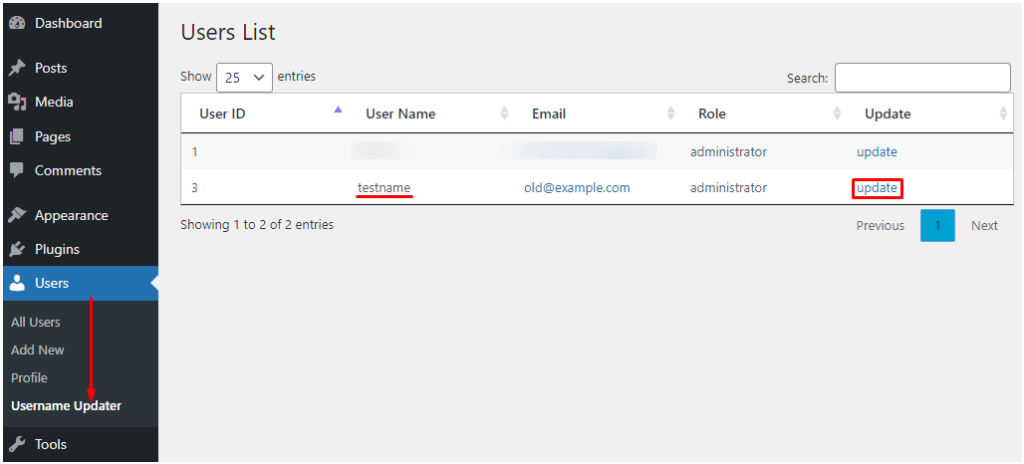
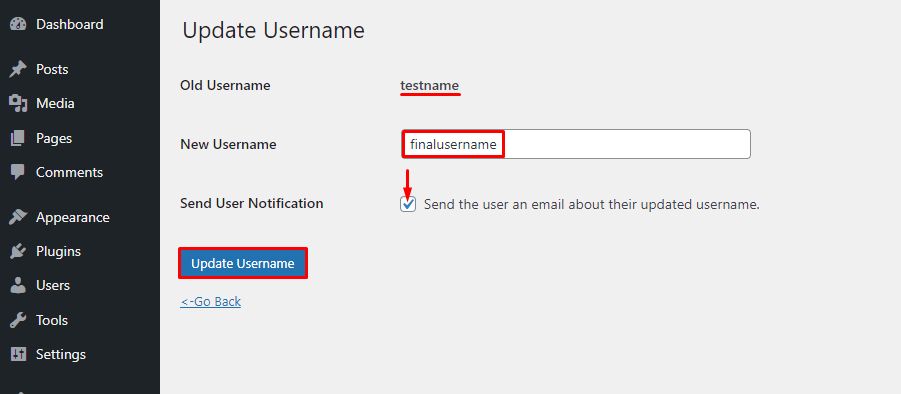
The installed plugin adds a new menu to the sidebar. Visit Users > Username Updater. You’ll see the list of all users here. Click on update placed beside the username you want to change.
You will be redirected to a new page with an input field consisting New Username section. Type your new username here. We used finalusername here. Then, hit the Update Username button to save changes. You can tick the Send User Notification checkbox to send the user an email about their updated username.
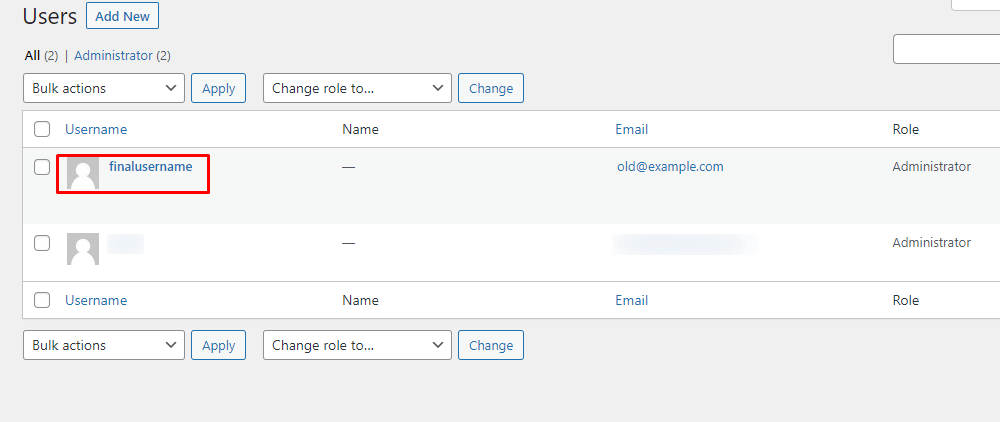
Now go to the Users section via your WordPress sidebar. You will see the updated username there. Remember that this plugin changes only the username; it keeps the email address the same as the previous user’s.
Log in to your website with the new credentials. We hope you can access your WordPress website with the updated username without any hassle. Don’t hesitate to reach out to us or comment on this blog if you face any issues.
Bonus: How to Change the Password for a WordPress User
WordPress allows users to change their passwords anytime. You can easily update passwords for a specific user via the WordPress admin panel sidebar. Follow the below simple steps to create a new password for your username.
Step 1: Log in to your WordPress website and visit Users > All Users.
Step 2: You’ll see the list of all users. Identify the username you want to change the password for.
Step 3: Click on Edit option to find out the Account Management page.
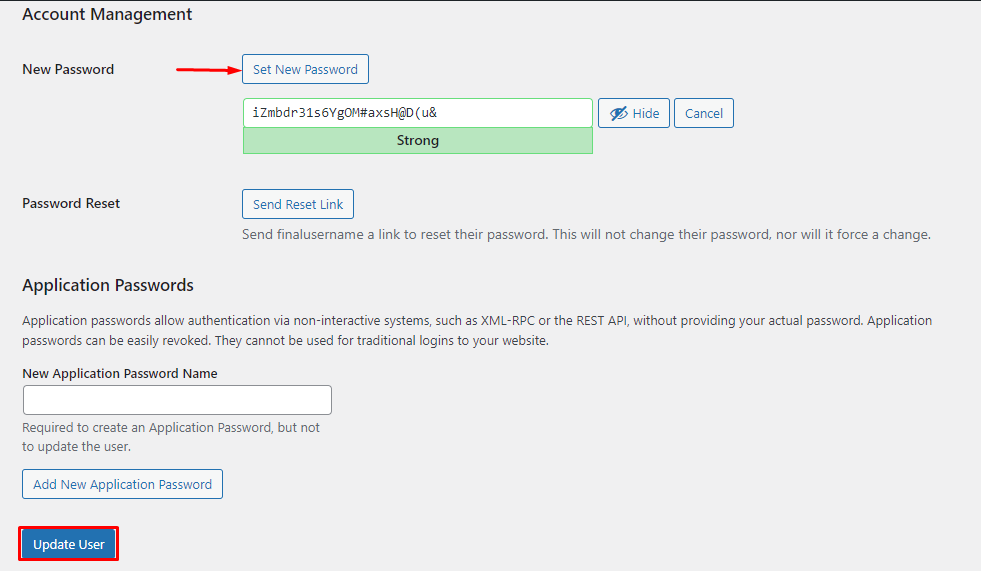
Step 4: Scroll down to get the Set New Password button. Hit this button.
Step 5: Insert a new password. You can use auto-generated passwords if you want. Then, click on the Update User button to save recent changes.
Now log out from the website dashboard. Try logging in with the updated password. Hope you can access the website without any difficulty.
This article showed you how to change a username and password, you can change your WordPress admin email by following the below blog-
How to Change WordPress Admin Email
Create Unique Usernames & Strong Passwords for a Secure WordPress Experience
We hope now you know how to change WordPress username in the most straightforward ways. Keep the tips we discussed above in mind to create unique and secure usernames for your WordPress website. Don’t forget to associate a strong. hard-to-guess password with your user account. You can enjoy a secure and hassle-free WordPress experience with the right username and password.
Subscribe to our blogs to get more tips and tricks, tutorials, updates, news about the WordPress ecosystem. You can also follow our Twitter and Facebook accounts to get regular updates from us.


Add your first comment to this post