
You might be facing trouble while uploading large files, like videos, software, or downloadable content, on your WordPress site.
In such a situation, you are definitely thinking about how to increase WordPress upload size, and is there any easy way to do so. Just relax. We are here to help you.
Not one or two, we have 5 easy methods to show you here in this article which will help you expand the upload file size limit any time you want.
Along with covering these methods, we will also let you know what is the maximum upload file size on your site, the use cases for increasing the size limit, and answer some frequently asked questions.
Quick Navigation
What is the Maximum Upload Size in WordPress and How to Find it?
When you upload files on your site, they consume some resources on the server. The bigger the file, the heavier the load on the server. Even, the extreme loads can cause server timeout sometimes.
That’s why WordPress has a built-in system to limit the file size in order to prevent a such situation. Hosting service providers mostly set the limit.
Usually, the default maximum upload file size in WordPress ranges from 4 MB to 150 MB.
This type of limitation hinders usability sometimes, particularly if you have a media-heavy website. Increasing upload file size comes into play in these cases.
To find out what is the maximum upload size limit you need to follow these steps or simply check the image below:
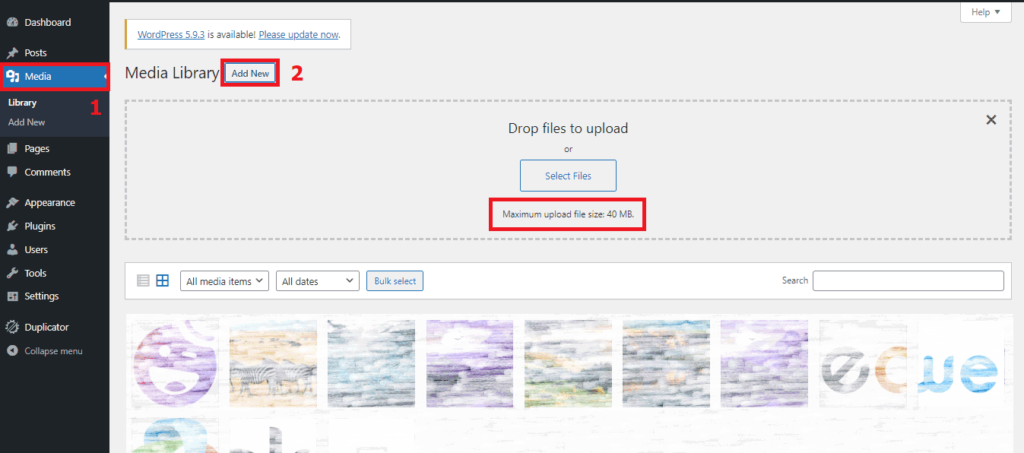
- Go to the “Media” menu from your WordPress Dashboard
- Click the “Add New” button from the Media Library panel
Now you can see the limit underneath the “Select Files” button.
You can follow this process to check back the status after you learn how to increase WordPress upload size. Before going there, let us tell you some use cases of doing it.
Why You Need to Increase Upload Size in WordPress
Increasing upload file size allows you to add large files, like videos, audio, apps, and games, to your website. The default upload size would be enough for most WordPress users, but there are some occasions when you need to increase the size limit.
The common use cases of expanding upload size would be if you:
- Operate a digital distribution website
- Manage a design or photography site, or a travel blog
- Need to add high-quality audio and videos to your posts
- Want to upload large plugins, themes, apps, or games
Don’t Upload Large Files Unless It’s Very Necessary: Increasing the upload size gives you freedom and enhances usability. But keep in mind that uploading large files hampers your site’s performance significantly, like slow page loading and jittery navigation; can even down your entire site.
Therefore, you will upload large files only if it’s very necessary. If you need to upload large files frequently, you may choose offloading or cloud storage then link back to your page or post.
5 Easy Methods on How to Increase WordPress Upload Size
You can extend the upload file size for your WordPress site by installing a plugin, changing settings from the cPanel, adding a few lines of codes in the settings files, or contacting your hosting service providers.
So, the popular and easy methods on how to increase upload size in WordPress are:
- Installing a Plugin
- Changing the PHP Options from cPanel
- Configuring the PHP INI Settings via cPanel
- Modifying or Creating the “php.ini” File
- Contacting the Hosting Provider
Method 1 requires a plugin installation, 2 and 3 need a little technical knowledge, 4 requires some sort of coding ability. And, method 5 is there if you want your hosting provider to deal with it.
Now, we are going to demonstrate each of the methods in detail with the necessary visuals. So, read carefully and stay with us till the end.
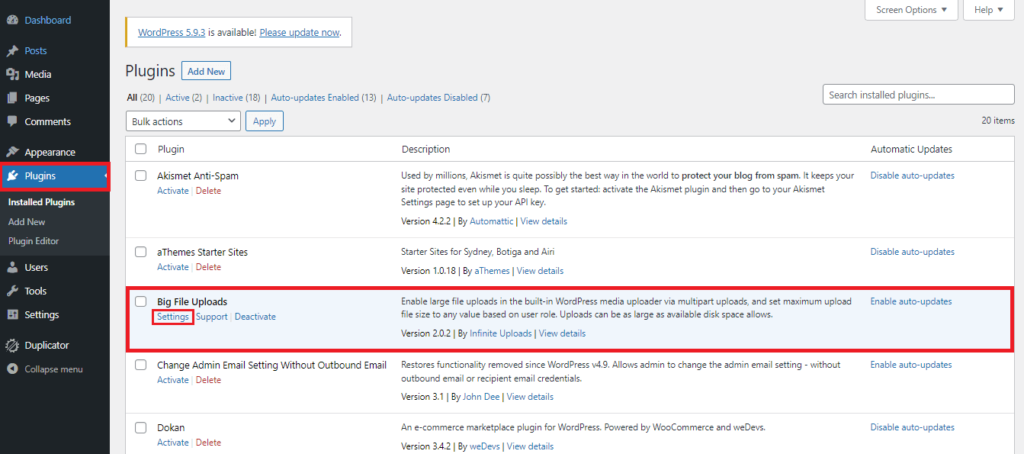
Method 1: Installing a Plugin
It is the easiest and the most common method to increase the maximum upload file size in WordPress. To execute this method, first, you need to install a plugin on your site. Read this article if you don’t know how to install a WordPress plugin.
You will find several plugins on WordPress to make your job done. But, we prefer “Big File Uploads” because it has good reviews and is easy to use.
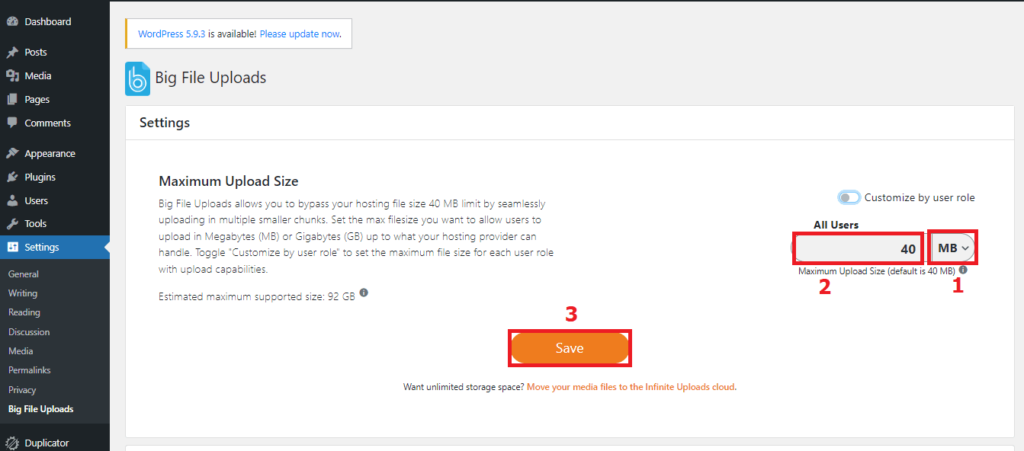
After installing and activating the plugin, you need to go to its “Settings” menu. Just have a look at the screenshot below:
Now, follow these three simple steps:
- Choose the unit (MB or GB)
- Give input to set the maximum upload size
- Press the “Save” button. And you are done!
You can deactivate the plugin once you finish uploading the large files. You just reactivate it and start doing such uploads when you need it again in the future.
If you don’t want to install any more plugins to your website, then you may follow the next methods.
Method 2: Changing the PHP Options from cPanel
You can easily increase the upload file size of your WordPress site by going to the PHP settings from your cPanel, then tweaking the values as you need.
It is another user-friendly and popular method though it requires a little technical knowledge which most WordPress users have nowadays. Let’s jump into the steps.
First, click on “Select PHP Version” from your cPanel. You will find it under the “Software” category (the interface might vary from the image below as it depends on the hosting company).
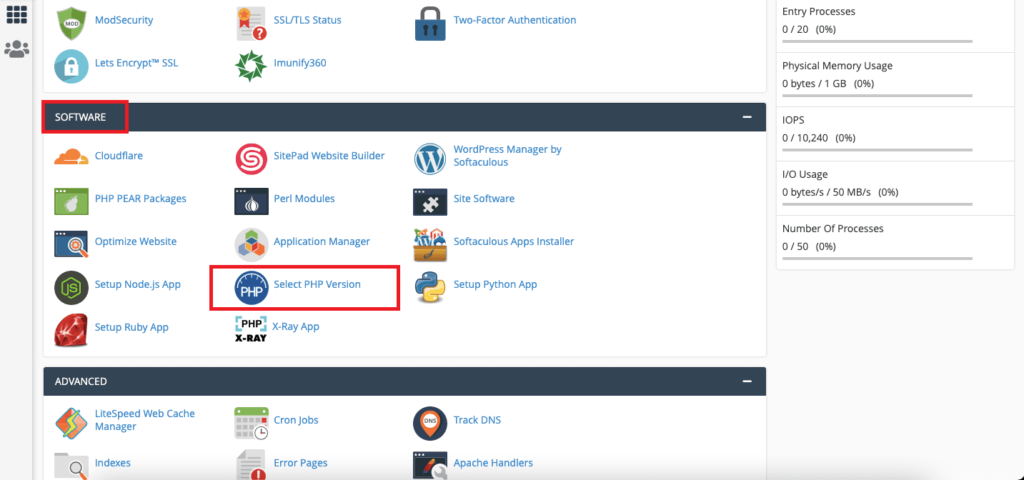
After going to the PHP Version menu, you need to follow these steps:
- Click the “Options” tab and scroll down
- Find out three required fields and change their values
- Press the “Save” button
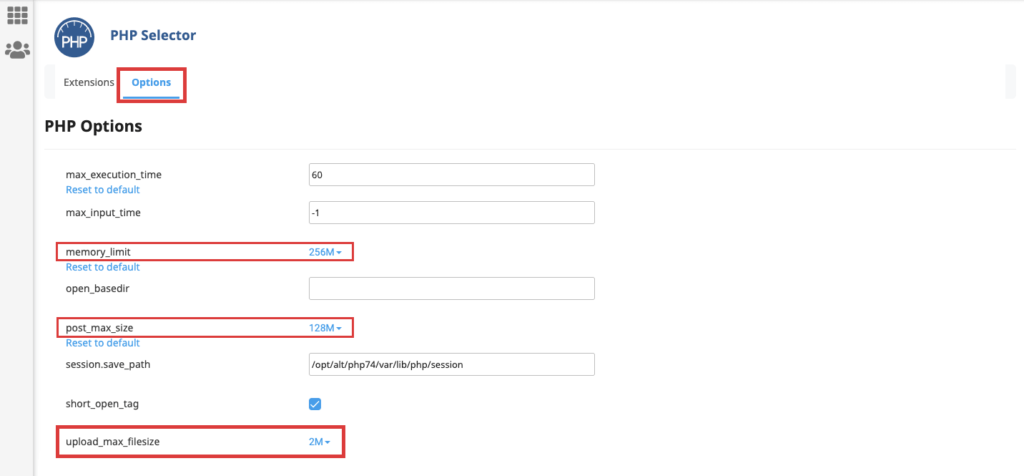
What to change: you should change the values of upload_max_filesize, post_max_size, and memory_limit based on your need. It’s better you set the values from low to high. Example: 300M for upload_max_filesize, 400M for post_max_size, and 512M for memory_limit.
We prefer this method as it neither requires plugin installation nor coding knowledge. Besides, it is effective and easy to execute. Let us know which method you prefer the most in the comment section.
Method 3: Configuring the PHP INI Settings via cPanel
Some hosting providers do not provide the option to “Select PHP Version”. In that case, you need to configure the PHP settings using the “MultiPHP INI Editor” from cPanel to increase the maximum upload file size in WordPress.
First, click on “MultiPHP INI Editor” under the “Software” category of your cPanel (the interface may vary slightly based on the hosting company).
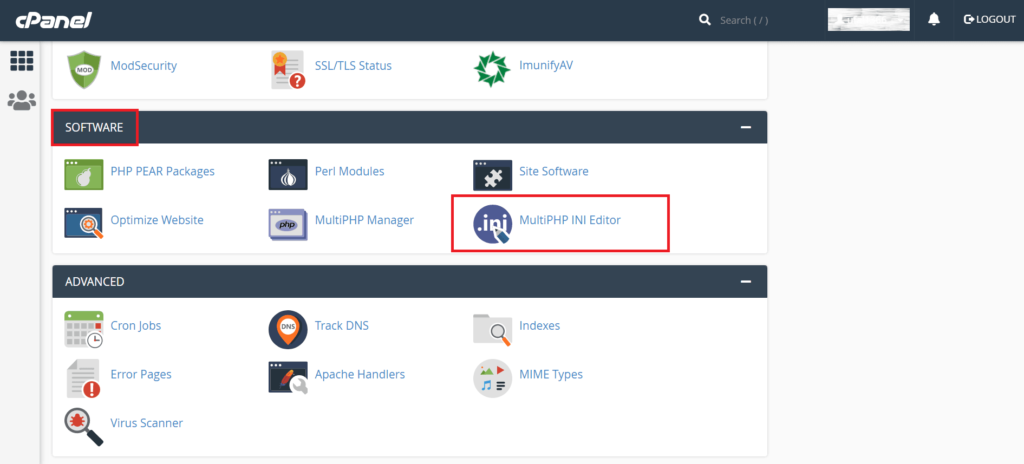
Then, select your domain from the drop-down menu (marked red in the following screenshot).

Now, follow these two simple steps mentioned below:
- Find out three required fields and change their values
- Press the “Apply” button. You are done!
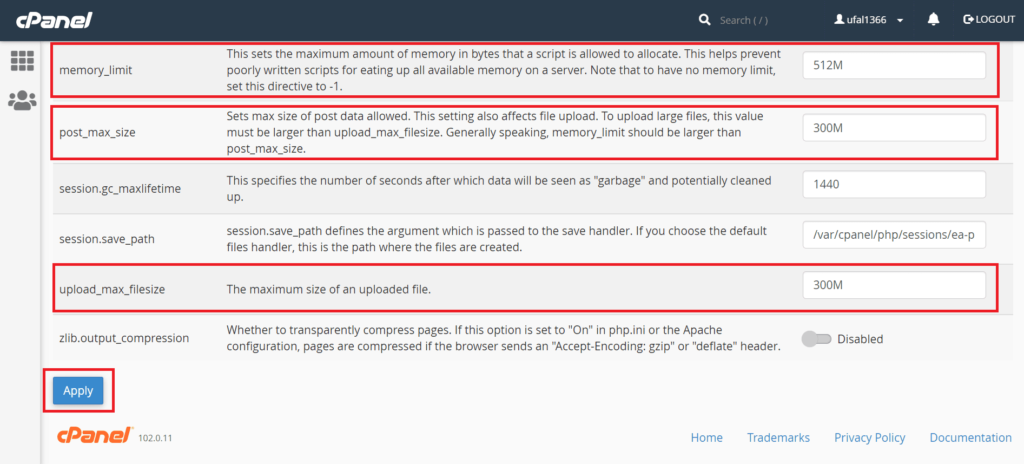
You have to change the values of upload_max_filesize, post_max_size, and memory_limit based on your need. Set the values from low to high as we discussed earlier.
Method 4: Modifying or Creating the “php.ini” File
The “php.ini” file contains the changes you make to the default PHP settings in the WordPress environment. Usually, it contains the directives like maximum upload size, file timeouts, and resource limit.
So, you can increase the WordPress upload size limit by modifying it (if it already exists) or creating it by yourself. All you have to do is to –
- Paste the following codes into the “php.ini” file
- Tweak the numbers as per your need
- Then, save the file
upload_max_filesize = 300M
post_max_size = 400M
memory_limit = 512M
Where to find “php.ini“: you can find this file in your WordPress root (home) directory.
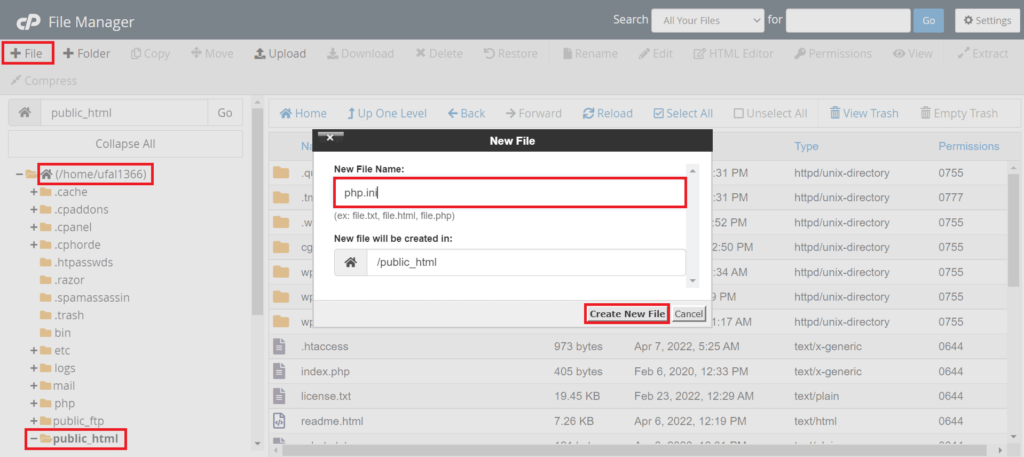
First, click on “File Manager” from your cPanel, then press the “public_html” folder. Here you’ll find it (check the screenshot below).
How to create “php.ini”: after going to the “public_html” folder, click the “+File” button (the interface might vary from user to user).
Set the name of the file as “php.ini”. Then, press the “Create New File” button.
Note: Some hosting service providers may keep the global PHP settings locked for security purposes. This method would not work in that case.
Then, you have to find out and edit the “.user.ini” file or create it by yourself instead. The method is almost identical to this one.
Don’t edit the “wp-config.php” file: some tutorials have shown to expand the upload size by editing the “wp-config.php” file. But this method doesn’t work anymore due to some recent technical changes. So, it’s better you avoid it.
Method 5: Contacting the Hosting Provider
If you don’t want to install a plugin or write codes to increase WordPress upload size, then you can contact your hosting service provider. They will eagerly help you.
Besides, you might need to contact the hosting providers in case all the previous methods fail (it is very rare though). Or, you make a critical mistake while writing the codes (unless you are an expert user).
Therefore, we are recommending you again read this tutorial with concentration, follow and execute the instructions carefully.
This marks the end of our discussion on how to increase upload size in WordPress. Next, we will answer some common questions, then draw a conclusion.
Also Read: How You Can Optimize WordPress Speed
FAQ on WordPress Upload File Size

We have included some frequently asked questions on WordPress upload file size here in this part, some of which you may find useful.
What is the maximum upload size for WordPress?
Usually, the default maximum upload size in WordPress ranges from 4 MB to 150 MB.
Why does the upload size limit exist in WordPress?
The upload size limit exists in WordPress to prevent heavy load on your site and storage shortage, keep it easy to navigate, and check security issues.
How do I increase WordPress upload limit in cPanel?
To increase the WordPress upload limit in cPanel, you need to follow these steps:
1. Log in to your cPanel
2. Click on “Select PHP Version”
3. Click the “Options” tab and scroll down
4. Find out “upload_max_filesize” and change its value
5. Press the “Save” button
Increase WordPress Upload Size Now and Overcome the Barrier
We tried to show you the easiest and the best possible methods in this tutorial on how to increase WordPress upload size. We hope they will serve your purpose very well.
All of our methods are proven. So, it’s time you pick up your preferred method and execute it on your site.
We have covered 5 methods here because we wanted to give you the freedom of choice and the option to try the alternatives in case one of them fails to make your job done.
Please feel free to let us know in the comment section if you face any kind of problems while extending the upload size limit for your site.
You can also be connected with us via our Twitter and Facebook pages.


Add your first comment to this post