
Each WordPress update comes with improved security patches and enhanced functionality. You will miss out on new features and leave your website vulnerable to cyber attacks if you use the old version of WordPress.
Besides, most popular themes and plugins align with the latest WordPress releases. So, you need to update WordPress to make the best use of the ecosystem.
Updating WordPress to the latest version is pretty much easy but a failed update can break your website. The themes and plugins may malfunction if you make a blunder. This is why you should know how to update WordPress safely, without harming the design of a running website.
No worries, we’ve got you covered. In this article, we’ll show you the ways to keep your WordPress updated both manually and automatically. Keep reading to learn further.
Why You Should Update WordPress to the Latest Version

In this fast-paced internet world, technologies are evolving every day. WordPress developers are continuously trying to make WordPress a better place for its users. Every update comes with new features, bug fixes, security patches, enhanced performance, security, speed, and more.
You may wonder what’s the point of taking the hassle to update WordPress to the latest version when your current version is working just fine. Well, there is no immediate effect of using a backdated version of WordPress.
But, it’s a good practice to keep pace with new technology. Here’s a list to help you understand why you should update WordPress.
- To reap the benefits of new cool features
- To ensure optimal speed and performance for the website
- For improved security patches to fight potential vulnerabilities
- To remain compatible with popular WordPress plugins and themes
- To get an almost bug-free WordPress version
Now that you know the importance of updating WordPress to the latest version, let’s learn what you should keep in mind before starting the process.
Things to Consider Before Updating WordPress

- Read the changelog: Every WordPress update publishes a changelog that describes what’s new in the update. Have a look at those new things. This will help you understand whether you need to update the WordPress version immediately or you can wait for a few days.
- Wait to identify issues: It’s wise to wait a bit before updating to the latest version of WordPress. Sometimes, new updates accompany many errors and bugs. You can follow the WordPress support forum to check if the new update has loading issues. Update to the latest version if no issue is reported there or in any other forums like Quora, Reddit, GitHub, and StackExchange.
- Ensure PHP version compatibility: WordPress runs on PHP programming language. So, you need to keep the PHP version updated to keep it compatible with the latest WordPress. It’s essential to check the PHP version before updating WordPress to the latest version. Thus, you’ll be sure of the compatibility between PHP and WordPress.
- Create a backup: Most importantly, you must create a backup of your website to reduce the risk of losing content, media files, and other relevant data to almost zero.
Since creating a backup is the most serious thing to check before going for the update, here we’ve shown how you can create a backup of your website in the following section.
How to Create a Backup of Your Website
You can create a backup of your WordPress website both manually and with a plugin. Manual backup involves sensitive tools like cPanel, phpMyAdmin, and FTP accounts.
For Beginners: If you’re unfamiliar with advanced troubleshooting, follow these steps:
- Create a backup before updating, so you can restore your site if something goes wrong.
- Use WordPress’ support forums or contact your hosting provider for assistance with complex errors.
For Advanced Users:
- Consider using staging environments/local development setups to test updates before applying them to your live site.
- Utilize developer tools like WP-CLI for faster debugging and deployment.
- Use website management tools like cPanel and FTP clients
It’s a bit painstaking to back up a WordPress website via the cPanel and FTP. That’s why we suggest you use a backup plugin instead to reduce the workload.
There are many WordPress backup plugins available in the ecosystem. You can choose any of the following three. These are top-quality plugins that can serve your purpose.
- WPvivid
- BlogVault
- UpdraftPlus
- Backup Buddy
- Duplicator
Also read: How to Backup WooCommerce Site- 3 Proven Methods (Manual & Automatic)
How to Update WordPress – 4 Easiest Ways

You can update WordPress from the admin panel sidebar, using an FTP client, or enable the automatic updates to remain tension-free. We explained all three methods here.
- Manually from the Dashboard
- Manually Via an FTP Client
- Automatically from the Dashboard
Accessing the admin panel and updating WordPress from there is the easiest process. We’ve shown this process at first. Let’s learn how you can manually update your WordPress from the admin dashboard.
1. Update WordPress Manually from the Dashboard
Log in to your website’s admin panel using the username/email and password. The sidebar will show a notification beside the Update menu if your website is running on an old WordPress version.
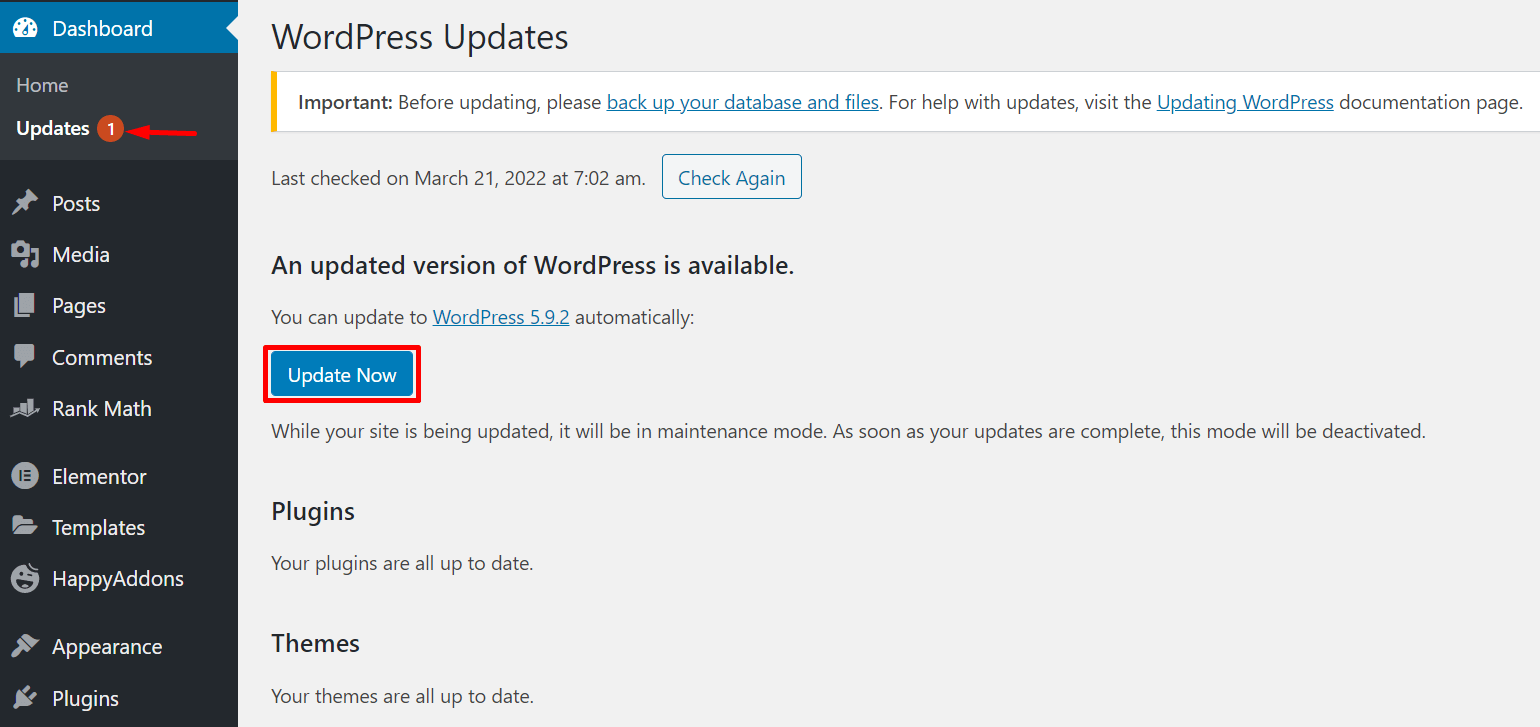
Click on the Update Now button to initiate the updating procedure. Within a few seconds, you’ll get the updated version of WordPress.
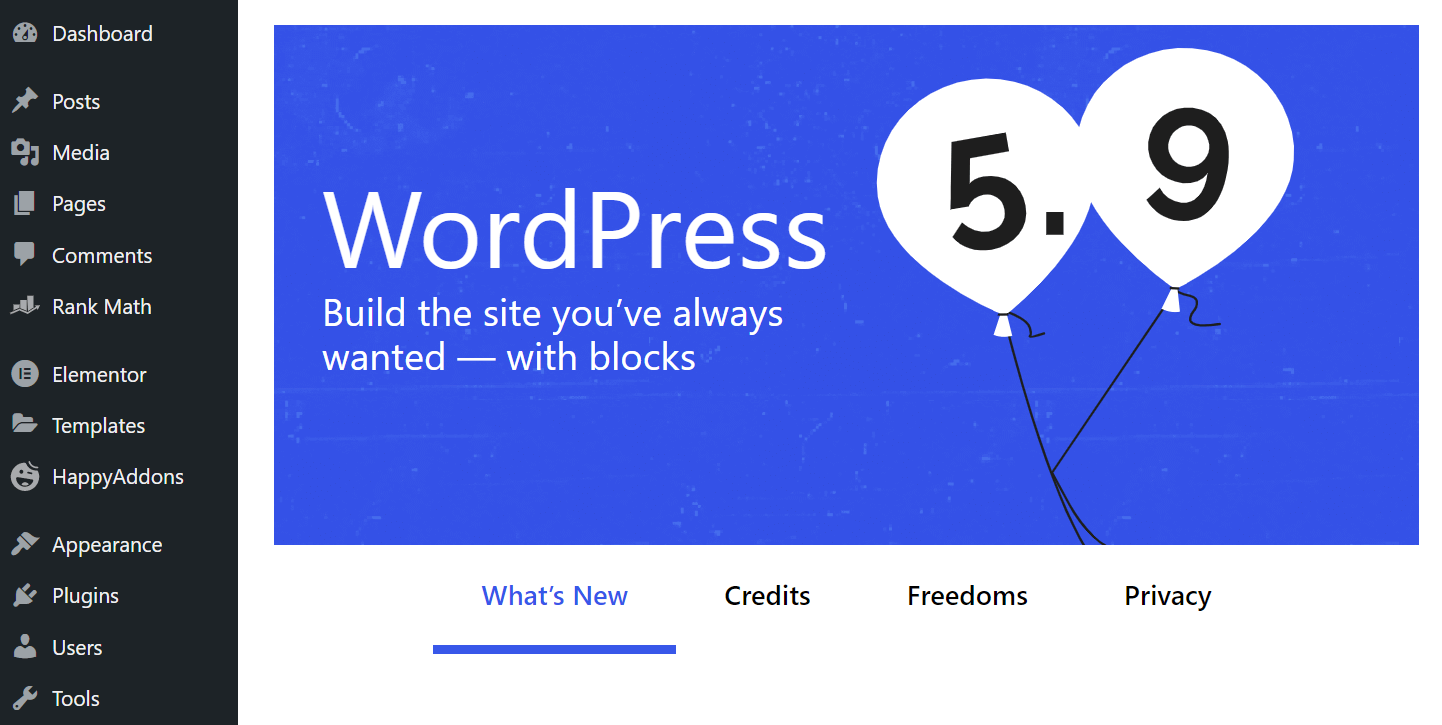
After the update, our website is now running on WordPress’s latest version (5.9.2).
2. Update WordPress Manually via Your FTP
You’ll need an FTP client and configure that with your website to use the FTP account. Here, we’ve used one of the most popular and user-friendly FTP clients FileZilla to update WordPress manually. Check the step-by-step guide to updating WordPress to the latest version.
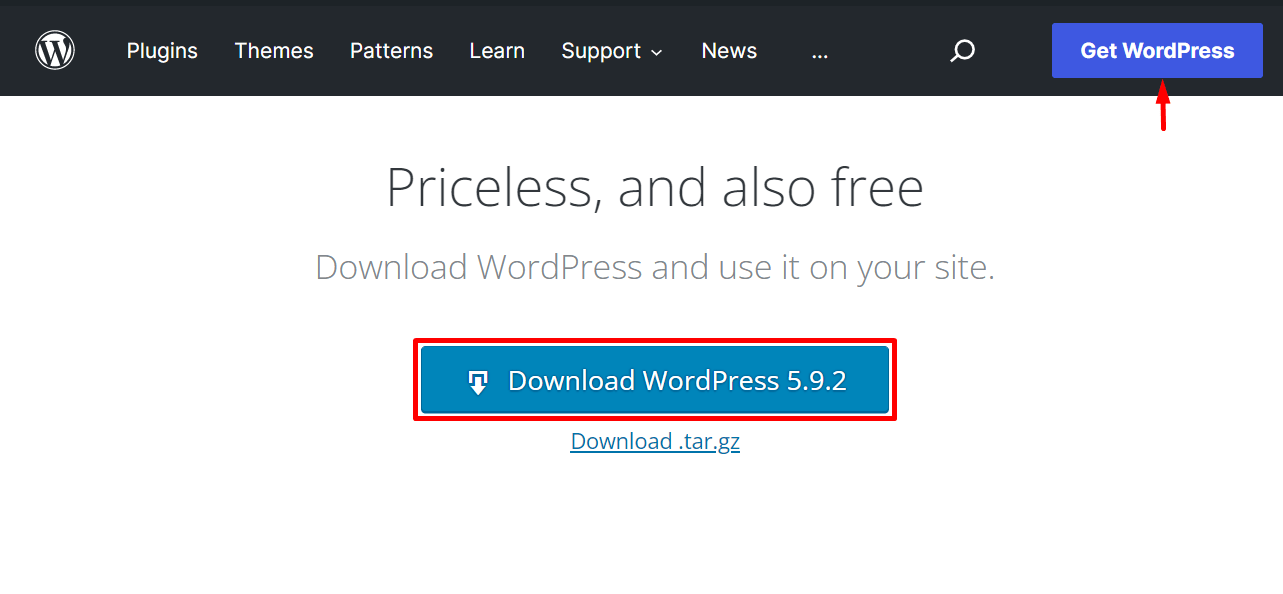
Download the Latest Version of WordPress
Go to WordPress.org to get the latest version of WordPress. Hit the Get WordPress button. It will lead you to the Download page. Click on the Download WordPress version name to get it on your computer as a ZIP file.
Extract the ZIP File to a Folder on Your PC
Now find the ZIP file you’ve just downloaded and extract the compressed WordPress files to a folder. Remember the folder name. You’ll need this information in the further step.
Install FileZilla and Connect It with Your Website
You can download the .exe file from https://filezilla-project.org/. Carefully download the FileZilla Client for Windows, macOS, or Linux operating systems as per your needs.
After installing the FTP client it will look like the following picture. You can access the local site’s files from the computer. But you have to connect the FTP client to your website server to get the data of your remote site.
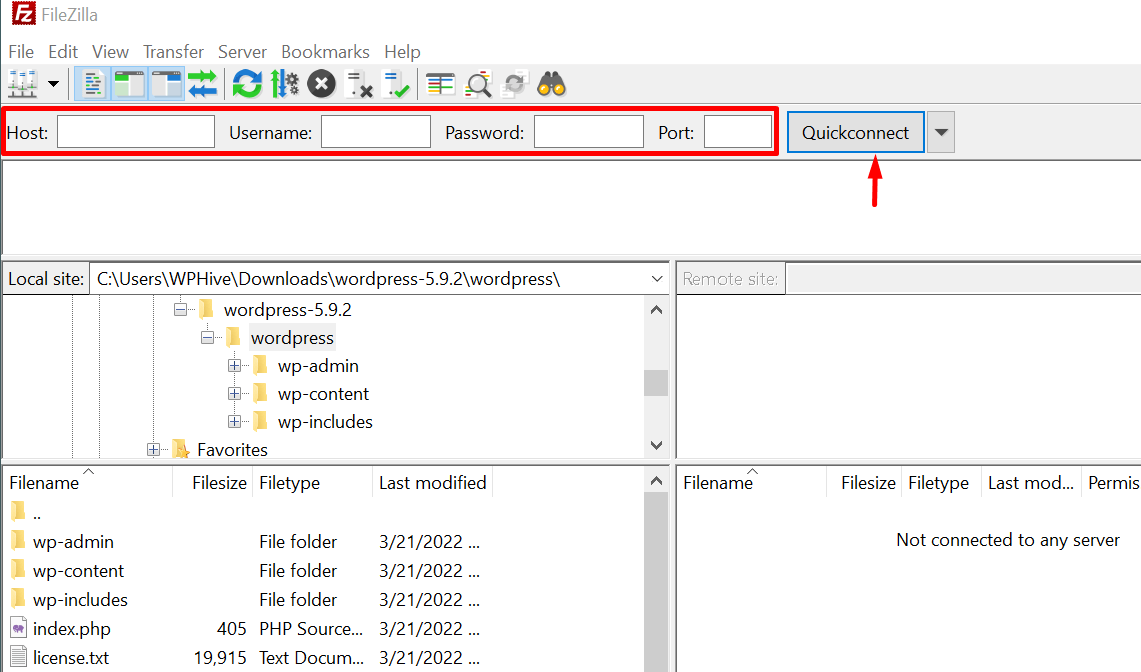
Simply provide the hostname, cPanel username, password, and use 21 as the port. These pieces of information are supposed to connect your FTP with the website and render the data from the remote site.
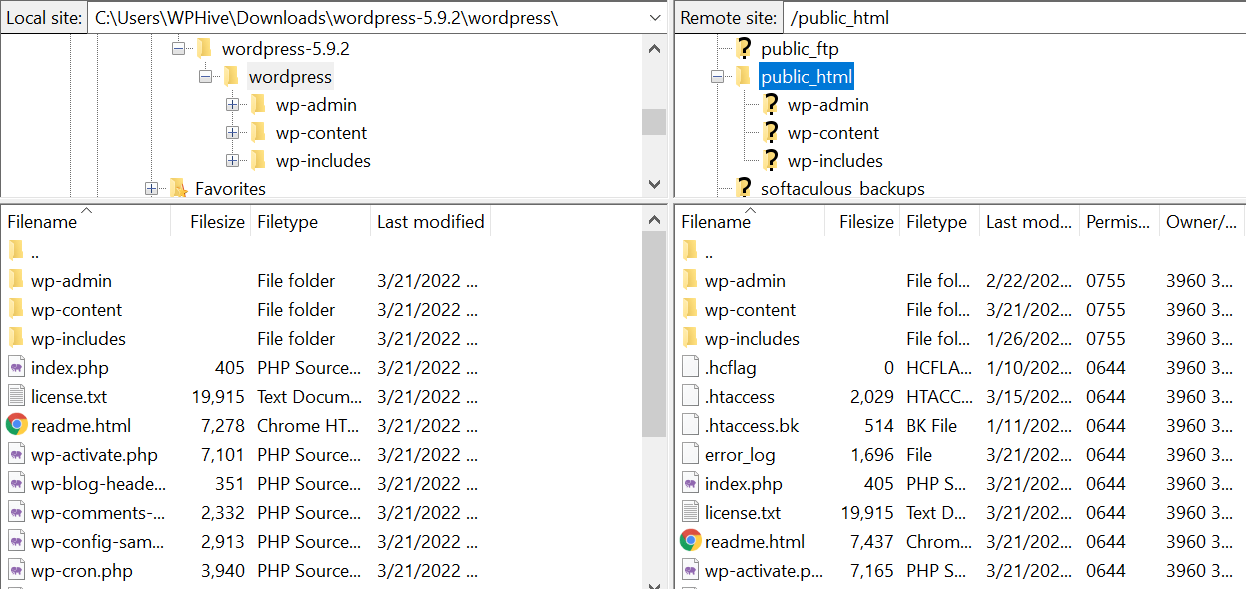
Access the Files From from Both Local & Remote Site
Open the extracted files from the computer in the local site section. And open the public_html folder in the remote site section.
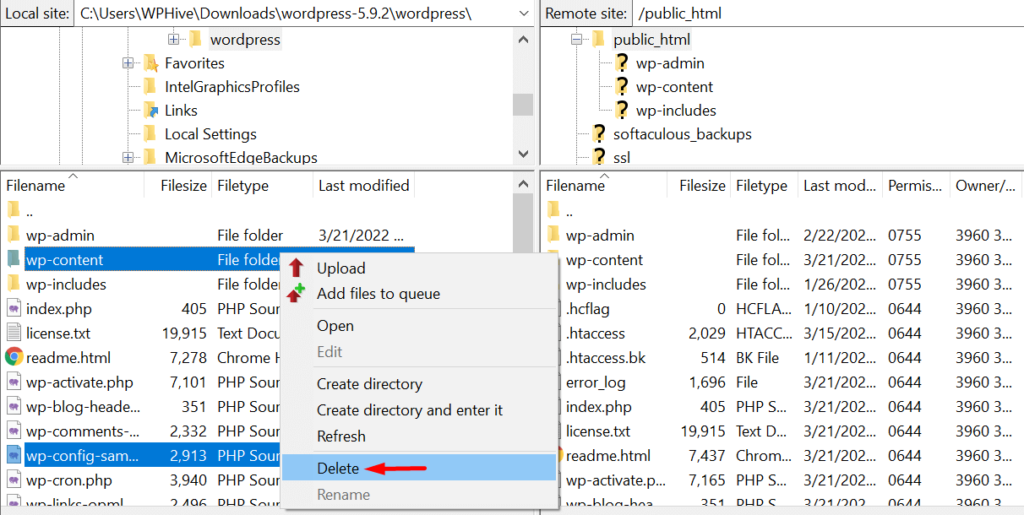
Delete the wp-config File & wp-content folder from the Local Site
Select the wp-config-sample.php file and wp-content folder, click on the right mouse button and Delete them. This will prevent you from losing any data from your remote site when you’ll transfer these extracted files there in the next step.
Upload And Transfer All The Extracted Files
Now upload all the extracted files from the local site to the remote site.
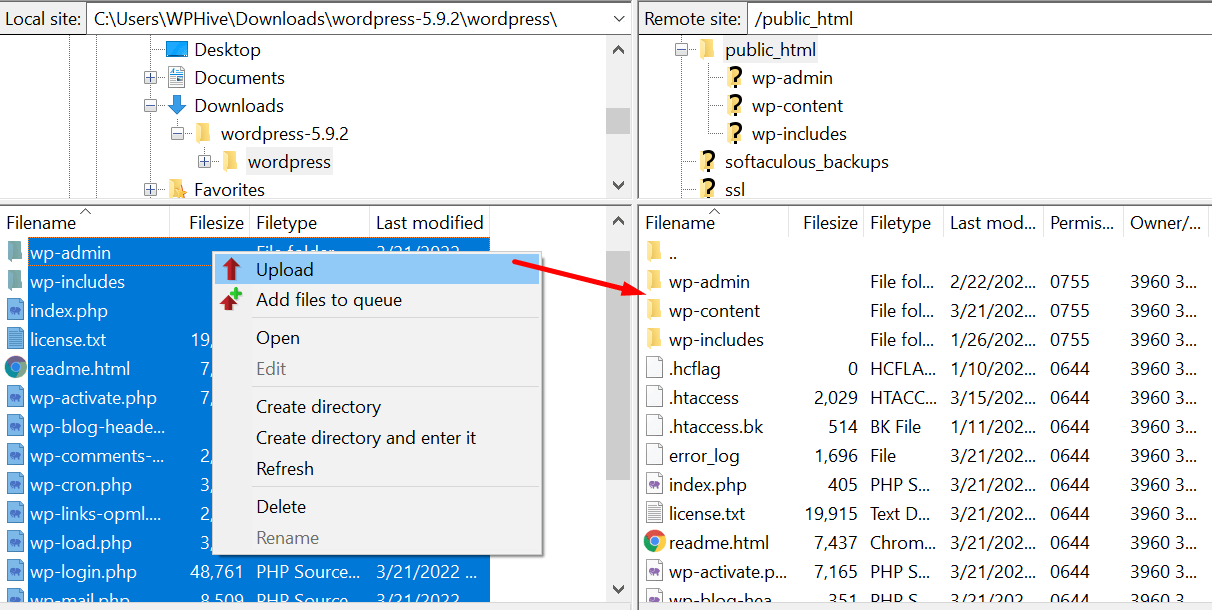
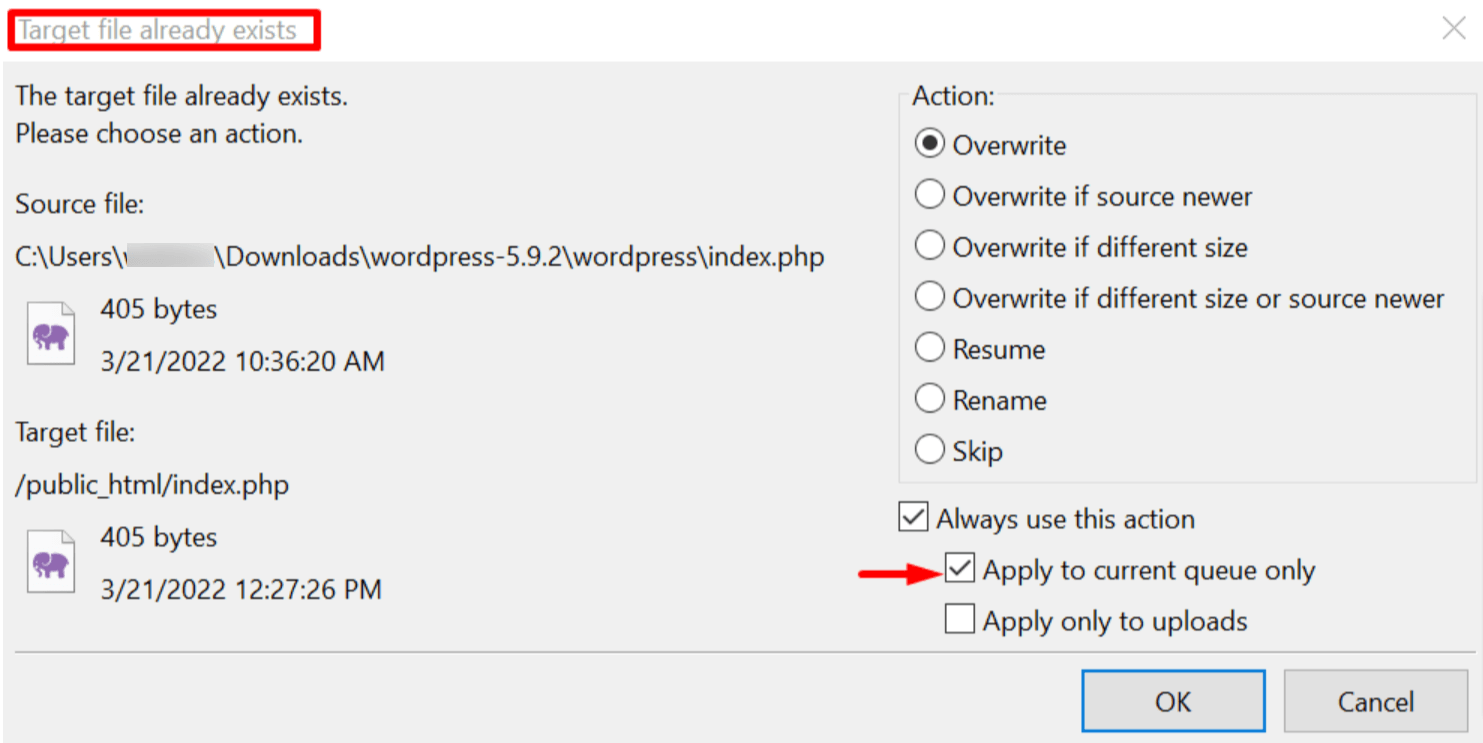
Since the live site has folders and files by the same name, you will see a popup window as shown in the below picture. It seeks permission to overwrite the target files that already exist on the remote site.
You should tick the Always use this action option here to facilitate the transfer process.
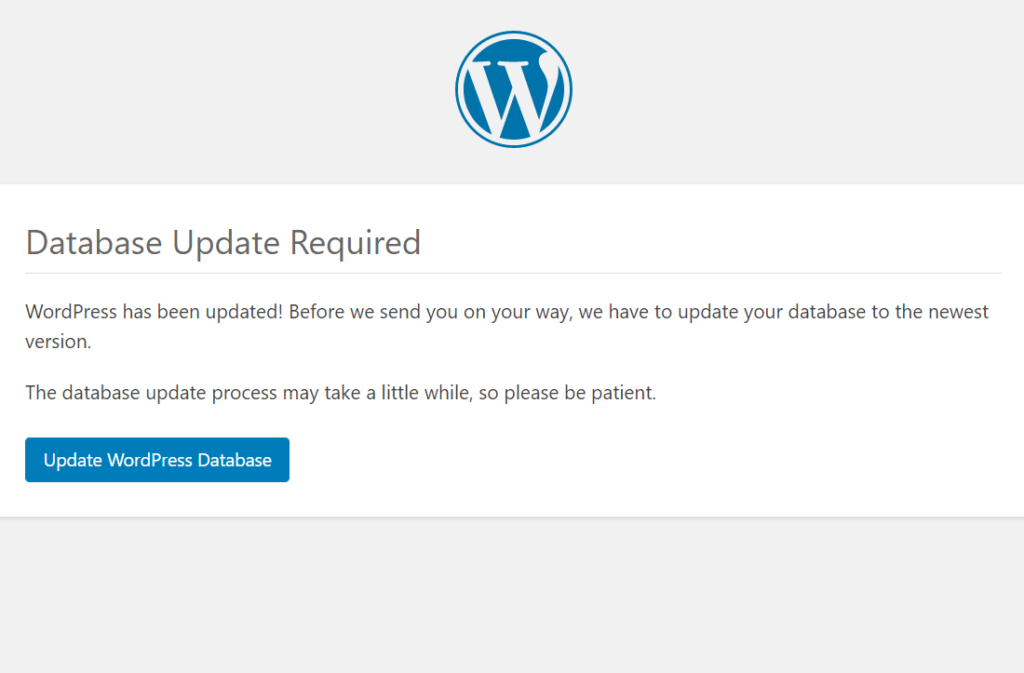
Update WordPress Database
Go to your wp-admin page to check if everything is okay as intended. After successfully uploading the extracted files to your remote site, you may see a notification message prompting you to update the WordPress database for the newest version.
Hit the Update WordPress Database button to complete the update process.
3. Update WordPress Automatically
All WordPress sites are automatically kept up to date with maintenance and security and security releases of WordPress only. You can enable this automation in the following way.
Activate the Auto-Updates from the Admin Panel
WordPress offers an automated update feature for plugins, themes, and all of its new versions. You need to enable automatic updates from the admin panel.
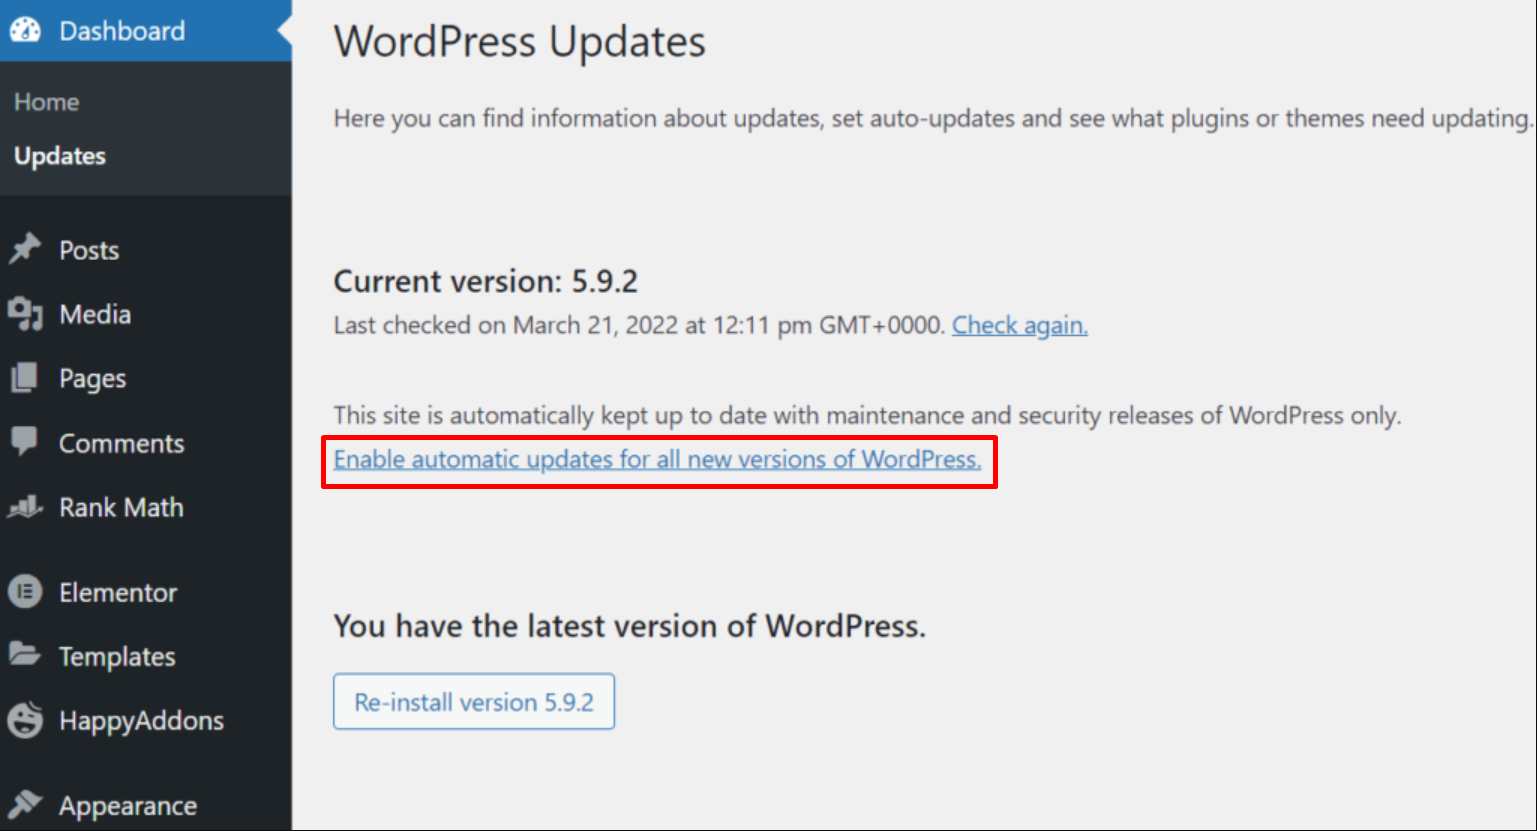
Choose Updates from the sidebar. You will see the Enable automatic updates for all new versions of the WordPress option. Click on it to start the auto-update process.
Note: If you don’t see this option here, that means the auto-update feature is already active for your website.
Edit the wp-config.php File to Enable Auto-Update
If you feel comfortable making changes to your WordPress website manually, you can follow this process. A simple code snippet can enable auto-updates for your website.
Access the cPanel of your website and go to the file manager. Open the public_html folder to explore the PHP files. Choose the wp-config.php file and click right on the mouse to open the available options. Click edit to open it.

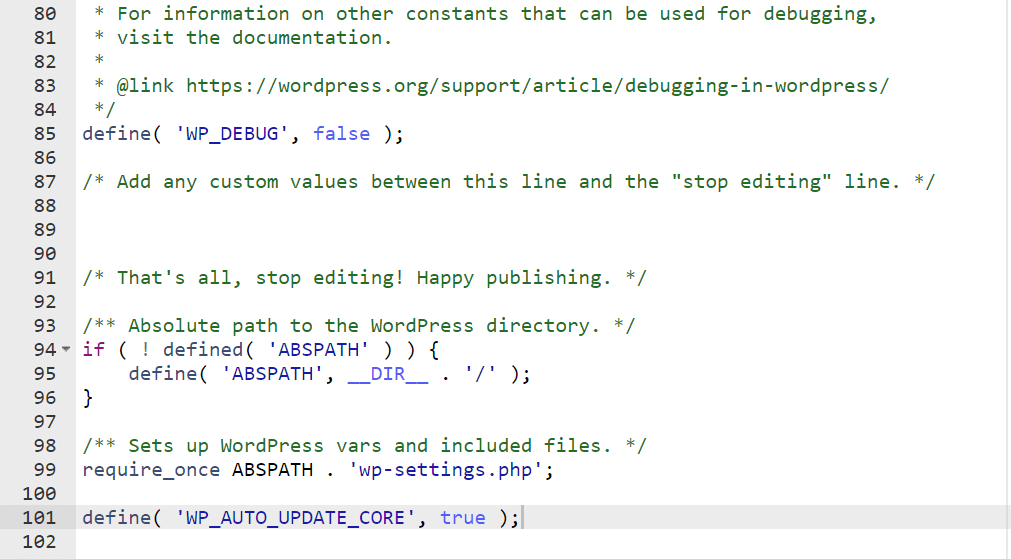
Go to the bottom of this file and the following code snippet there.
define('WP_AUTO_UPDATE_CORE', true);
Once you do it successfully, you’ll get the newest version of WordPress updated automatically for your website.
We have a detailed blog on How to Manage WordPress Automatic Updates Like a Pro. If you want to learn more, you can follow this blog.
4. Step-by-Step Guide to Use WP-CLI for WordPress Updates
WP-CLI is the command-line interface for WordPress, allowing developers to manage WordPress installations, update core files, and manage plugins and themes directly via the terminal. It’s particularly useful for advanced users and developers managing multiple WordPress sites or dealing with server-only access.
Install WP-CLI:
Download the wp-cli.phar file using curl or wget:curl -O https://raw.githubusercontent.com/wp-cli/builds/gh-pages/phar/wp-cli.phar
Verify the downloaded file:php wp-cli.phar --info
Make the file executable and move it to your system path:chmod +x wp-cli.phar sudo mv wp-cli.phar /usr/local/bin/wp
Confirm installation by running:wp --info
Run WordPress Core Update:
Navigate to your WordPress installation directory using cd. For example:cd /var/www/html/your-site/
Check for available updates:wp core check-update
Run the update command:wp core update
If your database needs an update, execute:wp core update-db
Verify the Update:
Check the WordPress version to ensure the update was successful:wp core version
Check If Everything Is Okay After the Update
Now visit your website to see whether it appears perfectly or shows any issues. You should browse across the website, open the pages, and posts to check for any issues. We hope nothing will go wrong and your website will be up and running smoothly.
But, if you see any issue, you should examine the website carefully to find what’s causing it to not load properly. Here’s a list of issues you may face when working with a WordPress website.
- White Screen of Death
- Compatibility Issues with The Plugin
- Theme Integration Problem
- Missing or Renamed Theme Directory
- Internal Server Error
- Error Establishing Database Connection
- 404 Not Found Error
- Syntax Error- One of The Common WordPress Errors
- Scheduled Maintenance Error
- Connection Time Out Error
The following blog explains all common errors that you may encounter. Know the reasons and solutions from this blog:
Common WordPress Errors And How To Fix Them (10+ Errors With Easy Solutions)
Troubleshooting Common Issues During WordPress Updates
Updating WordPress can occasionally lead to issues. Below are common problems and actionable troubleshooting steps:
1. “Briefly Unavailable for Scheduled Maintenance” Error
Cause: During updates, WordPress creates a .maintenance file in the root directory. If the process is interrupted, this file might not be removed.
Solution:
- Access your site files via FTP or File Manager in your hosting dashboard.
- Locate and delete the
.maintenancefile from the root directory. - Reload your website, which should now function normally.
Prevention Tip: Avoid refreshing or navigating away from the update screen during the process.
2. White Screen of Death (WSOD)
Cause: Plugin or theme incompatibility or memory limits.
Solution:
Increase PHP memory limit:
- Edit the
wp-config.phpfile and add:php define( 'WP_MEMORY_LIMIT', '256M' );
Deactivate all plugins:
- Rename the
pluginsfolder via FTP toplugins_backupto disable all plugins. - Rename it back and reactivate plugins one by one to identify the culprit.
Switch to a default theme:
- Rename the active theme folder and WordPress will default to a core theme like Twenty Twenty-Three.
3. Plugin or Theme Conflict

Cause: Incompatibility between updated WordPress core and outdated plugins/themes.
Solution:
- Update all plugins and themes after updating WordPress.
- Check plugin compatibility in the WordPress Plugin Repository.
- Use a staging environment to test for conflicts before applying updates on the live site.
Prevention Tip: Always update plugins/themes before the WordPress core.
4. Database Update Errors
Cause: The database didn’t update properly after a core upgrade.
Solution:
Manually initiate the database update:
- Visit
yourwebsite.com/wp-admin/upgrade.php.
Repair the database:
- Add this line to your
wp-config.phpfile:php define( 'WP_ALLOW_REPAIR', true ); - Visit
yourwebsite.com/wp-admin/maint/repair.phpand follow the instructions.
5. HTTP 500 Internal Server Error
Cause: Corrupt files, plugin/theme conflicts, or server misconfigurations.
Solution:
Check the .htaccess file:
- Rename
.htaccessto.htaccess_oldand regenerate it by saving permalinks in the WordPress admin dashboard.
Enable WordPress debugging:
- Add the following to
wp-config.php:php define( 'WP_DEBUG', true ); define( 'WP_DEBUG_LOG', true ); - Check the
wp-content/debug.logfile for errors.
Verify PHP version compatibility:
- Ensure your server runs a compatible PHP version (e.g., PHP 7.4 or above).
6. Stuck in Maintenance Mode
Cause: Update processes interrupted by server timeouts or browser refresh.
Solution:
- Refer to the solution for the “Scheduled Maintenance” error (deleting the
.maintenancefile).
7. Slow Website After Update
Cause: Cache issues or conflicts with updated plugins/themes.
Solution:
Clear your website cache:
- Purge caches from plugins (e.g., WP Super Cache, W3 Total Cache).
- Clear CDN caches (e.g., Cloudflare).
- Optimize your database using tools like WP-Optimize.
Bonus: How to Update Your WordPress Themes And Plugins

Your themes and plugins are supposed to remain unchanged after the update. Theme and plugin data are preserved inside the wp-content folder. Since we didn’t make any changes to this folder, you’ll get them in their previous state.
You can update your themes and plugins anytime you want. Go to your WordPress dashboard and navigate to the Updates option.
After clicking on Updates, you’ll see notifications about the updated information of both themes and plugins. Simply hit on the Update Plugins or Update Themes to initiate the updating process.
Tip: Sometimes you may not see the updated information on the dashboard. In that case, check the inbox of your email. Developers will send you release updates via email or the WordPress dashboard.
Note: Updating the theme may result in the loss of customization that you made to the theme’s previous version. You can use a child theme to avoid losing the personalized designs made in the parent theme.
If you are adding a new theme, you can easily activate it without losing content by following our step-by-step guide on-
How to Change WordPress Themes Without Losing Content.
FAQs- How to Update WordPress
We tried to address all issues regarding how to update WordPress. If you still have any queries, we hope the following FAQ section has your answers.
1. Do I have the risk of losing any data of installed plugins after the update?
Yes. You may lose data if you make any changes to the wp-content folder available in the root directory of your live website. Don’t delete anything from that folder to avoid losing the theme and plugin data.
2. How can I update WordPress manually on my localhost?
The process is quite similar to what we have shown above in the Update WordPress via FTP section. You can update WordPress manually on your localhost by following the below steps:
1. Download the latest version of WordPress
2. Unzip the files and save them to your computer
3. Delete the wp-content folder and wp-config-sample.php file from the extracted files
4. Go to C:\xampp\htdocs\ or the folder where you hosted your local site
5. Explore the WordPress folder
6. Copy all the remaining extracted files and paste them inside it
7. Update the WordPress database if it is required
3. Does WordPress automatically update?
Yes, WordPress automatically updates all minor releases and security patches.
4. How to update my PHP version in WordPress?
You can easily update your PHP version via the cPanel. Follow this blog written on How to Update the PHP Version of a WordPress Site to get a detailed guide.
5. Which PHP version is best for WordPress?
We suggest using the latest PHP version for your website. According to WordPress, you should use at least the PHP 7.3 version to get optimal performance. Any version before PHP 7.3 may affect your website’s functionality.
6. Should I back up my website before updating WordPress?
Yes, it’s highly recommended to create a backup of your website files and database before performing any updates. This ensures that you have a restore point in case anything goes wrong during the update process.
7. How can I check if my WordPress website is up to date?
To check for updates in WordPress:
– Log in to your WordPress admin dashboard.
– In the left-hand menu, go to “Dashboard” > “Updates.”
– You’ll see notifications if any updates are available for WordPress core, plugins, or themes.
8. Can updating WordPress cause compatibility issues with plugins or themes?
In rare cases, updating WordPress may lead to compatibility issues with certain plugins or themes. Developers usually strive to maintain compatibility with the latest version of WordPress, but some plugins or themes may not be updated as frequently.
9. How frequently should I update WordPress?
It’s recommended to update WordPress as soon as new updates become available. This ensures that you stay up to date with the latest security patches and improvements. Regularly checking for updates and performing them promptly is a good practice.
10. Can I revert to a previous version of WordPress if I encounter issues after updating?
Reverting to a previous version of WordPress is not a straightforward process and can be complex. It’s better to have a backup of your website and consult with a professional developer if you encounter issues after updating.
Update Your WordPress Without Losing Content
No matter how you update WordPress manually or automatically, you should always align with the best WordPress security practices. A simple mistake can result in a big mess. The best way to avoid hassles is to create a backup of your website before making any changes to it.
You’re less likely to lose any content if you enable the auto-update feature. Manual update through cPanel, or FTP often comes with potential risks of losing data and settings.
So, be careful when you do something manually. In this case, ensure that your wp-content folder and wp-config file are intact. Thus, you will be able to update WordPress without losing content.


Nice article with lot of useful information for readers. You have mentioned some of the important safety measures that one need to really take care of. There few more points I would like to add if you allow. Check out them below:
1. Use a Child Theme.
2. Update PHP and Server Software.
3. Disable and Re-enable Plugins.
4. Use Reliable Plugins and Themes.
5. Keep an Eye on Error Logs.
Hope this points add importance to your article. One need to be very careful while building or update any website, secure website is very important.
Dear Sophia, we deeply appreciate your time and effort in sharing your thoughts on our blog post.
This is a really informative article with lots of great ideas. Could you please tell me what software you use to run your incredibly fast website? I also want to create a simple website for my business, but I need help with the domain and hosting. Are there any other choices available, and if so, what would you suggest?