Creating a website has become much easier than ever before. Now even you can create your online presence without being an expert in coding.
Though you don’t have to write codes, you need to know how to set up WordPress and customize it to design your website. It needs a lot of hard work, dedication, and proper guidelines to follow.
You can follow YoutTube videos, WordPress courses, or any other blogs to learn about website building.
Or, you can follow this ultimate tutorial to build your dream website where we are going to show you from registering your domain name to deploying your site to the world all in one place.
It’s going to be a step-by-step guide, so without just scanning or skimming it, you should seat at your desk with your computer and start building your site following this guide.
If you’re ready with your machine, let’s start this tutorial, shall we?
Why Should You Use WordPress to Build Your Website?
You might be wondering why you would use WordPress. It’s not like WordPress is the only solution. Then why WordPress?
Because it’s easy, free, and massively popular. That’s it? Hell no!
Let’s find some more reasons why we have chosen WordPress over other CMSs.
It’s an Open Source Software
The term open-source software gets thrown around a lot in development circles, but it may not tell you much if you’re not a part of that world. For practical purposes, it means two things:
- The platform is free: Open-source software is free, which means you can use it for any type of project you want, be it commercial or otherwise.
- You can customize it any way you like: With WordPress, you can look under the hood of the CMS and change just about any aspect of it.
It’s the Most Popular CMS
There are millions of websites out there, and WordPress powers more than 40% of them. Every day, over 500 new sites using WordPress go live, and those numbers are only getting larger.
With such a massive user base, you can be sure that WordPress developers aren’t going to stop developing it any time soon. That means choosing this CMS ensures you’ll always have access to updates that make your site more secure and add new features to it.
WordPress is for Anything and Everything
You might have heard that WordPress is a blogging platform. That’s not technically false, but the way the CMS is built also means you can use it for all sorts of projects.
For example, you can use WordPress to grow your online business, build virtual classrooms, create forums, run social media platforms, or power pretty much any other type of project you can imagine.
WordPress is Simple
WordPress is pretty easy to pick up, even if you’ve never dealt with a CMS or built websites before. Beginners are welcome! To get started, all you have to do is select a theme, maybe install a plugin or two, and then jump right into creating pages and other content.
There is no or little learning curve for WordPress. So, you can adapt it anytime you want to.
You Can Optimize Your Website for Search Engines
Search Engine Optimization (SEO) is all about making sure your website gets the traffic it deserves from the likes of Google, Bing, etc.
There are a lot of things you can do to work on your site’s SEO. With WordPress, you get access to a lot of powerful SEO plugins, such as Yoast SEO, All in One SEO Pack, The SEO Framework, and more.
WordPress is Secure
No CMS or website is 100% secure. New security threats are always popping up, so it’s essential to use a platform that takes online safety seriously.
WordPress is always pushing out new updates and security patches, so by keep updating your version, you’ll be a step ahead of everyone else. If you want to secure your website even further, you can look into using a web host that takes security seriously.
Related: What is The Future of WordPress in 10 Years?
How to Build a WordPress Website from Scratch in 2024
So, here we are! No more chit-chat.
Let’s dive into the main tutorial part. But before that let us show you what are the steps that you need to follow chronologically to build your website.
- Choose Your Niche
- Register a Domain Name and Buy Web Hosting for Your Website
- Install and Configure WordPress on Your cPanel
- A Short Journey to Your WordPress Dashboard
- Basic Customization After Installing WordPress on cPanel
- Choose and Install a Perfect Theme to Design Your Site
- Install Must-Have Plugins for Your Site
- Create Pages and Posts
- Submit Your Site to Google Search Engine
If you follow these steps properly, you should have a live website as soon as we finish this blog.
So, start with the first point – Choose your niche!
1. Choose Your Niche
Before you do anything involving WordPress, you need to pick your niche. Trying to develop a WordPress website about something that’s been done 10,000 times isn’t going to be beneficial.
Whether you’re starting a new business or scaling an existing one, niche marketing is an effective way to establish your brand’s positioning.
By focusing on a small audience, your business will be able to stretch its resources further and bring in customers who are closely aligned with your offerings. Those are the people who need your product most and are therefore most likely to convert and remain loyal customers.
If your WordPress site isn’t for an existing business, make sure you pick a topic that genuinely interests you so it won’t feel like a chore to update your site now or months down the road.
You can follow these steps to find your niche:
- Rely on your passion and interest
- Find your target customers’ problems and needs
- Research your competitors
- Then finally come up with your niche and its profitability
2. Register a Domain Name and Buy Web Hosting for Your Website
Buying a domain name is one of the most critical steps in starting a blog, personal site, or online business. Without one, users would not be able to easily access your website on the internet.
To buy a domain name from a domain name registrar or hosting provider, you need to visit a domain registrar, find the domain you want to purchase, and follow the instructions to buy it.
Follow these steps to register a domain name for your website.
- Find a credible domain registrar
- Run a domain name search
- Pick your domain
- Complete the domain registration
- Verify domain name ownership
Related: How to Buy a Domain Name Forever
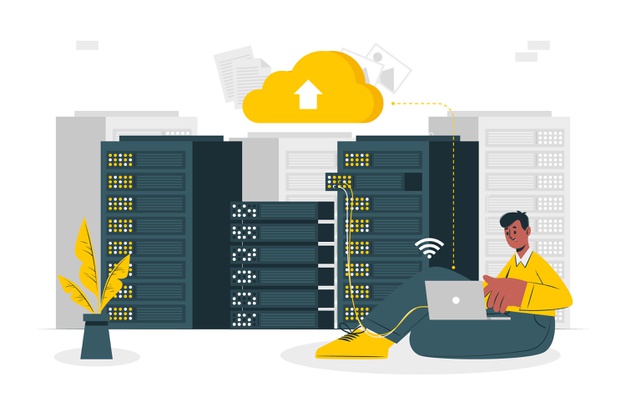
After registering your domain name, now it’s time to buy a hosting plan to launch your WordPress site.
This is the checklist you should look for while buying hosting for you.
- Types of hosting services
- Regular backups
- Uptime
- Traffic limit
- Support up to PHP 7 and beyond
- Security
- Refund policy
If you don’t know what are the types of hosting services. Let us explain that. There are mainly 4 types of hosting services.
- Shared Hosting Service: The main thing to understand about shared hosting is that you will be sharing server resources with other websites. This means other websites are hosted on the same server as your website.
- VPS Hosting Service: VPS hosting is similar to shared hosting in that your website is being hosted on the same server as other websites. The difference is that with VPS hosting you get a virtual space on a server that simulates a separate device.
- Dedicated Hosting Service: As the name suggests, dedicated hosting provides 100% percent of a server’s resources to one dedicated website. This means you don’t have to share resources with other websites or worry about the security and performance issues that can come with shared hosting solutions.
- Managed Hosting Service: Managed WordPress hosting can include any of the above options. The major difference is that this type of host offers additional WordPress-specific support. This can include everything from automatic backups, and plugin maintenance to easy staging environments and caching solutions that will help your WordPress site run faster.
3. Install and Configure WordPress on Your cPanel

No matter what hosting server you are using, you must have access to your cPanel. Else, you cannot log into it. If you haven’t received your cPanel ID passwords, ask your hosting providers. After you get the credentials, follow the below steps.
Step 01: Log Into Your cPanel
There are many ways you can go to your cPanel page. If you have a domain, you can go to cPanel from there as well. But these methods are quite complicated for many users. Below is an easy formula to find your cPanel page.
- Type https://www.(domain-name).com/cPanel on your browser
- Click the Enter button.
You will get the cPanel page. Just type your username and password that the hosting provider sent you through email or else.
Your cPanel interface may look like the below photo.

Step 02: Locate Softaculous App Installer
You will see a search bar on top of the cPanel. Type ‘Softaculous’ there. It will automatically show you the apps under the Scripts section that this installer app supports. You will get WordPress under this section. Click on it.

Step 03: Select Your Domain Name and Protocol
The last click will take you to the WordPress setup page. Click on the Install button. It will extend the page.

Scroll a bit down. You will come to the Software Setup portion.
Choose your preferred protocol. If you have the SSL certificate enabled, you can choose ‘https://www’. Otherwise, you should use ‘http://www’. After that select your domain and keep the Directory option blank.

Note: If you want to install your WordPress under a sub-folder or sub-directory, you can name it in the Directory box. But in this case, you cannot see your website loading on the front. This part is basically for beginners and not for general users.
Step 04: Fill in Site Settings and Admin Information in Detail
Scroll a bit down again, you will come to the portion of Site Settings and Admin Account.
If it’s a blogging site, you can name it My Blog. If it’s an eCommerce site, you can put the store name here. Next, give a short description of your website. Once you are done with Site Settings, come to the Admin Account section.
According to Infosecurity Groups, 90% of passwords are breakable in seconds. So, create a unique admin username and passwords that become difficult for cybercriminals to track. Set an admin email address at the end.

Step 05: Select Language and Plugin
Scroll a bit more down. You will get the language and plugin(s) options. Choose your preferred language from the left side. Next, select any of the recommended plugins from the right side. But it’s not mandatory. You can do it later on.

Step 6: Select a Free Theme
Scrolling down to the end of this page, you will see the Select Theme option. Click on the arrow icons to slide show more themes. Also, you can click on the Show All Themes button to see all the available themes at a glance.

Click on the theme that you liked most. It will take you to the demo page where you can explore some of its features. If you finally agree to go on with this plugin, click on the Select Theme button.

You will get back to the WordPress settings page. If all your requirement selection is done, click on the Install button from the end of this page. Also, provide an email address to get a report once the installation is done.

When the installation is done, you get a congratulatory message like the below one.

Step 7: Log in to Your Admin Dashboard
Now, try to log into your admin dashboard to explore if your WordPress has been properly installed. Go to the theme and plugin section and check if your selected themes and plugins are there or not.

If everything is okay, you can take that your WordPress site has been rightfully installed.
4. A Short Journey to Your WordPress Dashboard
You can log in to your WordPress user panel if you go to www.YOURDOMAIN.com/wp-admin/
Use the access credentials to log in.
After logging in successfully, you’ll see the main WordPress interface in all its glory:
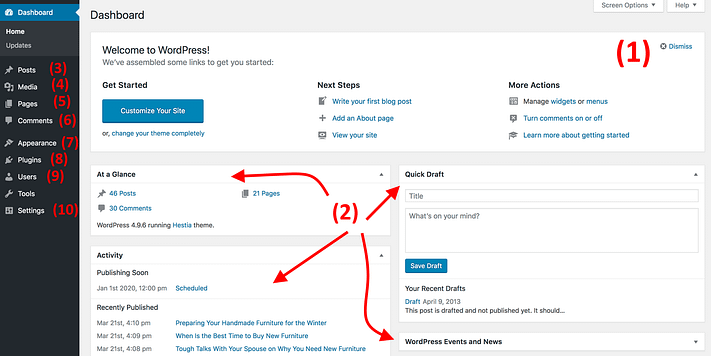
- Welcome message – Some of the most important areas of the admin panel are listed as quick shortcuts links – these are usually your shortcuts to how to make a website.
- The current status of your site and what’s going on with it.
- Posts – go here to create blog posts.
- Media – upload/manage images and other media files here.
- Pages – go here to create sub-pages.
- Comments – this is where you can moderate comments.
- Appearance – change your site’s design here and/or customize how certain things are displayed on the current design.
- Plugins – install new plugins here.
- Users – manage user accounts that can access the admin panel of the website.
- Settings – the main settings.
5. Basic Customization After Installing WordPress on cPanel
At this stage, it’s good to take care of some basic getting-started settings after WordPress installation that will improve your experience further down the road.
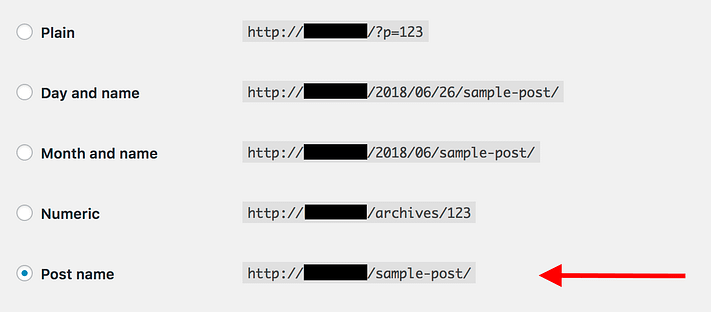
i. Set Permalinks
Permalinks define how the individual web page addresses – aka URLs are structured within your site.
The most optimized structure is to have the page’s title in the URL. For example, your “about” page (more on that page later on) should be available under something as simple as YOURSITE.com/about. Setting the permalinks correctly will allow you to achieve that.
To set your permalinks, go to Settings → Permalinks from the main sidebar in your WP dashboard.
Once there, select this setting:
ii. Making Your Site Public
You want Google to be able to find and index your website, right? To make sure that’s the case, go to Settings -> Reading, and make sure that the box labeled “Discourage search engines …” is unchecked.

iii. Set Your Website Title and Tagline
Go to Settings > General and set the Site Title and Tagline fields to what you want.
Your site title and tagline might appear in various places throughout the site. Some WordPress themes display those on the homepage and in the SEO description – which Google uses when listing your website on the results pages.
iv. Allow or Disable Comments
Whether or not you want to accept comments on your website is up to you.
On the one hand, letting readers leave their opinions and questions under your articles/pages can be great for building a community around the website.
But, on the other hand, you’ll also have your hands busy dealing with spam and making sure that there’s no trolling. It’s sometimes better to leave the contact page as the primary channel of communication.
Whether you’ll end up allowing or disabling comments, it can be done in Settings → Discussion.
6. Choose and Install a Perfect Theme to Design Your Site
You can change your WordPress default theme if you don’t like it. There are ways to change and install new WordPress Themes from cPanel. Follow these steps to get your job done.
i. Install a Theme Directly from Your Dashboard
To install a theme from directly your dashboard, you need to log in to your admin dashboard first. Once you are logged in, navigate to Appearance > Themes.
From here, click on Add New, and you will be on the Add Themes page. From this page, you can search if you already have a preferred theme.

However, if you don’t have a preferred theme yet, and you’re looking for a theme that suits the type of your website, you can look for it on the Featured, Popular, or Latest theme section. One option that we suggest you to use, is the Feature Filter.
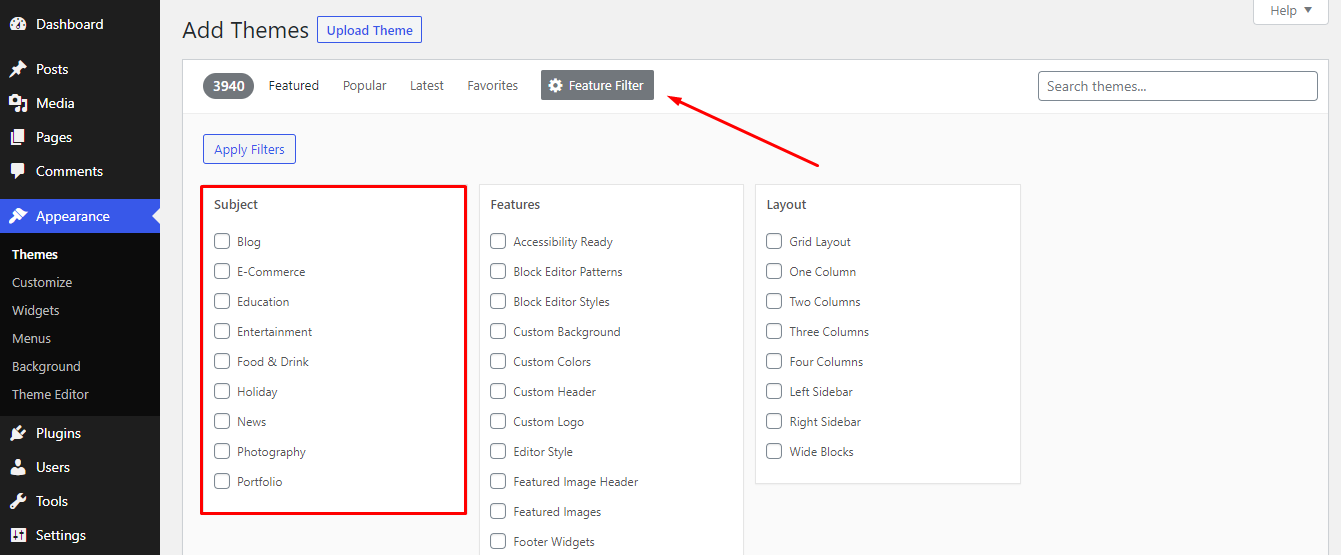
The Feature Filter lets you choose the subject of your website, the features that you want, and the preferred layout of the website and show the themes that match your selection.
This way you can easily find the most suitable theme for your website.
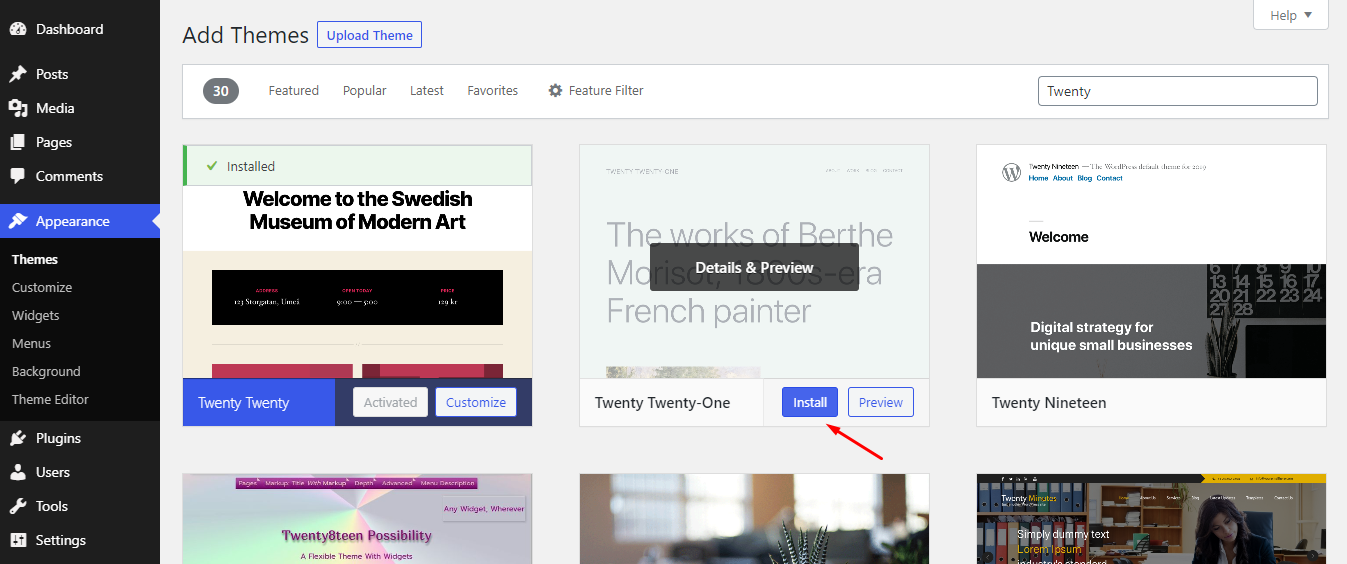
Once you find the perfect theme for you, just hover your mouse over it and you will find the Install button. Do keep in mind that installing a theme doesn’t necessarily mean that the theme is active on your website.
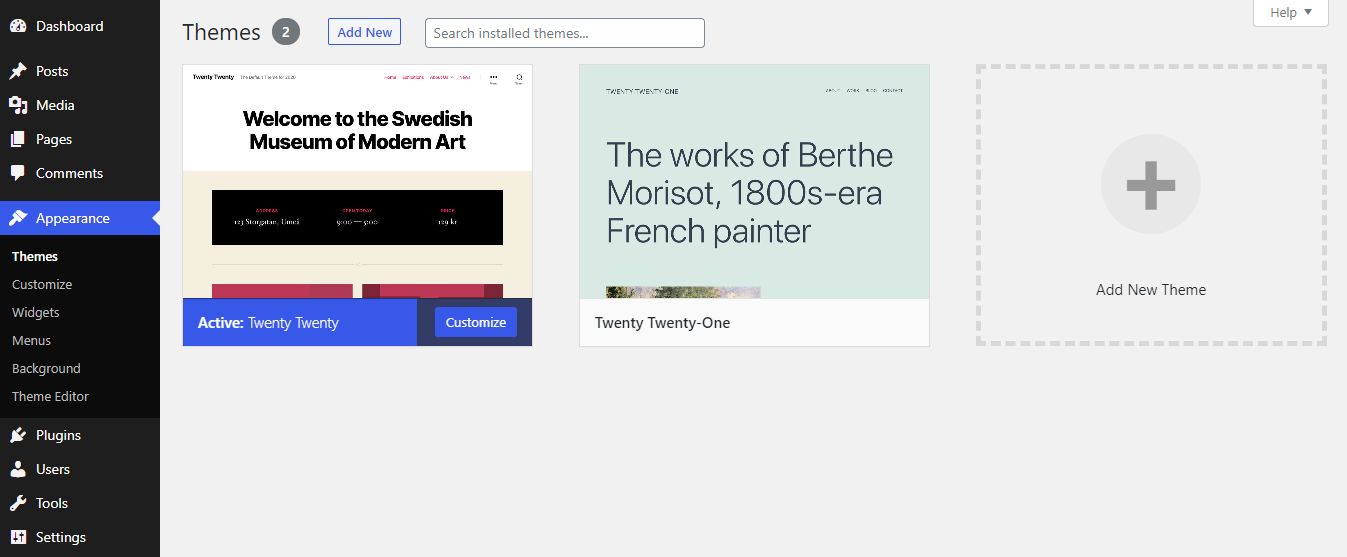
In order to activate the theme, you have to click on the Activate button, which can be found once you install the theme.

Once you are done with activating the theme. You can further customize the looks from Appearance > Customize. Some themes also have a setup wizard that follows after you activate the theme.
ii. How to Install a Theme Manually Using Zip File
The second way that we will talk about, is installing a theme from a Zip file. If you download your WordPress theme from elsewhere other than the WordPress repository, you will get a Zip file to install it on your WordPress website.
To install the Zip, navigate to Appearance > Theme once again.
From here, click on Add New and then Upload Theme. The upload theme button will trigger a new section on the page, which allows you to upload the downloaded Zip theme file.
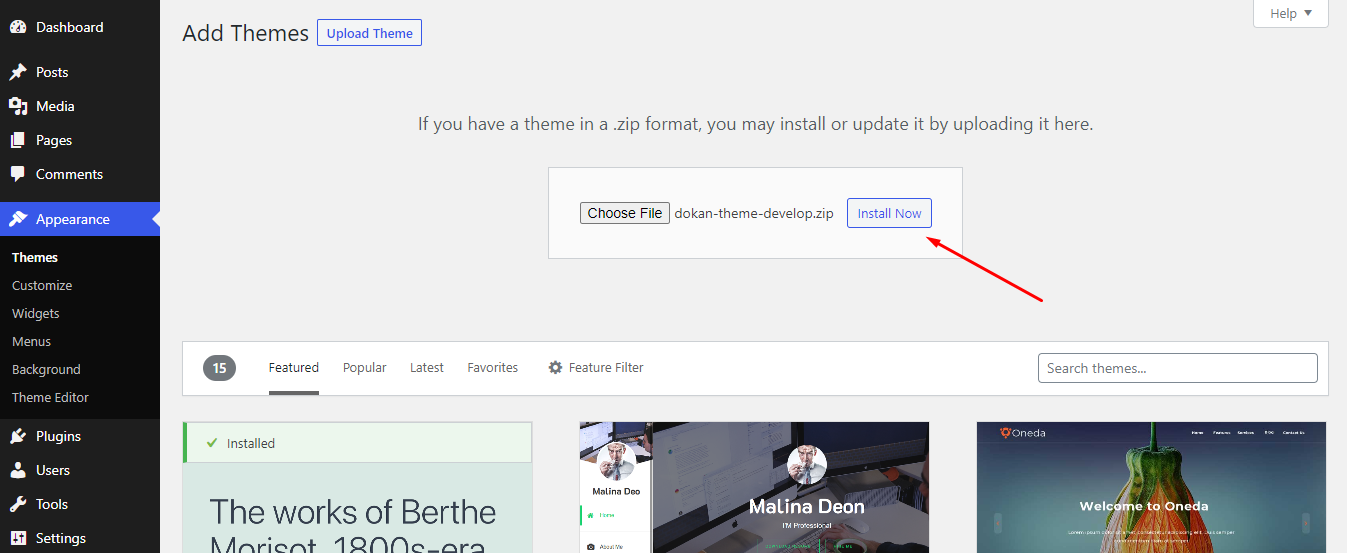
After uploading and installing the Zip file, activate the theme just like before.

Activating the theme will make it your current theme. Depending on the theme, you may or may not find a setup wizard afterward. After that, you can start customizing your theme as you want.
7. Install Must-Have Plugins for Your Site
Installing a plugin is just like installing an app from the Play Store. You go to the store, search for an app and install it. The basic methodology is the same here.
i. Install a Plugin Directly from Your WordPress Dashboard
In your WordPress Dashboard, on the left-hand side, you will find a Plugin section. If you click on the plugins two sections will appear.
- Installed Plugins
- Add New
To install a new plugin, you have to click “Add New.” This option is used to install a new plugin on WordPress.
On the new screen, enter the name of the plugin you want to install. It will match the plugin name with the WordPress plugin repository.
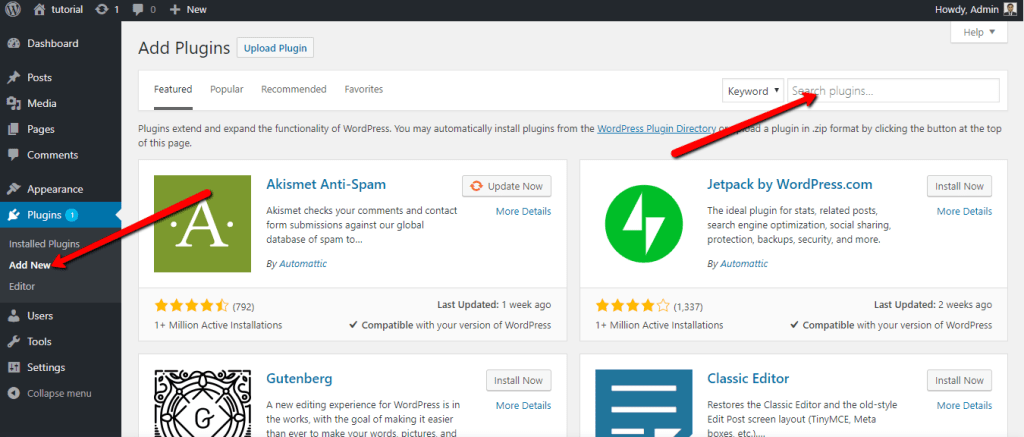
Just like a quick Google Play search, you will see the search result. In this example, we searched for WooCommerce, and it is the first result. So if you want to install the plugin, all you have to do is to click Install Now. It’ll trigger the installation.

After clicking install now, the Instal Now will turn into “Activate.” That means the plugin has been installed and is in an “Inactive” state.
To be able to use it, you have to activate it first. Click “Activate” to activate the plugin. That wasn’t so hard, was it?
Congratulations! You have successfully installed a WordPress plugin.
ii. Upload a WordPress Plugin Manually
There is another way to install plugins in WordPress. You can install the WordPress plugin without FTP when using this method. All WordPress plugins can be found as a compressed .zip file from the WordPress repository.
You can upload a compatible .zip file directly to your Dashboard to install those plugins. This method is particularly helpful for aftermarket Premium Plugins that ship as a compressed zip file.
This time instead of searching, you have to upload the plugin to the server. You’ll have to upload the zip file in the upload section. Go to the plugin screen again by clicking “Add new.” But instead of searching look at the top.

You should be seeing a button named “Upload Plugin.” Click on it. It will expand a dialogue box on that page.
Then you can click “Choose File,” to browse your plugin’s zip archive. You can click Install Now to install the plugin after uploading and activate it afterward.
The good news is if you want to get rid of any plugin, deactivate bar is always there. You can go for deactivation anytime you want.
iii. List of the WordPress Must-Have Plugin Names for You
WordPress Caching Plugins
- WP Super Cache
- Cometcache
- WP Rocket
WordPress SEO Plugins
- All in One SEO Pack
- Yoast SEO
- Rank Math
WordPress Comments Plugins
- Disqus Comment System
- Jetpack
- Lazy Social Comments
WordPress Plugins for Spam Blocking
- Akismet
- Spam protection, AntiSpam, FireWall by CleanTalk
WordPress PageSpeed Optimization Plugins
- Autoptimize
- Asset CleanUp: Page Speed Booster
WordPress Backup Plugins
- Duplicator
- BlogVault
Social Sharing Plugins for WordPress
- Social Media Share Buttons
- Nobs: Share Buttons
WordPress eCommerce Plugins
- WooCommerce
- Dokan Multivendor
Security Plugins for WordPress
- Wordfence
- Sucuri
8. Create Pages and Posts

When you add content to your WordPress website, it’s usually displayed in the form of posts and pages.
Posts (or “dynamic pages”) are typically used for blogs and portfolios because they automatically place your newest website content at the top of your featured content.
Pages are static, which is why they appeal more to business owners.
Posts and pages are the main post types in WordPress. Additionally, there are other native post types, as well as custom post types. For now, we can just stick to pages and posts.
Start by deciding whether you want a post or page to serve as the homepage (or any page) of your website. To add a post to your website, go to the admin dashboard, click Posts and then Add New.
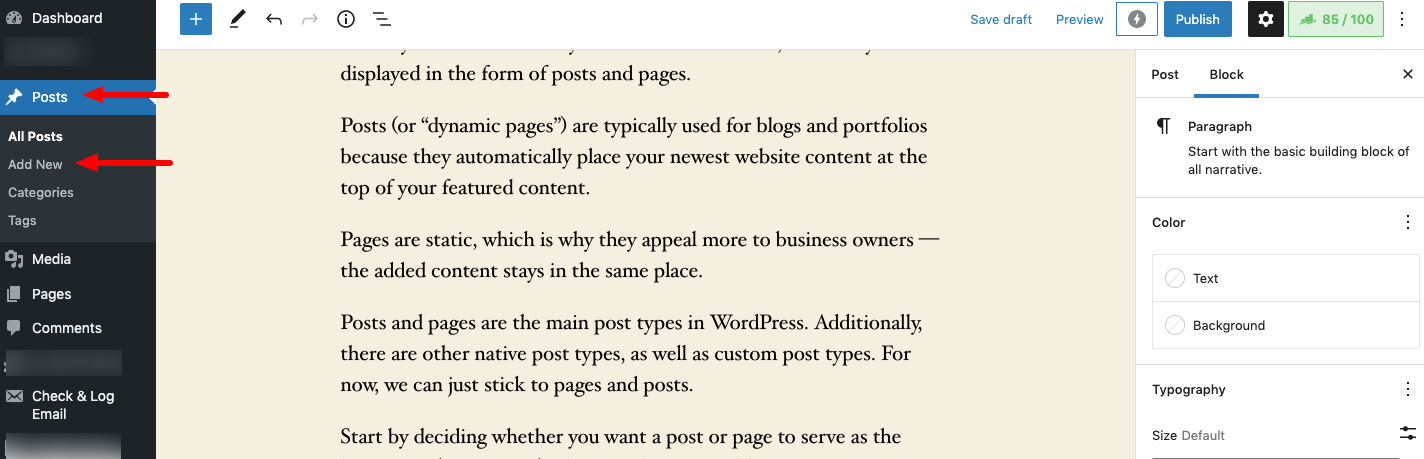
You can add a title for your post, place photos, change the format, and insert page elements via blocks and shortcodes. Click Save Draft to save your changes as a draft, or click Publish to immediately take the post live.
Adding a page to your website is a similar process. In your admin area, click Pages, then Add New.
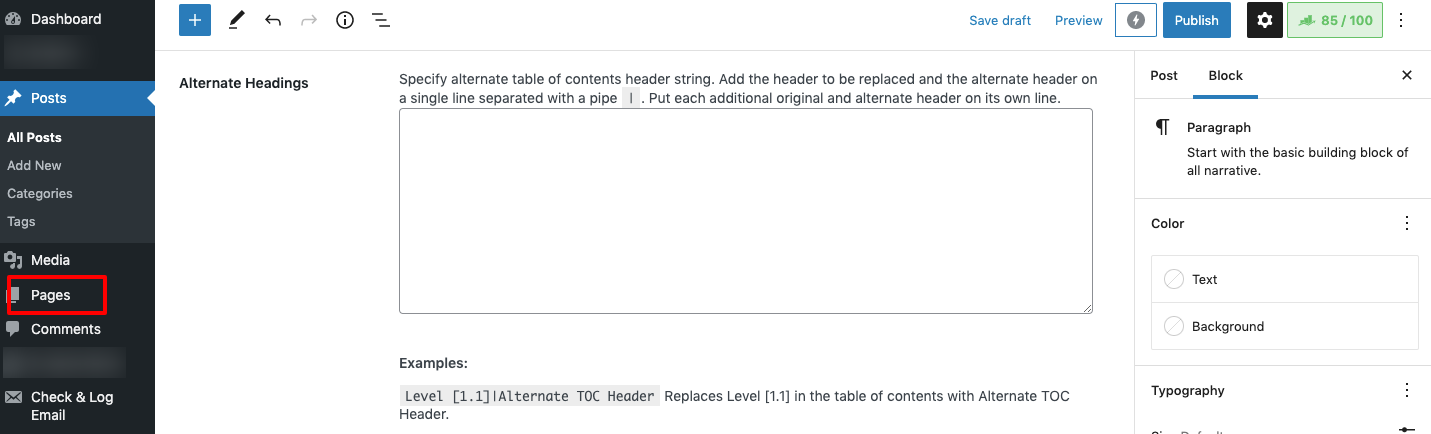
First, add a title to your page. Next, you can insert photos, embed videos, and add content. Follow the same steps to create multiple pages for your website. When finished, click Save Draft or Publish.
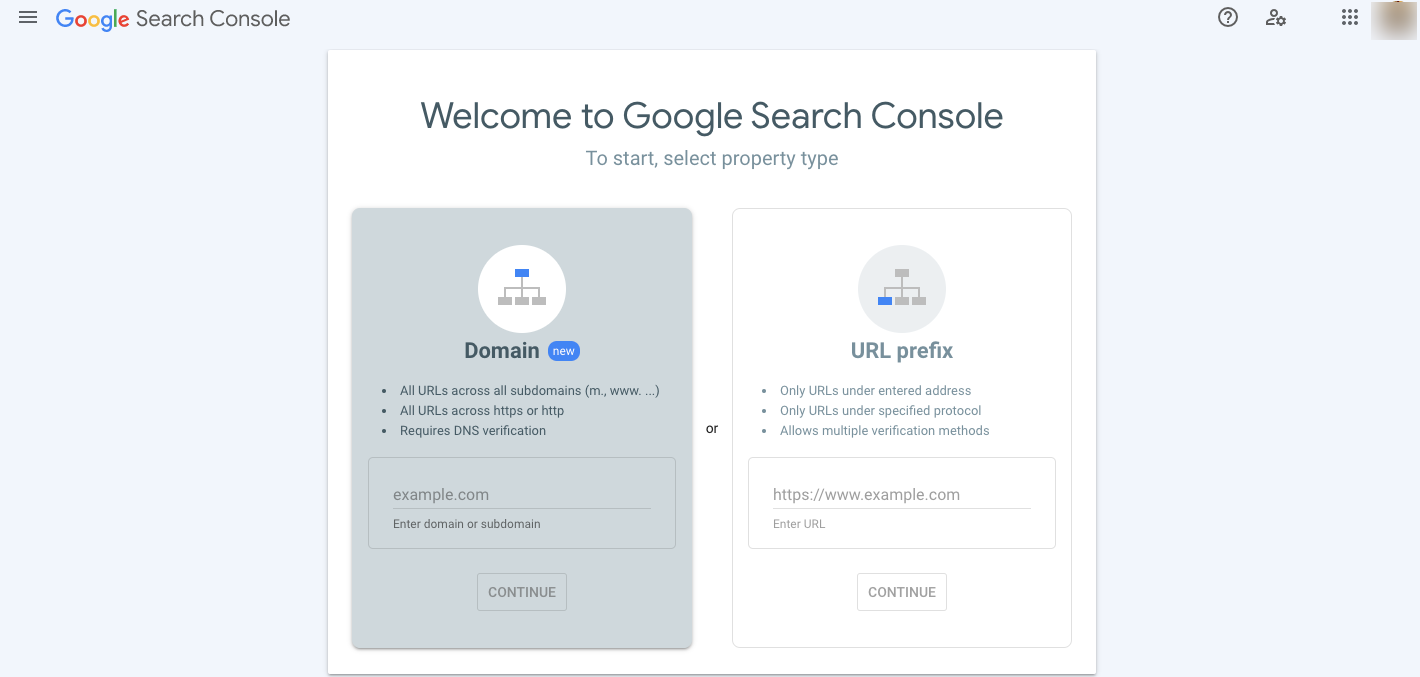
9. Submit Your Site to Google Search Engine
To submit your website to Google, set yourself up with Google Search Console, and verify website ownership.
The easiest way to verify domain ownership is to copy the DNS TXT record and add it to your domain name provider.
Once you’re logged into Search Console, go to “Sitemaps” in the sidebar, paste in your sitemap URL, and click “Submit.”
How to Build a WordPress Website- FAQ
How to build a WordPress website for the first time?
To build a WordPress website for the first time, follow the below procedures.
1. Choose a domain name and hosting provider
2. Install WordPress
3. Set up your URLs
4. Choose a theme
5. Install some must-have plugins
6. Finally, start adding content to your site
That is how you can create your first WordPress website.
Can I create a WordPress site for free?
WordPress is a free and open-source platform. You don’t need to pay any fee for using WordPress. But to publish a WordPress site, you’ll need a domain and hosting service. That is something you will have to pay for.
Does WordPress require coding?
WordPress is a popular CMS platform. It doesn’t require coding skills to create websites. But if you have coding skills, you can make your site stand out from the crowd.
How much does it cost to create a WordPress site?
Actually, the cost depends on what type of website you want to build. You have to bear a different type of cost for a different type of website. But we can say it will cost you an average of $500 to build a WordPress website.
Is it hard to build a WordPress website?
No, building a WordPress website is not hard. Even if you are a beginner, still you can create your site by following some videos or tutorials. As a beginner, maybe it will take more time than usual to create your site. But eventually, you’ll be able to publish your site if you have the right intention.
Also Read: How To Create a Website For Free in 2024 [5 Easy Steps]
Now It’s Your Turn
Having a website is not a luxury anymore, instead, it’s a need. And the availability of WordPress and its ease of use make everyone capable of creating a website. It doesn’t matter if you have any technical skills or not.
You can follow this ultimate guide to create your own site with ease. We have shared all the details here. Hopefully, you’ll get everything from this article.
Having said that if you face any difficulties while designing your site, you can let us know through the comment box below. Any feedback regarding this blog will be highly appreciated. Thank you!


Add your first comment to this post