WordPress has transformed how we create and manage websites, but even this powerful platform isn’t immune to errors and bugs. That’s where the debug mode comes in. Enabling debug mode in WordPress can help you identify and fix errors quickly, which can save you a lot of time and headaches.
However, many website owners are hesitant to enable debug mode due to a lack of knowledge or experience. Fear not! In this discussion, we’ll cover everything you need to know about enabling debug mode in WordPress, from its benefits to step-by-step instructions on enabling it manually or with a plugin.
Don’t let website errors bring you down – become a WordPress debugging pro today with our guide on how to enable debug mode in WordPress. But first, let’s dive into what debug mode is and why it’s so important.
Quick Navigation
What is debug mode in WordPress?

Debug mode is a feature in WordPress that allows you to see error messages and warnings on your website. It can help you identify and fix issues that may be causing your website to malfunction. When you enable debug mode, WordPress will provide you with information about things like deprecated functions, undefined variables, and other PHP errors that might be affecting your site’s performance.
So, if you’re looking to take control of your WordPress site and optimize its performance, enabling debug mode is definitely worth considering. It will help you identify the root cause of the problem and fix the issue more quickly and accurately.
Why and when should you enable the debug mode in WordPress?
There are several use cases of why and when you should enable the debug mode in WordPress. Take a quick look at them in the discussion below.
1. Identify and resolve issues quickly
With debug mode enabled, you’ll be able to see detailed error messages that can help you pinpoint the root cause of any issues on your website. This means you can fix problems more quickly and efficiently.
2. Improve website performance
Debugging your website can help you identify areas where you can optimize your site’s performance. By fixing issues and errors, you can make your website faster, more efficient, and more user-friendly.
3. Gain insight into your website’s code
You’ll get a deeper understanding of how your website’s code works, which can be incredibly useful for troubleshooting and maintenance. You may even be able to improve your coding skills along the way.
4. Enhance the security of the website
Debug mode can help enhance website security by identifying and fixing security vulnerabilities. By reviewing error messages, you can identify potential security risks and take steps to mitigate them.
5. Save time and money
You can save time and money on troubleshooting and maintenance by enabling debug mode and identifying and fixing issues more quickly. You’ll also be able to avoid costly downtime, which can hurt your website’s reputation and impact your bottom line.
How to enable debug mode in WordPress (two methods)
To enable debug mode in WordPress, you can add a couple of lines of code to the wp-config.php file. This can be done manually or with the help of a plugin. Just remember to turn off debug mode when you’re finished troubleshooting to prevent any sensitive information from being displayed to your visitors. Keep reading to know how to enable debug mode in WordPress.
Back up your site before enabling debug mode
It is highly recommended to create a backup of your website before enabling debug mode. Debug mode can potentially expose sensitive information about your website and make it more vulnerable to attacks if not handled properly. Creating a backup can help restore your website to its previous state if anything goes wrong during the debugging process.
You need to choose a backup method first. There are several ways to back up a WordPress website, including using a plugin, using a web host backup service, or manually downloading files and databases. You can learn more from this detailed guide on how to back up a WordPress website.
Method One: Enable debug mode using a plugin
You can enable debug mode in WordPress by adding a few lines of code. However, if you’re not comfortable editing your site’s files, you can use a plugin to enable debug mode instead. Here’s how to enable debug mode using a plugin –
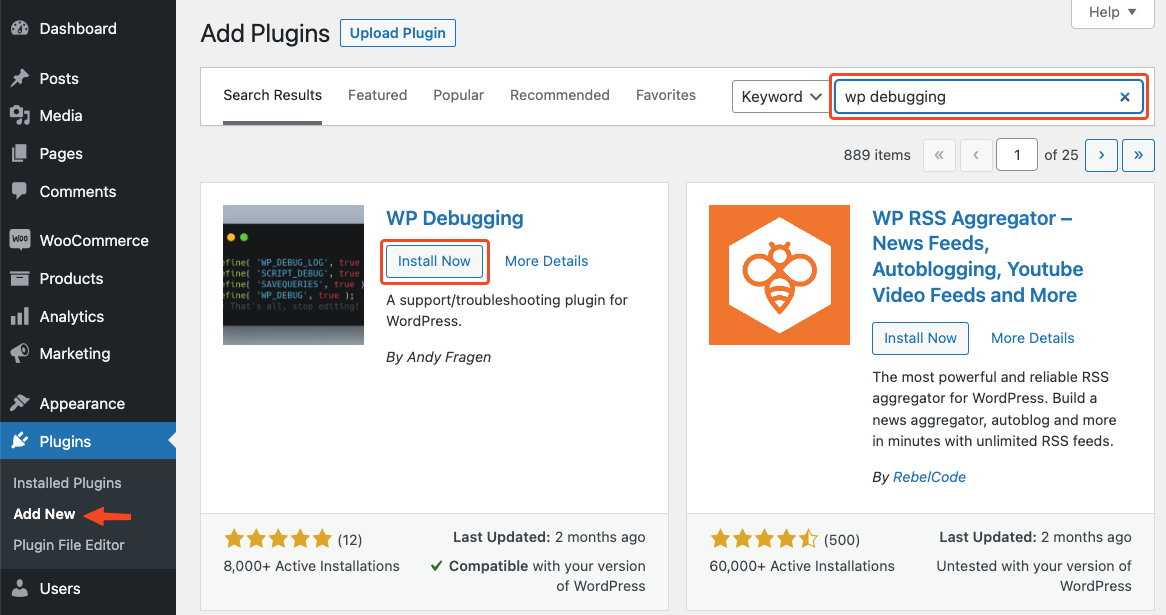
Step 1: Install and activate the WP Debugging plugin
Go to your website’s WordPress dashboard and navigate to Plugins > Add New. It will take you to the WordPress plugin repository. Now, search for the “WP Debugging” plugin. Install and activate it on your website. Click on the Install Now button to initiate the process.
Also read: How to Install a WordPress Plugin – Step by Step for Beginners
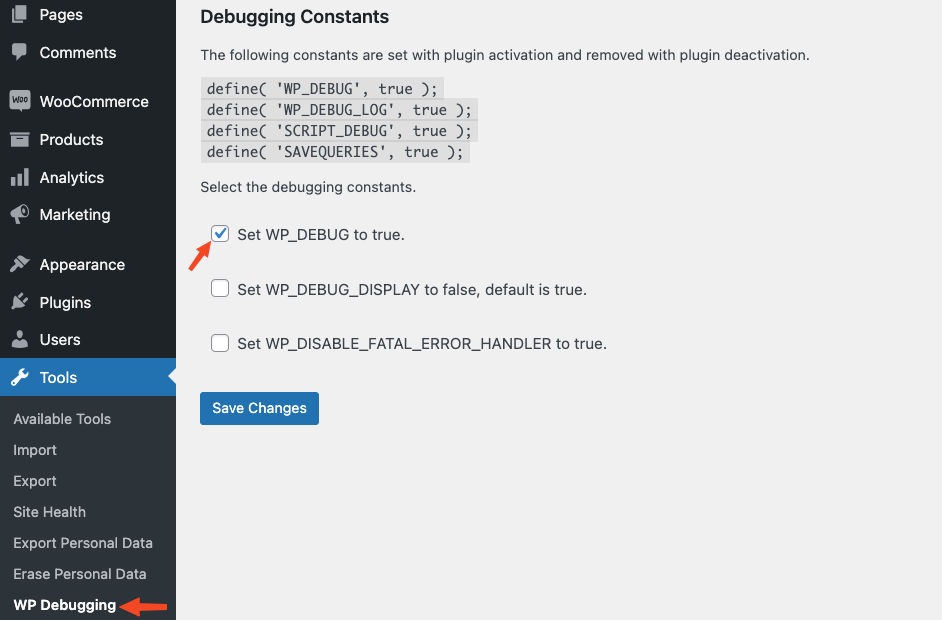
Step 2: Configure the WP Debugging plugin
Once the plugin is activated, go to the Tools > WP Debugging page to configure its settings. Here you can choose the debug mode you want to use, such as WP_DEBUG, WP_DEBUG_LOG, or WP_DEBUG_DISPLAY. Click on the checkbox near to “Set WP_DEBUG to true” text. Then save the changes.
Step 3: Check your website for errors
After enabling debug mode, check your website for any errors or warnings that appear on the front-end or back-end of your website. If any errors are displayed, you can use the information to diagnose and fix the issue. You can also see the error log using the plugin.
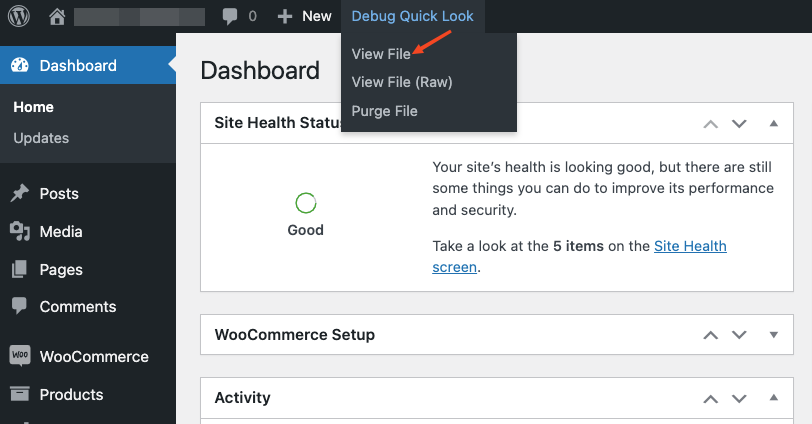
Go to the top bar of your WordPress dashboard. Click on Debug Quick Look. It will expand a few options for you. Click on View File to see the list of errors. Then fix them accordingly.
Step 4: Disable the debug mode
Once you have fixed the issue, we suggest you disable debug mode by deactivating the WP Debugging plugin or by removing the code that you added to the wp-config.php file. Using this plugin, you can easily configure and manage your debug settings without manually editing your website’s files.
Method Two: Enable debug mode manually (without a plugin)
The manual method of enabling debug mode is faster than using a plugin. It’s always better to avoid third-party plugins. Using a plugin can potentially introduce security vulnerabilities to your website. So, use a plugin only when the manual process is quite tricky to pull off for people with low technical abilities.
The manual method of enabling debug mode in WordPress is easier, more reliable, customizable, and more secure than using a plugin. It gives you complete control over the process and enables you to troubleshoot issues more efficiently. Here are the steps:
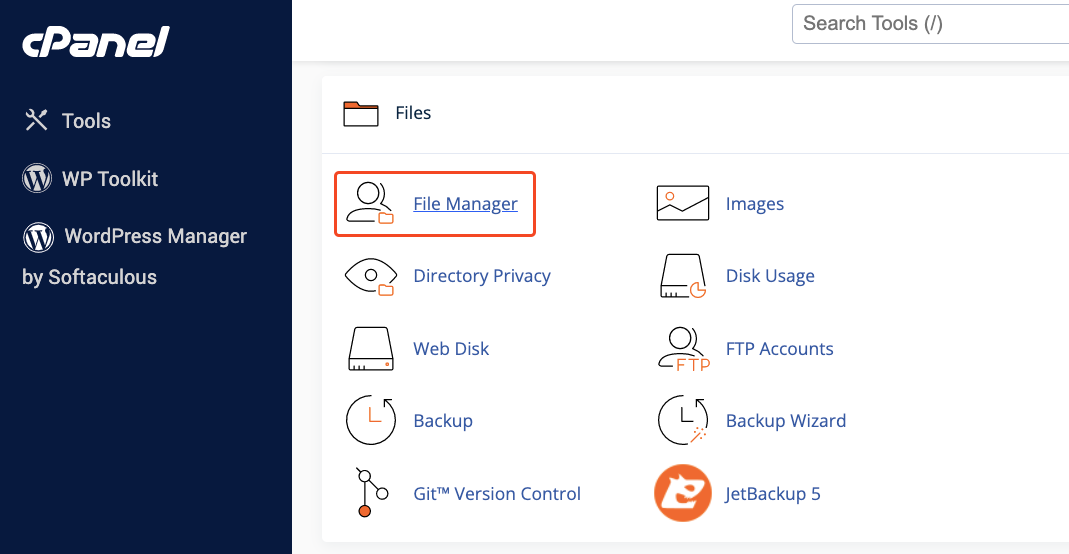
Step 1: Go to your hosting account’s file manager
Log in to your WordPress site’s hosting account and click on the File Manager to access all files related to your WordPress website.
Step 2: Locate the wp-config.php file
Then, navigate to the root directory of your WordPress installation. This is typically the public_html folder or a subfolder within it, depending on your server configuration. Locate the wp-config.php file and download a backup copy of it to your local computer.
This backup copy will come in handy if you face any issues after enabling the debug mode in Step 4. Otherwise, you won’t need this copy of wp-config.php.
Also read: How to Access wp-config.php File in WordPress- A Step-by-Step Guide for Beginners
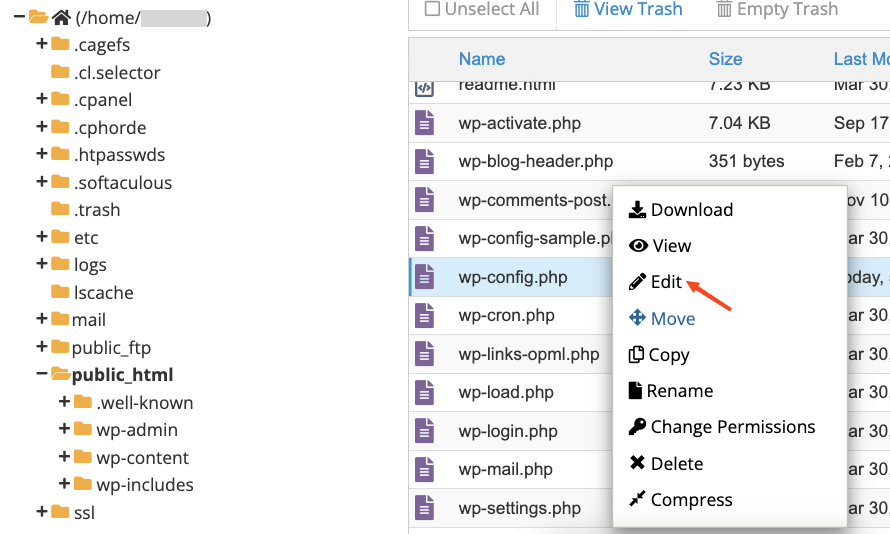
Step 3: Edit the wp-config.php file
Open the wp-config.php file using the text editor provided by your cPanel. Right-click on the wp-config.php file and choose the Edit option. It will take you to the editor.
Add the following lines of code to the wp-config.php file, preferably just before the line that says “/* That’s all, stop editing! Happy publishing. */”:
define( 'WP_DEBUG', true);
define( 'WP_DEBUG_LOG', true);
It will look like the following image in the editor.
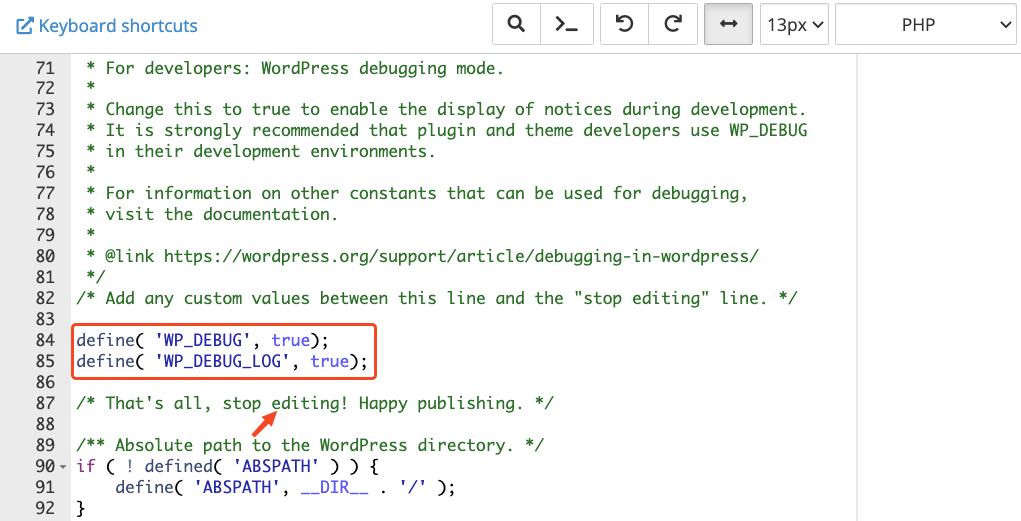
Save the changes. The first line of code will enable the debug mode in WordPress. And, the second one will create a debug log file under the public_html/wp-content/debug.log file. You can see all your errors there.
Step 4: Check for issues (if any)
Check if everything is okay. Don’t worry if any issues arise. Upload the old wp-config.php file back to your server, replacing the new file. You can use an FTP client or cPanel file manager to upload the file. Make sure to upload the file to the correct location.
Step 5: Disable the debug mode after troubleshooting
To disable debug mode in WordPress, you need to modify the wp-config.php file again by changing the “true” value to “false” so that it reads:
define('WP_DEBUG', false);Then, save changes to the wp-config.php file. Once you have made these changes, your website will no longer display error messages or notices. We suggest you disable debug mode after you have finished troubleshooting your website. Leaving it enabled can potentially expose sensitive information to unauthorized users.
Best practices for debugging WordPress issues
Debugging is an essential part of maintaining a healthy and optimized WordPress website. However, it’s important to follow some best practices to ensure that you’re not causing any harm to your website or impacting its performance. Here are some of the best practices for debugging in WordPress:
- Use debug mode on a staging site
Before enabling debug mode on your live website, it’s a good idea to create a staging site where you can test your changes and troubleshoot any issues. This way, you can ensure your live website remains stable and functional.
- Turn off debug mode when you are done troubleshooting
Once you’ve identified and fixed the issues on your website, make sure to turn off debug mode. Leaving debug mode enabled can impact your website’s performance and expose sensitive information to potential attackers.
- Ensure debug mode is not visible to visitors
Debug mode can reveal sensitive information about your website’s code and settings, so it’s important to ensure that it’s not visible to visitors. You can do this by adding some code to your website’s functions.php file to restrict access to the debug mode information.
- Keep your website updated
Keeping your WordPress core, plugins, and themes up to date can help prevent errors and issues from occurring in the first place. This can reduce the need for debugging and save you time and effort in the long run.
- Consult the WordPress community
The WordPress community is a vast network of developers and users who can provide valuable insights and support when debugging WordPress issues. You can ask for help on forums, social media, or other WordPress communities.
By following these best practices, you can ensure that your debugging efforts are effective, efficient, and safe for your website.
FAQs – How to enable debug mode in WordPress

-
1. What are the types of errors that can be debugged in WordPress?
Types of errors that can be debugged in WordPress:
1. Syntax errors: These are caused by incorrect use of code syntaxes, such as a missing or extra parenthesis, bracket, or semicolon.
2. Database errors: These are caused by issues with your website’s database, such as incorrect database credentials or a corrupted database.
3. Plugin and theme conflicts: These occur when plugins or themes on your website conflict with each other, causing errors or issues.
4. HTTP errors: These are caused by issues with your website’s server or network, such as incorrect server settings or connectivity issues.
-
2. How to read and interpret error messages?
To read and interpret these messages, you’ll need to understand the syntax and structure of the messages, as well as the specific error codes and descriptions. Error messages in debug mode will provide you with information about the error, including the file and line number where the error occurred. You can identify the root cause of the issue by analyzing the error messages.
-
3. What are the common errors and their solutions?
You may face a wide range of WordPress errors. Here are the top 5 errors with their quick solutions:
White screen of death: This occurs when your website shows a blank white screen instead of displaying content. To fix this, try disabling plugins or switching to a default theme.
Error establishing a database connection: You may face this error when WordPress is unable to connect to the database. Check that your database credentials are correct and that the database server is running. Know more from this detailed guide on How to Fix Errors in Establishing a Database Connection in WordPress.
404 error: This error occurs when a page or post is not found on your website. To fix this, check your website’s permalink settings and ensure that the page or resource exists.
Internal server error: This error refers to an issue with your website’s server. To fix this, try increasing the memory limit in your server’s PHP settings or contacting your web host for support.
Connection timed out: It happens when your website is taking too long to load. To fix this, try optimizing your website’s performance by minimizing file sizes and reducing the number of HTTP requests.
Also read: 35+ Most Common WordPress Errors and How to Fix Them.
-
4. How to hide error messages from the front end?
To ensure that debug mode is not visible to visitors, add the following lines of code to your website’s wp-config.php file:
define('WP_DEBUG_DISPLAY', false);
@ini_set('display_errors', 0);
Don’t forget to add these lines before the ‘That’s all, stop editing! Happy publishing.‘ line.
-
5. Can enabling debug mode affect the performance of my website?
Enabling debug mode can slightly impact the performance of your website as it generates additional information and error messages. That’s why we recommend disabling debug mode when you are done troubleshooting to improve your website’s performance.
Final thoughts
Enabling debug mode in WordPress is a simple yet powerful way to diagnose and troubleshoot WordPress. Knowing how to enable debug mode manually and how to check if it’s working can help you quickly identify and resolve any issues that may arise.
Remember to always be cautious and follow security best practices when enabling debug mode on your website. With the knowledge and tools provided in this discussion, you can confidently enable debug mode in WordPress and keep your website running smoothly.


Add your first comment to this post