11+ Worst Yoast SEO Settings Mistakes to Avoid | Best Yoast Settings
If you are using WordPress, Chances are you are using an SEO plugin to boost your online presence. Today, we are covering how to install and set up one of the best WordPress plugins for SEO – the Yoast SEO plugin by Team Yoast.
If you are not optimizing your content for search engines, you are missing out. We have previously covered the best WordPress SEO Guide where we discussed in-depth about the Do’s and Dont’s of WordPress SEO. In this article, we will illustrate the top 11 Yoast SEO settings mistakes that people regularly do.
How to Install Yoast SEO Plugin
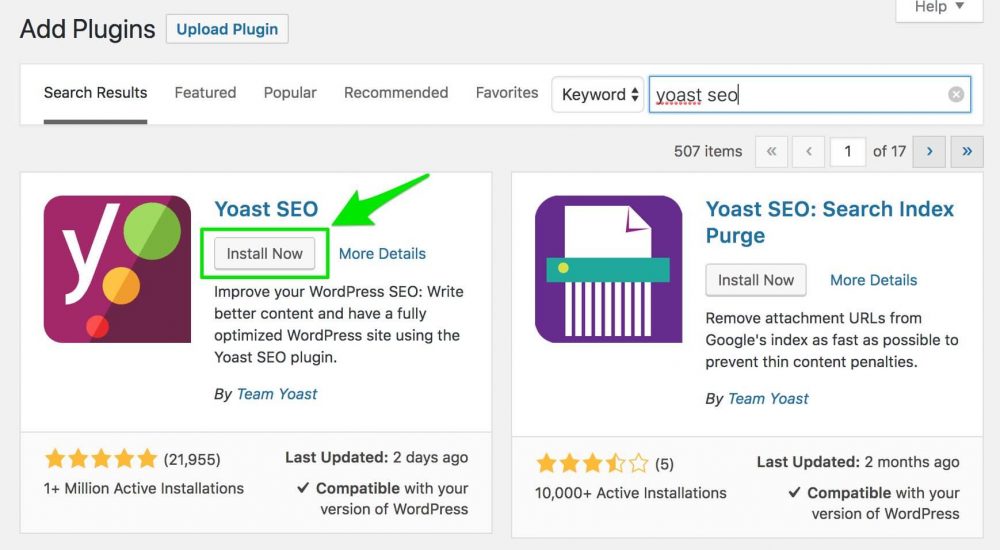
Installing Yoast SEO is really simple. Follow the tutorial to install the Yoast SEO plugin. Read our tutorial on How to Install a WordPress Plugin: Step by Step for Beginners if you have trouble installing a WordPress plugin.
To install, search the plugin from Dashboard → Plugins
Worst Mistakes to Avoid in Yoast SEO
Now that the installation part is over, here are the settings mistakes that can hold you back from optimal performance.
#1 Not Verifying Website in Google Webmasters Tools
Many do not verify their website in Google Webmasters Tools. There are many advantages of verifying your website on Google Webmasters Tools such as submitting sitemaps, view errors, and resolve them.
Go to your Dashboard > Yoast SEO General > Webmaster Tools
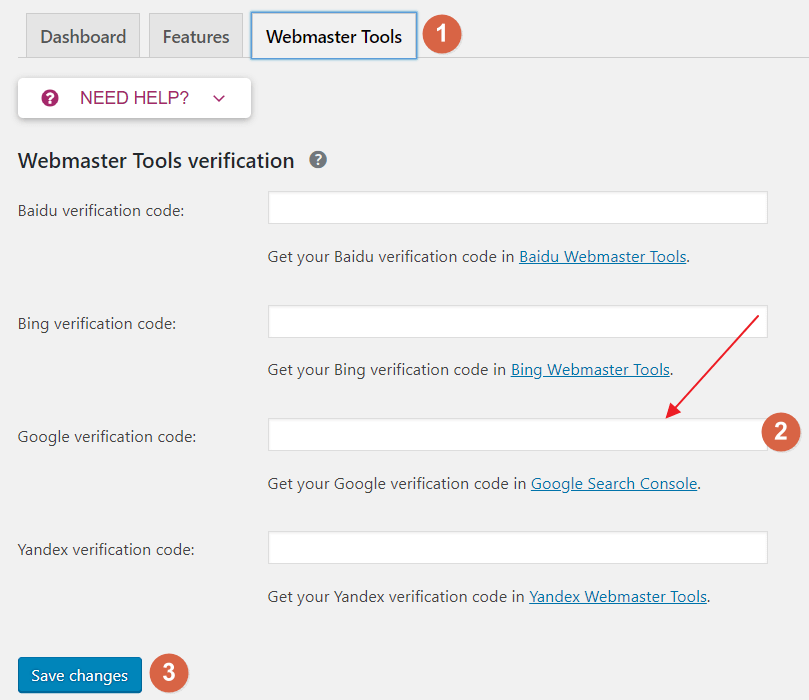
Verify your website by signing up at Google Webmasters Tools and entering your secret site key.
#2 Not Enabling Sitemaps from Yoast SEO Settings
Yoast SEO has the option to generate a dynamic sitemap. Sitemaps help search engines to crawl your website content faster.
To enable sitemaps, navigate to
Dashboard > Yoast SEO (General) > Webmaster Tools
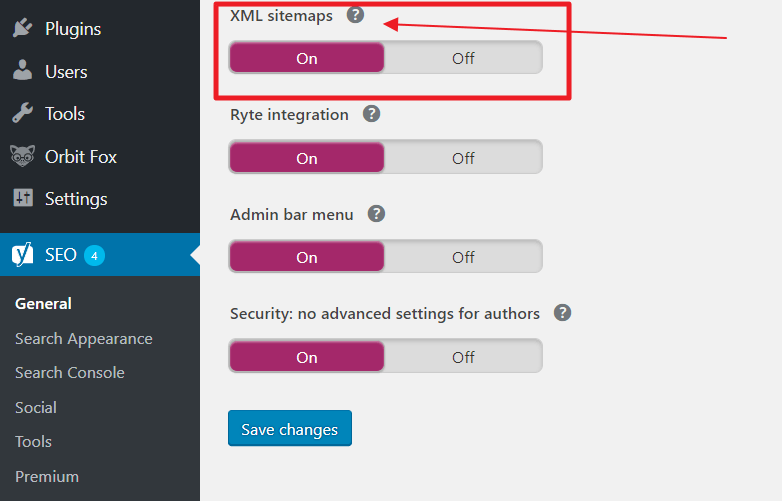
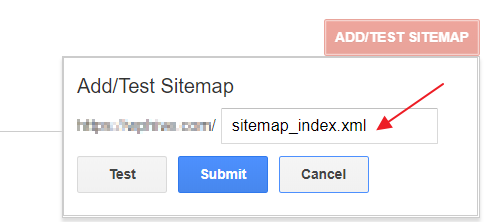
After enabling the option, you can navigate to your website’s XML sitemap. Usually, the sitemap stays on /sitemap_index.xml location. So, if your website is example.com, your sitemap location would be
https://example.com/sitemap_index.xml#3 Not Submitting Sitemaps to Google Webmasters Tools
Watch this video to know how to submit XML sitemaps to Google and how to submit them.
[Also read: Turn off Youtube Related Videos in WordPress]
Submitting a sitemap to Google is easier than you think. But you must have already verified your ownership of your website as we mentioned before.
- Sign in to google.com/webmasters/tools
- Navigate to Crawl >> Sitemaps from left-hand menu.
- Click ADD/TEST SITEMAP button to add your sitemap URL.
#4 Not Optimizing Titles & Meta Settings
Not optimizing Titles & Meta settings is one mistake that most bloggers do. To optimize your titles & meta settings, navigate to
Dashboard > Yoast SEO (Search Appearance) > General
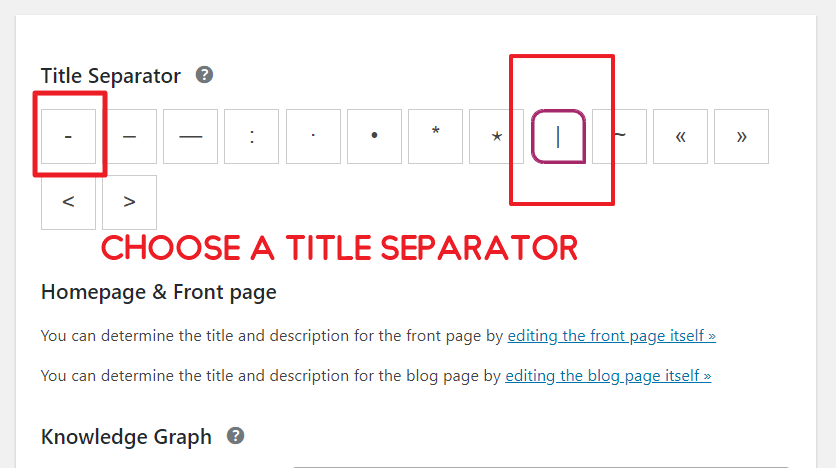
WP Hive recommends using hyphen (-) or separator ( | ) as these are the most common and Google likes this.
#5 Not Filling Up Knowledge Graph
Knowledge graph in Yoast SEO Settings adds necessary Schema.org markup to your website. If you do not properly fill up the Knowledge Graph you will be missing out.
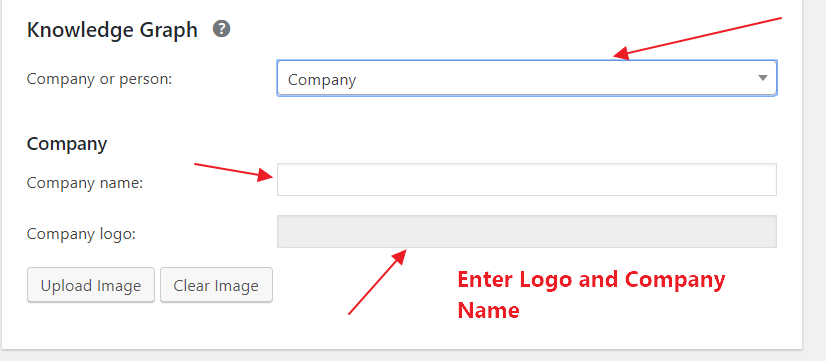
- Enter your company name
- Upload your company logo. The logo must be 600px x 60px as recommended by schema.org
[Follow the Ultimate WordPress SEO Guide]
#6 Not Taking Time to Edit Homepage Meta
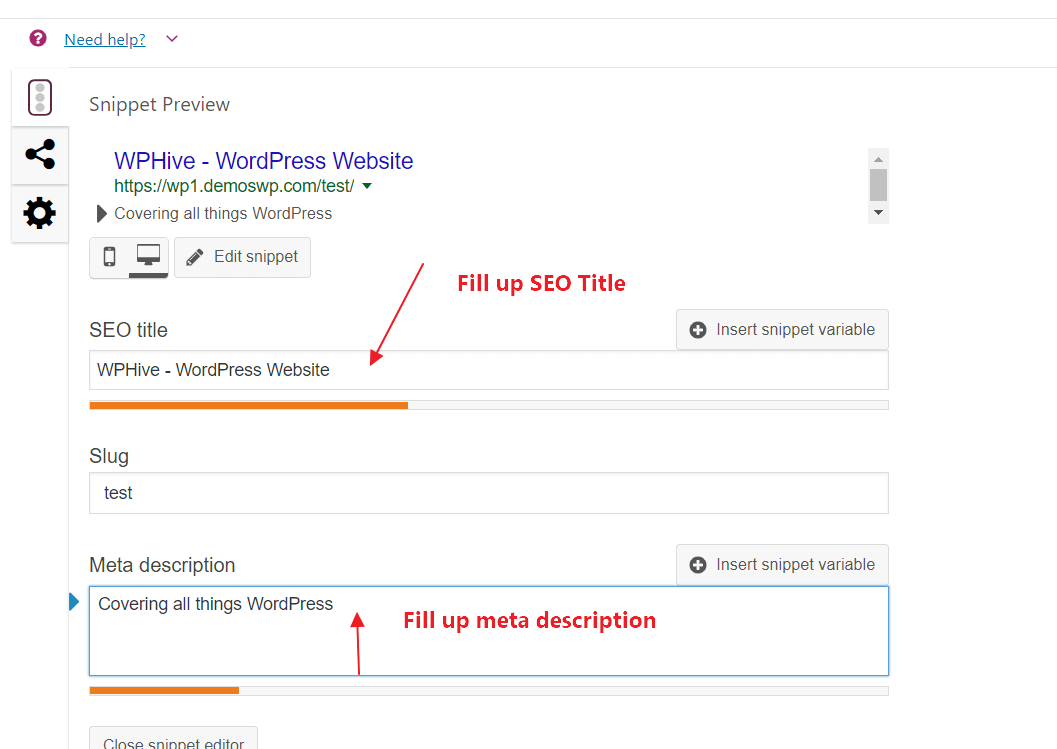
Your homepage is one of the most critical aspects of your website. So, you must properly give titles, meta descriptions, meta tags on your homepage. Since the homepage gets crawled a lot more than individual pages, you must be focused and careful while filling up the SEO of your homepage.
To access the following settings, go to Dashboard > Yoast SEO (Search Appearance) > General.

Clicking the link will take you to your homepage’s SEO settings. Take your time to properly fill these meta boxes.
#7 Not Making Use of Yoast Snippets
Yoast SEO Setting supports many variables which you can use to give you an edge over your competitors.
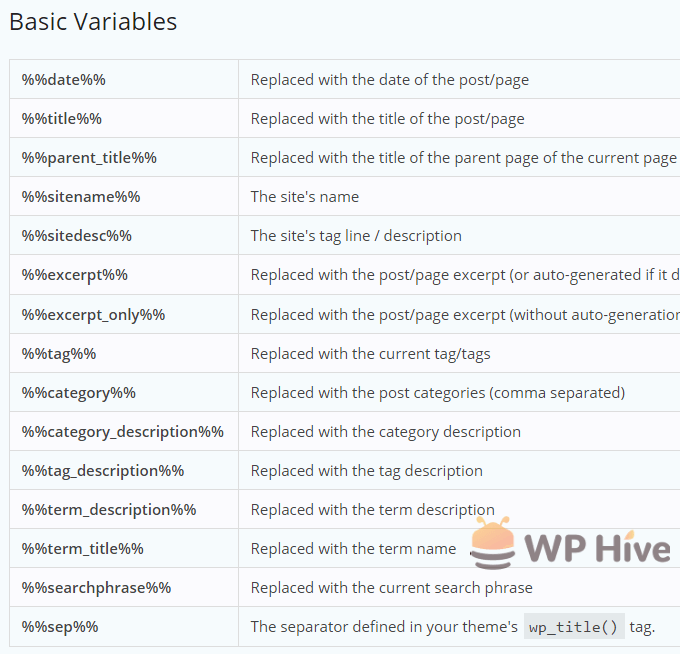
You can use those variables to automate writing some SEO meta. Although we suggest you to always write manually because that would give you more control how your content appears to Google.
#8 Indexing Tags
Many SEO experts and gurus suggest that you SHOULD NOT INDEX your tags on Google. The reason behind this decision also justifiable.
Quality Content = Winner. Doesn’t matter if it is less in quantity.
Content Quality is the most significant metrics for Google. If a large number of links from your site does not provide much value to your users
How to Deindex Tags in WordPress?
Navigate to Dashboard > Yoast SEO (Search Appearance) > Taxonomies
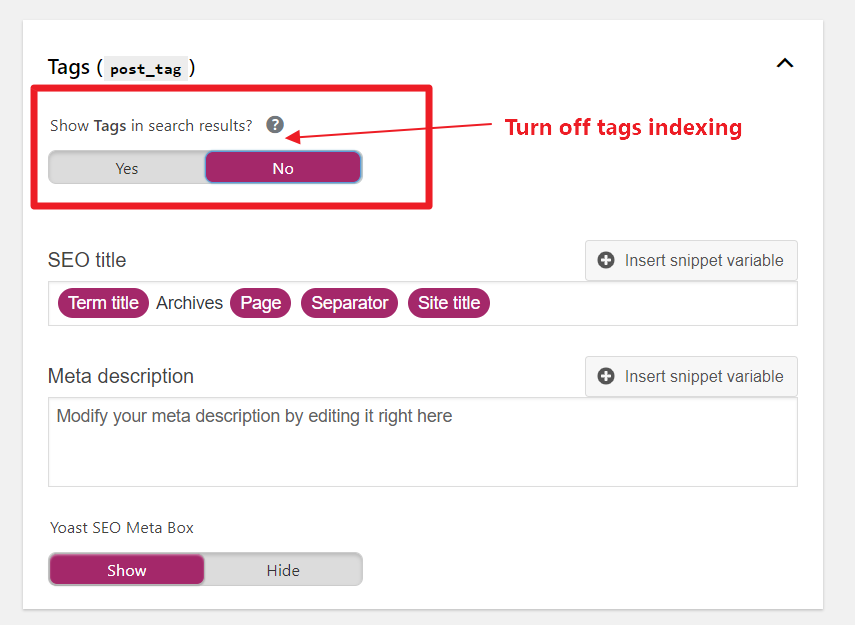
Google wants only high-quality links from your website. We recommend turning off tag indexing in Yoast SEO settings.
#9 Using Site Title in Every Post
Yoast SEO usually adds the website title after each post using the separator. However, if your title is long enough already, you should not use site title.
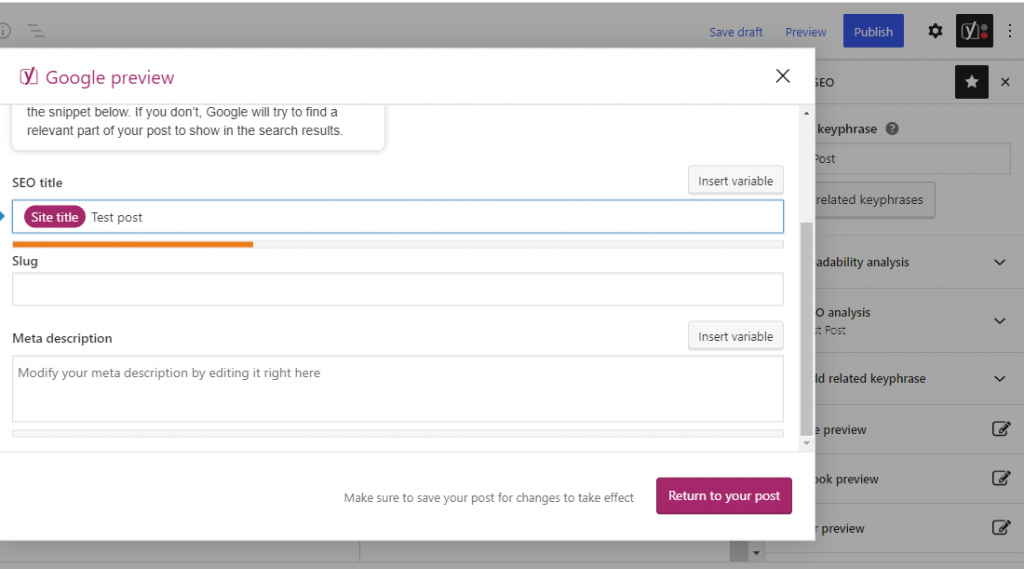
The reason is simple. Your title length is limited. Usually, the best title length is less than 60 characters. You do not want to add site title to waste about 10 characters.
#10 Indexing Author Archive
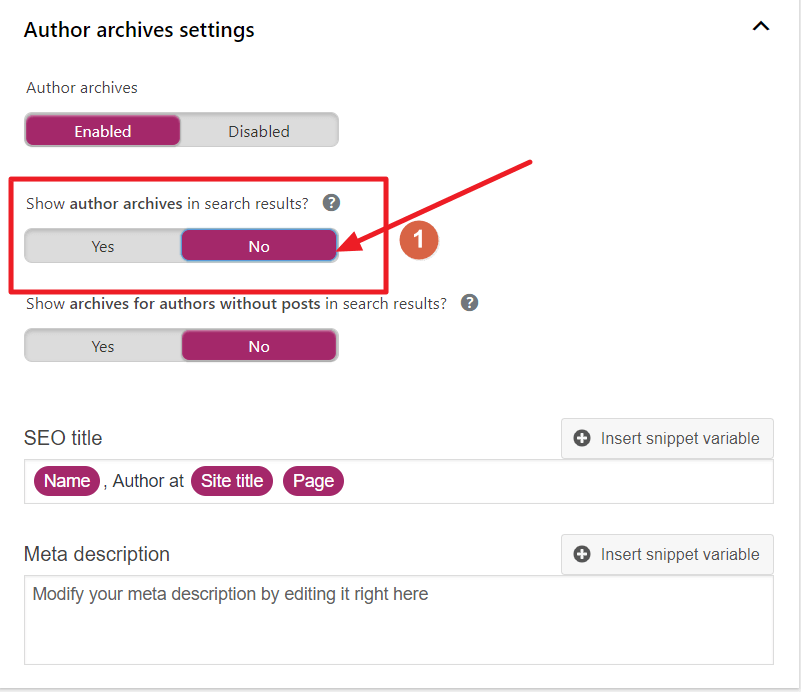
Like before, you could de-index your Author Archive pages. Indexing author archives is a mistake.
The reason is the same. As your articles are getting indexed already, you do not need to index Author Archives again. This will only create duplicate content.
Duplicate content can harm your SEO rankings. Read our tutorial on 7 Ways to Fix Duplicate Content Issue in WordPress
Go to Dashboard > Yoast SEO (Search Appearance) > Archives to disable author archives in search results.
#11 Giving Priority to Meta Description
Many new WordPress and SEO plugin users do not know that there was a thing named “meta keywords”. Meta keyword acted like tags. However, Google has clarified that Google does not use the keywords meta tag in web ranking. So you don’t need to worry about meta keywords.

If you focus on writing great content, Google will understand it automatically by using their AI and algorithms.
#12 Not Utilizing Social in Yoast SEO Settings
Yoast SEO provides a dedicated tab to manage your Social Media settings. You already discussed why and how social media auto posting can bring you a lot more traffic. Even Facebook Instant Article is getting a lot of appreciation since it introduced lightning-fast content loading and a great user experience.
Go to Dashboard > Yoast SEO (Social) > Accounts.
You can fill in your social handles. We highly recommend doing it.
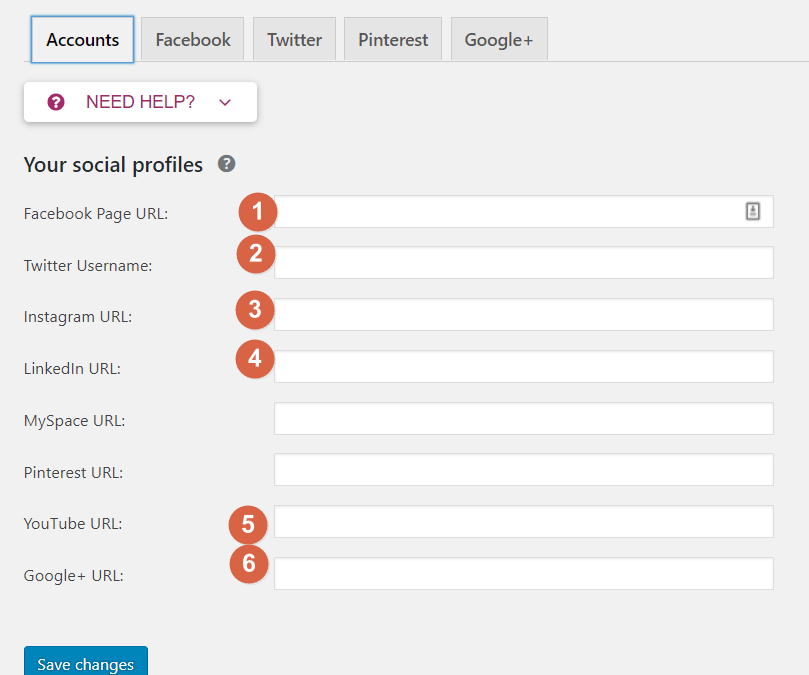
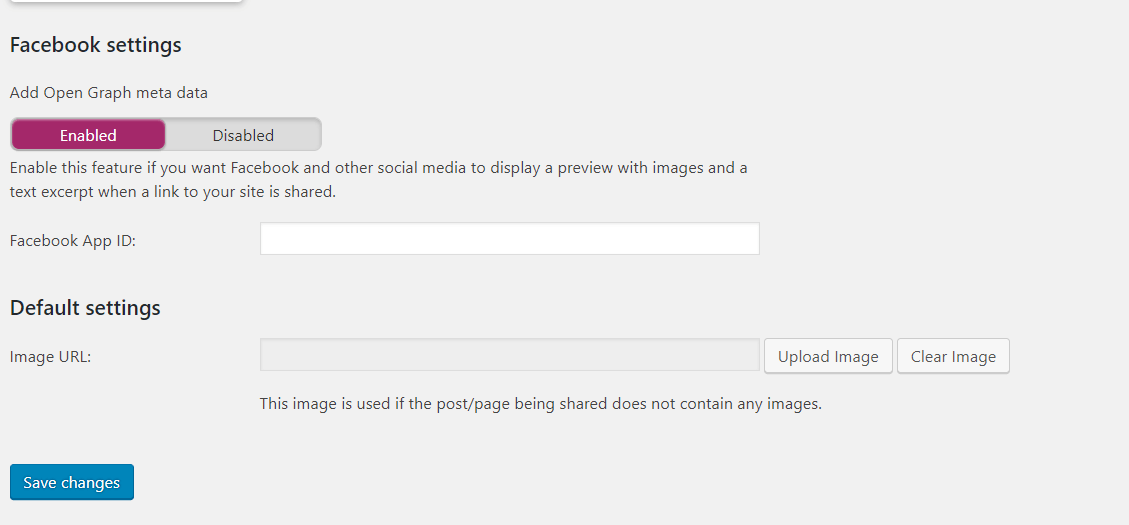
Many people also ignore to fill the Facebook Account settings properly. But you should not. This will add useful schema snippets to your website.
Navigate to Dashboard > Yoast SEO (Social) > Facebook to fill up Facebook specific settings.
Conclusion
I hope this article provides you the essential tips to avoid Yoast SEO Settings Mistakes. Yoast is a great and powerful SEO tool for site owners and webmasters around the world. That’s why we featured Yoast SEO in our best WordPress plugins list.
However, Yoast pushed a buggy update back in May, 2018. That update was the worst in Yoast’s history.


Many webmasters and SEO specialists found a drastic drop in their SEO rankings. back in 2018. That’s why you may also opt for other plugins like SEO Framework, All in One SEO or Rank Math more as well.
If you have success stories to tell using Yoast feel free to share in the comments!

Disclosure: WP Hive earns a commission when you buy through partner links. It does not influence the unbiased opinions of our writers. Learn more →
https://wphive.com/tutorials/optimal-yoast-seo-settings/
Saif Hassan
Product Manager by passion & profession. Lead Product Manager at weDevs, former PM @ Poptin. Passionate about writing & tech. He's an advocate of Human-Centered Design and believes that websites and the tools used to build them should be well crafted, intuitive, and accessible. Cyclist. Reader. A WordPress ninja 🥷, HCI expert & a design thinker 💡




6 replies on “11+ Worst Yoast SEO Settings Mistakes to Avoid | Best Yoast Settings”
Thanks for sharing.
helpful tips.
Glad you liked it
Great article, it’s super useful. Thanks Saif!
Glad to know that you liked it.
Grate article, thank you for sharing.
Thanks Kunaj